Technical MB General

Technical non-specific MB

Waterproofing Mercedes SL Mohair Soft Top – Fabsil

This has to be one of the most simple and worthwhile jobs you can do.  Since I purchased the SL over Christmas I have run around with the hard top on.  About three weeks ago when we had that first little burst of nice weather I stored the hardtop in the back of one of the Storage Units and have run with the rag top ever since.

OLYMPUS DIGITAL CAMERA

I kind of imagined that in the 20 years since the car was manufactured, the roof has never seen any attention for waterproofing.  This was based on the fact that water just soaked into the material and left it looking like a drenched wash leather!  Even though it remained water tight throughout, I decided it was about time to proof the mohair fabric.

OLYMPUS DIGITAL CAMERA

I researched a few products and what came out top was Grangers Fabsil in a can.  Other stuff looked to be a little messy and in many cases was an aerosol spray (I didn’t fancy masking off and dealing with overspray on the paintwork) so I opted for a brush-on product.  Fabsil is a silicone based ‘clear liquid’ that is free flowing and dries very quickly without any residue.  In fact, even in instances where I was a little careless with the brush it wiped off the paint without issue and left no marking what so ever.  Even the brush you used will dry out overnight and not harden – this was the product for me!  eBay Link to the Fabsil product in 2.5L Can – Here.

OLYMPUS DIGITAL CAMERA

There is a little in the way of preparation to do if you want to do a good job, but I suppose the proofer would work equally well if you just slapped it on – it really is that easy!

I dry brushed the whole roof down to remove any debris and rain ‘wash-down dirt’ that collects in the lip and edge rolls, for this I used a stiff nylon bristle nail brush and worked with the grain.  Once this was completed and all other marks removed and brushed out, vacuuming the complete roof area proved to be fantastic at removing and collecting up all the loosened debris.

OLYMPUS DIGITAL CAMERA

Obviously pick a dry day and one that looks like being so for at least three to four hours. Blanket off the windscreen (don’t fancy silicone smears!!) and the boot lid area, tucking the protective cloth under the rear roof lip.

DSC_0177

Use an old sandwich box to decant a decent amount of Fabsil and obtain a new or ‘ultra-clean’ 2 inch brush.  As far a quantities used goes, I gave my roof a generous coating, twice, and I used a little under half a gallon of Fabsil.  I have seen this sold in half gallon cans, but my shop only had the larger gallon can, that was in my case, far cheaper than buying its equivalent volume in one litre tins! – Plus once in stock, in the future I can proof anytime I care too !

I read several painful reviews of people brushing on the proofer once in one direction of weave then the second coat the other way.  I personally went for the ‘flood and soak’ approach, to the point where the material was soddened with Fabsil – making any weave brushing just a total waste of time!  It worked perfectly.  There advantage of this method is that by keeping a wet edge to your work with the brush, you don’t get any brush marks whatsoever, and the agent ‘wicks’ into the most hard to get places.  Painting around the windows is a cinch!  Just get to within a couple of millimetres from the seam edge with a loaded brush and let capillary action do the rest. Easy…

OLYMPUS DIGITAL CAMERA

After the first coat you will notice how the colour of your your roof darkens to a beautiful ‘as-new’ black.  As Mohair ages and gets an ingrained surface dirt coating from the elements of our poor weather, it tends to go a dark charcoal grey and it really does look fantastic once the proofer has dried and it returns to its ‘as-new’ black finish.  The second coat goes on much the same as the first, taking about four hours to dry totally.

OLYMPUS DIGITAL CAMERA

Some of the reviews I have read, beef about the smell involved in using Fabsil. I have found this really, to be honest, unfounded and if you ventilate the car well and let it dry properly, I must say I can’t understand why it is worthy of comment.  It smells slightly like ‘turpentine’, which I suppose is the products base solvent.

Great Job and well worth the effort (not that much effort required) – Its child’s play!

OLYMPUS DIGITAL CAMERA

I shall report back once I get chance to take a few photographs in rain, so far we have a couple of ‘dewey’ nights and the water droplets sit on top of the fabric – we have not had that before!

Added pictures of waterproofing after first downpour and hard frost a couple of weeks later…

roofpics2


Mercedes Sprinter – Steering Track Rod End (Ball Joint) Replacement

The wearing of an outer steering track rod end ball joint is quite common (Steering outer tie rod end) and can usually be found to be the culprit of wearing out prematurely the inner edge of both front tyres.  Another indicator is a slight ‘offset’ to the natural straight ahead position of the steering wheel, even though the vehicle appears to steer straight.  Frequently this is the only ‘give-away’ to this type of wear, due to the nature and size of the vehicle, very little wandering or any other symptom is rarely detected.  If your steering wheel ‘straight ahead’ position is turning slightly to the left, where it used to be dead-ahead – the worn component will more often than not be located at the right hand road wheel and vice versa.

OLYMPUS DIGITAL CAMERA

To check out the condition of the steering track rod end ball joint, jack and support the front of the vehicle on the side you wish to test.  Grasp the road wheel at the front and back outer edges of the tyre (horizontal) and push and pull the wheel about the hub.  You should detect little to no play.  If you feel play when you push and pull the wheel, inspect the steering ball joint for movement as indicated in the short video clip below.

If you feel a little play and the ball joint seems sound, follow the tie rod into the steering rack bellows and grip/pinch where it connects to the end of the rack (Inner tie rod ball joint)  If you detect a slight movement here this is due to wear in the inner ball joint.  In many cases this ‘small play’ is acceptable on high mile vehicles, but can be eliminated by replacing the tie rod and inner joint as one assembly (screws into the end of the steering rack).  For the purpose of this post we will investigate only the replacement of the outer ball joint.

OLYMPUS DIGITAL CAMERA

This is quite a straight forward job and should take no longer than an hour to complete.  Before you commence to raise the vehicle, wire brush the long thread and lock nut on the tie rod end, also cleaning off the ball joint lock nut on the hub steering arm, giving both a liberal spraying of penetrant.

OLYMPUS DIGITAL CAMERA

Slacken the wheel lug nuts then jack and support the Sprinter allowing total removal of the road wheel.  You can see the Tippex lines I use on the lug nuts once torqued to the correct tightness, so that a quick visual check of the nuts can be made.  It is easy for the driver to then spot if any nut is out of position, indicating that perhaps a nut could be coming loose.  This is especially useful on the rear nearside (UK) wheel that is often the one to ‘amazingly’ undo itself over time!

OLYMPUS DIGITAL CAMERA

Once the road wheel is removed (You can see the damage to the tyre that has occurred due to the worn joint in only a few days) begin by undoing the 24mm lock nut on the ball joint taper, then using a 24mm open ended spanner undo the lock nut on the tie rod – just slightly – enough just to back it off the casting of the ball joint.  Spray more penetrant.  If this nut is stubborn you may need to use a little heat to assist its removal.

OLYMPUS DIGITAL CAMERA

Using a stout hammer, strike the hub casting on the steering arm / ball joint taper. Do this accurately and with suitable force in two positions and the joint should ‘pop’.  If this technique does not work for you then use a ball joint splitter for this job – either a lever type or pickle fork.  Once the ball joint taper is released, unscrew the ball joint casting from the tie rod and screw on the new unit up to the lock nut. This maintains the distance and position of the new component to that of the old one, until you can get it checked for correct steering alignment – perhaps in the next day or so.

OLYMPUS DIGITAL CAMERA

Insert the ball joint taper into the hub arm and tighten the nut, then using the 24mm spanner nip up the lock nut on the tie rod end shaft.

OLYMPUS DIGITAL CAMERA

Now check to see if your play has gone, if so refit the wheel and lower the vehicle to the ground. If you still detect some play investigate further following the description above regarding testing the inner tie rod ball joint or possibly investigating the lower control arm ball joint for play.

OLYMPUS DIGITAL CAMERA

NB. Don’t forget to replace any worn tyres!

Mercedes CDI Injector leak – Honda washer/seal alternative

You may have read previously either here or on the web about the use of the Honda Accord 2.2 Diesel injector seals in applications for Mercedes CDI diesels.  Sprinter, Vito, E320, C220, C 320 etc.  Here is an instance that really benefited from the use of the alternative sealing washer.

Honda Injector Seal

Honda Accord 2.2 Diesel Injector Seal

I had one of the courier fleets T1N 4 metre Sprinters in for repair due to a chuffing injector.  Unlike most common ‘Black Death’ related failures this one had just decided to spray diesel everywhere under the bonnet without any prior warning or over-time buildup of coke around the injector. Previously the other 3 injector seals in this engine had been replaced with Honda types and this single remaining one (No.2 Cylinder) was an original Mercedes OEM seal installed at the same time as the others, simply because I had no more Honda parts available.

On removal of the injector (slacken injector hold down clamp bolt and run engine to normal operating temperature – this often unseats the injector allowing relatively trouble free removal) It was discovered the seat was scored and pitted. The seat was recut then lightly faced with a hand reamer / face cutter tool then checked with a mirror and torch.  I knew this seat was good last time I replaced the seal so there had been a problem with blow by gasses cutting the seating face.

Laser injector seat cutter tool

Laser 4597 Diesel Injector Seat Cutter Set

So now all seals have been replaced with Honda parts and the van is once more good-to-go!   This engine, along with the van itself has covered over 500,000 hard courier miles and although the piston rings/bores are now nearing end of life (increased crank case pressure) it still sounds sweet and runs like a train.  Also interesting testament to chipped and tuned engines and their longevity, this one was performance chipped from new and at half a million miles running its hard to say that it has in any way been detrimental to its life span – an interesting point of note.

I have photographed the Honda part (injector seal) above in its original packet for ease of identification and obtaining the part should you wish to use the alternative copper sealing washer.  They look slightly thicker and are definitely made from a softer more malleable material than the OEM Mercedes units – My own view is that this ‘softness’ assists in sealing to irregular hand cut/cleaned seal faces and seats better than the harder MB equivalent washers.

OLYMPUS DIGITAL CAMERA

Mercedes Sprinter engine 500,000 miles and still going strong…


Slight vibration heard when applying slow speed steering lock – Mercedes SL (R129)

Mercedes SL (R129) Rubber bobbin bushes

When I last went to the tyre shop the fitter drove the car into the bay, as he manoeuvred I heard a low frequency vibration from outside the car.  It was like a flapping vibration, two parts vibrating against each other and it was quite loud.  I knew it was nothing to to do with the auxiliary belt or its tensioners as I already inspected these components and found them to be sound.  So what was it…?

Mercedes SL (R129) Rubber bobbin bushes 2

It wasn’t until a few weeks later when I was replacing the steering idler arm bushes that I noticed the metalastic bush (rubber bobbin) on the front cross brace on the passenger side had deteriorated and parted company.  It was not instantly visible as faulty as the tension that is placed on the bush pushes the parts together so it can’t easily be seen.  Just give your bushes a little pry to see if they have parted company with the bonded threaded sections.

The cross braces run from the centre of the car, under the engine, to just behind each road wheel in a diagonal formation.  They are securely bolted fore and aft to the chassis with a single bobbin type bush in the centre run of each.  The bush is bolted to the brace then upwards to the chassis and I suppose is in place only to prevent it vibrating or flapping over its length – precisely the issue I had.

Mercedes SL (R129) Rubber bobbin bushes 3Mercedes SL (R129) Rubber bobbin bushes 4

I searched for replacement parts (bobbins) and was horrified to see that they were priced between £8 and £12 per bush!  Now, although I don’t mind buying parts that are required, I just think this is a ridiculous price to pay for what is in effect a piece of rubber with two threads on!  Especially as it was a non-critical part.

Searching deeper for an alternative I caught sight of a supplier in Hong Kong advertising the correctly dimensioned bush for 0.99 pence including delivery – thats more like it!!  Link to product found here

Mercedes SL (R129) Rubber bobbin bushes 5

Ordering six bushes I only had to wait two weeks and the package arrived.  Six bushes of what looked good construction and quality just what was required for the bracing bars. I then remembered the air box support bobbins had gone the same way and by chance the parts ordered also fitted this application perfectly.

Mercedes SL (R129) Rubber bobbin bushes 6

So for £6 I had repaired/replaced the two air box mounting bobbins and those on both bracing bars, plus two spare!.  As suspected the flapping sound of the bracing bar, induced by the pulsing of the power steering pump at low speed had now gone – Success!


Rear Suspension Refresh (R129) Mercedes SL & (W124) – A Wandering Star!

thin

Even though the Mercedes SL320 (R129) passed its MOT in December with flying colours, there has always been a slight uncertainty at speed with regard to wandering.  This is not ‘lane changing’ wandering we are talking about here, but just a hint of rear end steering that needed to be corrected in the 60+ mph range when buffeted or the road surface commanded, by the way of uneven camber or rutting of the tarmac.

Rear Suspension Refresh (R129) Mercedes SL & (W124) 1

Either way, it would be nice to sort this minor issue as the SL is such a pleasing drive and you do just ‘Waft’ along on a magic-carpet ride, with surety even when pushed.  I had previously had the vehicle in the air and ‘barred’ the various multi-link suspension components in every way possible.  Although the rubber bushes in each one of the pressed steel control arms was almost 20 years old, they were together and were just showing slight signs of perishing, with no real visually alarming deterioration.

Rear Suspension Refresh (R129) Mercedes SL & (W124)

Even gripping the wheel and then exerting huge forces with a crowbar under the tyre resulted in what seemed a taught rear suspension layout, seemingly not wanting for anything. But something was not just right and it was bugging me!

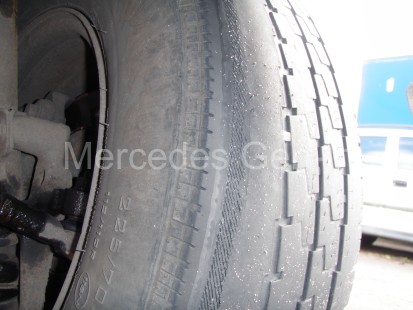
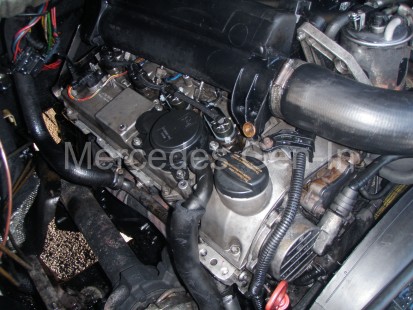
Previously I had already fine tooth-combed the front end, discovering that the lower wishbone (control arm) bushes were starting to get a little saggy, but were holding there own.  Visually the worst was the off side front rear bush in the set, but even when barred to extreme it still held firm.  A job for the future.  The front dampers were a little worn with only the slightest play in the rod/cartridge bush at normal ride height – again nothing to cause the wandering or write home about.  It goes without saying the steering components came under detailed scrutiny and in every case proved wholly serviceable, with no unusual tyre wear either on the front or rear.

Rear Suspension Refresh (R129) Mercedes SL & (W124) 3

So what to do…  well I decided the rear steering was obviously a result of some issue with the rear suspension, as the car would shift or wander needing correction through the steering.  If this was front end wander, you would be fighting the wear in the normal course of driving, over correcting as you drove.  So the decision was – it was the rear, you could kind of sense it happening under your seat, as you are sitting almost on top of the rear axle. It was almost as if you were being slightly ‘pushed’ sideways from the area under the seat.  Characteristics were unusual in that there seemed no repeatable reason for the movement.  I tried driving in ruts LHS/RHS, applying power, driving on white lines etc. It had a mind of its own – only the car knew when it wanted to do it!

Rear Suspension Refresh (R129) Mercedes SL & (W124) 4

Having double checked the rear sub-frame mountings and bushings for wear, I made the decision to jump in with both feet and totally refresh the rear suspension – maybe I would find something along the way that would directly point to the ‘Wandering Star’…

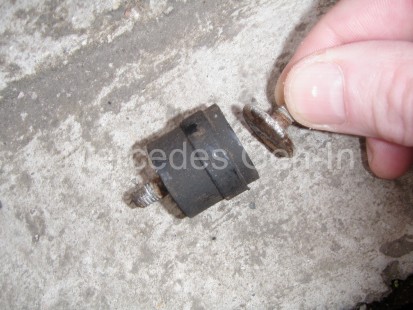
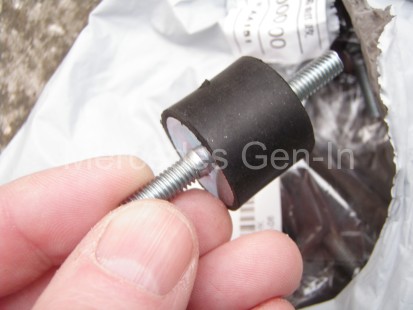
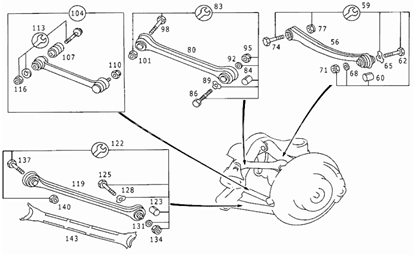
I sourced a complete kit of rear suspension parts containing four control arms per side, all new bolts, fixings and washers. The Delphi Kit price was very good value as the component parts individually added up to almost double the kit price by the time you had purchased – new camber adjustment bolts, washers and lock nuts etc.  On opening the kit, it was obviously good quality and proved excellent value against OEM or other available parts.  All the contents were checked against the originals as they were removed and bush centre to centre dimensions were crack on.

Rear Suspension Refresh (R129) Mercedes SL & (W124) 5

So on with the job, side at a time…

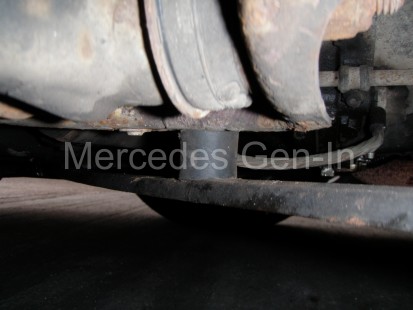
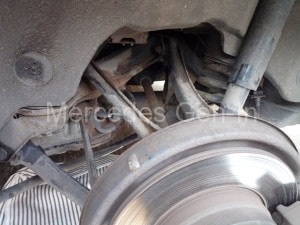
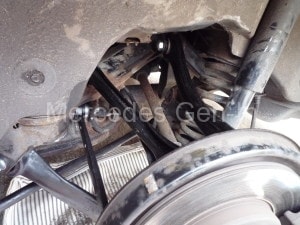
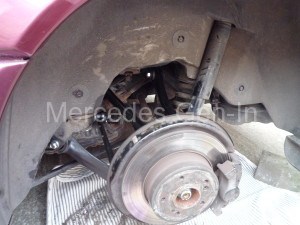
Raise the vehicle using the rear chassis jacking point and remove the road wheel.  Get a sturdy support to hand- blocks of wood are ideal, these will need to be inserted under the rear sprung arm to take the weight of the vehicle when necessary  during the work, especially when finally tightening the suspension fixings under normal ride height conditions.

Remove the plastic Spring Link cover by undoing the two 10mm head self tapping screws and prying off the cover from the lip on the arm.  Now adjust the jack so half of the weight of the car is supported on the jack under the chassis and the other half resting the Spring Link, supported by using your wooden blocks.  You will need to adjust the weight distribution at times between the chassis and Spring Link, by raising and lowering the jack slightly.  This will release tension from the suspension links allowing you to easily withdraw the various pins from the eyes and hangers as and when required.

Suspension set up W124 -1

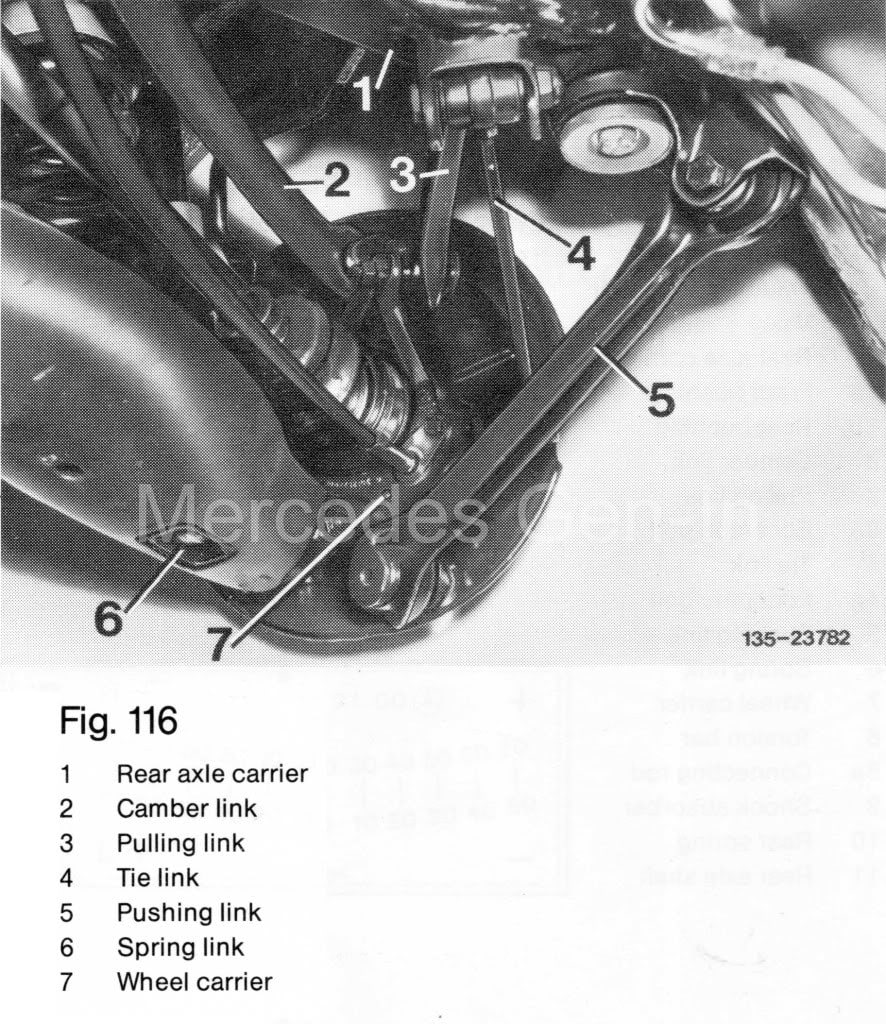
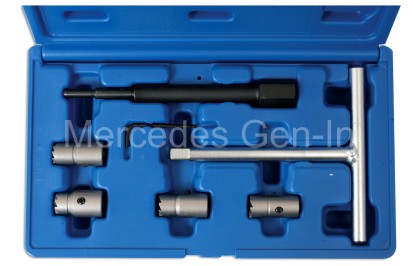
Start by removing the upper forward arm, The Pulling Link. Your tools of choice for the job in hand will mainly be a pair of good 19mm combination spanners, a 17mm combination spanner, 17mm socket and 18mm combo for interlocking with the other spanners to increase leverage to break any rust.  The new fixings/bolts and pins will require a triple square splined tool, it would be better to check exactly what size you need by first inspecting the parts in the kit when you purchase it. A heavy copper hammer and a sharp hack saw will also be required!

Tightening torques for bushes:  Body end = 70 Nm – Wheel end= 70 Nm with M12 thread, if M10 thread then 40 Nm.


Suspension set up W124 - 2

Open the kit of new parts and select the correct arm and refit it to the car, once fixed, just nip up the fixings. Lower the chassis to place pre-load weight onto the suspension, then fully tighten at the two fixing points on the Pulling Link, raising the vehicle again when done.

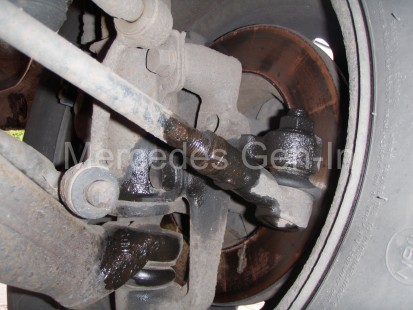
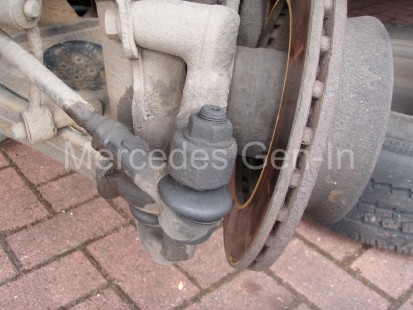
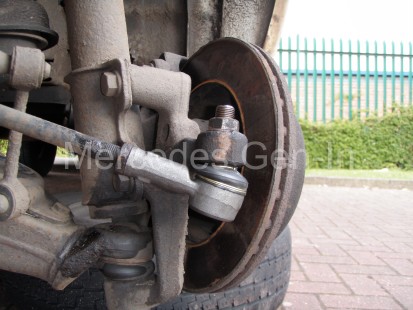
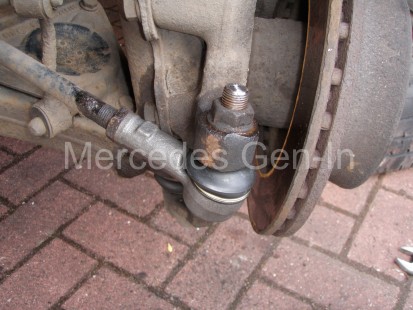
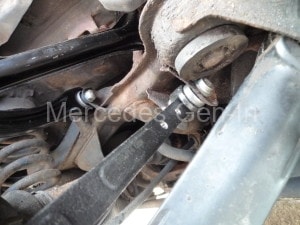
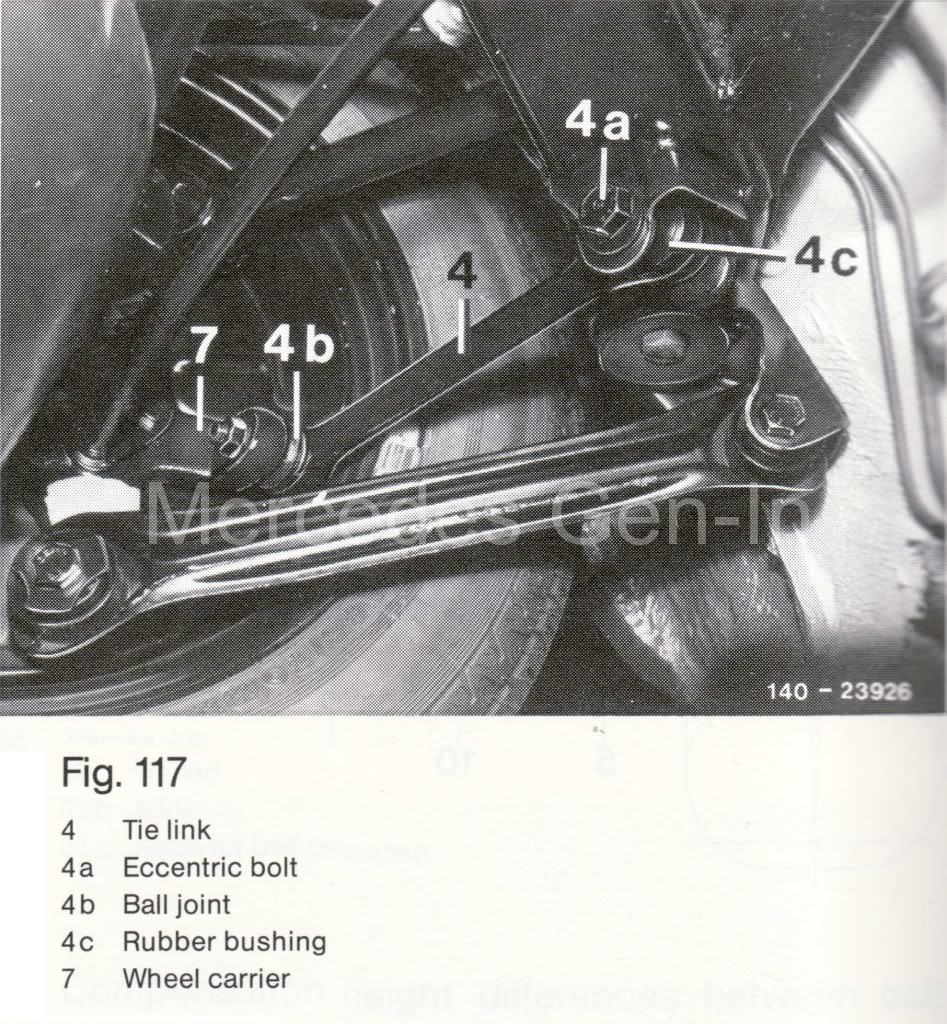
Now remove the Pushing Link, (Forward lower arm without a ball joint) This will have a plastic trim cover clipped onto it, this can be transferred to the new link when you refit the item. Begin to remove the Tie Link using a 17mm spanner on the nut attached to the hub carrier, if the ball joint begins to spin you may need to use a hexagon key in the taper end to hold it while you undo the lock nut completely. If it does not spin, you will get the nut off easily, then using a ball joint separator (Pickle Fork) part the joint.

Rear Suspension Refresh (R129) Mercedes SL & (W124) 6

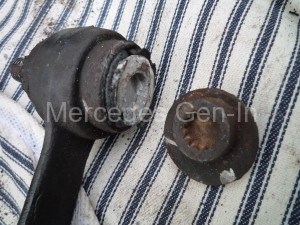
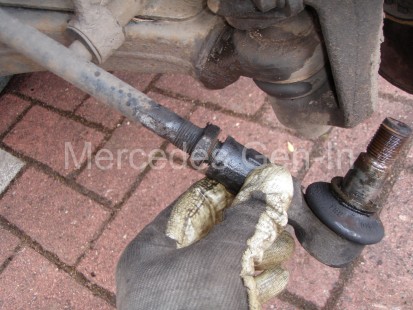
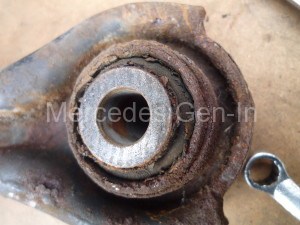
Tackle the other end on the Tie link chassis bushing by undoing the 19mm nut.  Make sure you paint mark the adjusting eccentric cam so it can be returned to its correct position on reassembly.  Typically this fixing bolt will be seized.  It has a longitudinal slot in the bolt to key with the adjustment cam.  In use this allows water to seep along into the joint and internally corrode the alloy bush to the steel pin – you may be lucky, but probably wont be!  Faced with a seized through-bolt, your only option is to cut off the bush and bolt with a hacksaw.  Begin your cut from underneath on the first alloy step of the bush, on the triple square end. Don’t try and cut the steel outer as you will be sawing for ever. Short strokes will be allowed and it takes a while to cut to a maximum of 90 per cent through the bush and bolt.  Any further and you will begin to cut the chassis or hanger bracket, so be aware of your limitations while sawing.  When you have cut to the maximum allowable depth, wire brush the triple square adjuster.  Insert your splined tool to its maximum, if you can only manage a poor fit, don’t go any further until you have cleaned the splines and can get the tool tip fully home. (rounding this head off at this point would be a disaster)  Once the spline tool is fully home, place a 10mm spanner on its shaft, interlock an 18mm combo spanner and turn the bolt, hard – if you have cut through to your maximum, the bolt head will shear and the end will fall off.  The joint can then be manoeuvred out of the hanger and thrown down the garden!

Rear Suspension Refresh (R129) Mercedes SL & (W124) 7

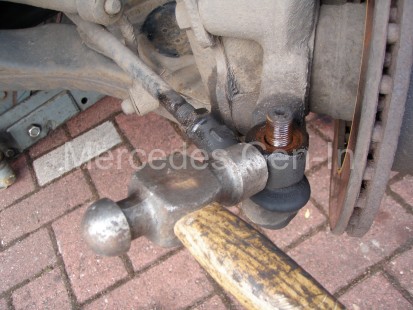
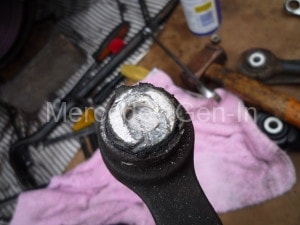
To fit the new Tie Link, slot the arm into the hanger, align the taper of the ball joint and tighten this first using the hex key and 17mm spanner.  Then align the hanger end, inserting the new through bolt (cam adjuster)  Mark the parts in the same way with paint, copying the exact positions from the removed components.  Lower the chassis to support the weight of the vehicle on the Spring Link and tighten the adjuster fully through the hanger, whilst maintaining alignment of your paint marks.

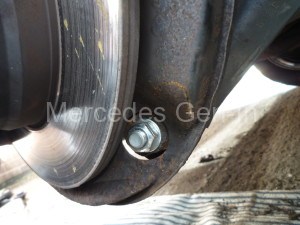
Raise the vehicle again and refit the Pushing link with its plastic trim cover, this fits between the front of the hub carrier and chassis. Use the same raise/lower technique with the jack to correctly stress the rubber bushes on tightening.

Rear Suspension Refresh (R129) Mercedes SL & (W124) 8

Move on now to replace The Camber Link, use the same above procedure to refit the last of the new components.

Check your work thoroughly, refit the plastic Spring Link cover and then the road wheel, finally lowering the car to the ground. Proceed to do the suspension ‘refresh’ the other side of the vehicle.

It is worth while mentioning that while individual links are off the vehicle, it is possible to test out the condition of the bushes in the Spring Link inner and outer locations, these should be firm and without play.

The complete rear suspension refresh job should take about three to three and a half hours a side, as although straight forward, space is restricted and work is hampered by suborn and seized bolts.  Either way, with a little patience and care it should go well.

So having completed the job it was time for the road test.  The biggest thought in my mind was… had I wasted my money!

I started the engine and selected drive, the familiar muted thud that had always been there when slipping the selector to D to move off had gone!.  I did not believe it, so I did it again – sure enough the slop when taking up the drive had gone.  Lets continue…

Out of the street turning out and into narrow roads, the car felt noticeably different, tighter.  I was unsure if this was psychological mumbo jumbo, but that is how it felt.  Amazingly the steering straightened up more positively out of a turn, pulling out onto the familiar main road proved this without any doubt.  Applying throttle on then off, felt no different, which was good news – because it meant that combined with the fact the car steered perfectly straight without drifting or pulling, meant that the Tie Link adjuster had gone back in a near correct position, maintaining a useable and balanced toe in figure for the rear wheel set.  Opening up the throttle showed that the work was well worth doing, the car no longer felt vague, and did no longer have a mind of its own wandering as it did before.  Result.  The most amazing thing for me was to lose the drive uptake when engaging gear from neutral or park, this was indeed unexpected.

Rear Suspension Refresh (R129) Mercedes SL & (W124) 10

It goes without saying that this is maybe the first time ever I could not convince myself by visual of physical inspection (on or off the car) that any of the joints were degraded to a point of causing this type of wander.  It just goes to prove that old soft, not necessarily collapsed bushings, in a Mercedes five link rear suspension set up has a cumulative effect on drivability.  If your links are are all old, the  rubber will exhibit a kind of aging related softness, this is without doubt time to change them and enjoy the improvements it can make – not just to the wandering, but also to steering geometry in general, add to that the new transmission firmness and the result –  Money well spent.

R129 rear suspension

If you were so inclined you could spend in the order of £175.00 upward having the vehicle 4 wheel aligned.  My own view is to maybe wait until I get around to doing the few jobs up-front before even considering this.  If I don’t get any abnormal tyre wear and drivability is perfect, I see no reason to have this alignment done, although without doubt it should be done in the real world.  I have read so many alignment tales of woe borne of the technicians inability to understand the complexities of the Mercedes W124/R129 series it could make things worse – you decide!

Interesting write-up on wheel alignment, front and rear – here.

If I was to review this DIY maintenance work honestly, I would say the resulting positives from such a suspension refresh were probably one of the most value-added improvements you could make to your R129/W124 for what is comparativley a very little monetary investment.

Enjoy !