Technical MB General

Technical non-specific MB

LED Lighting Upgrade – Side Light & Interior – Mercedes SL (R129)

I decided to upgrade the lighting in the interior of the Mercedes SL (R129).  Previously I had modified the BA9S LED lamps in the dome light / map light and now wanted to tackle the footwell and puddle lamps (under door lighting). Link to dome light modification/LED fitment here.

The reason for the upgrade is that I like the reliability of LED’s over the T10 and festoon tungsten lamp styles.  The T10 often blackens almost to the point of no light being emitted and the festoon ‘end to end’ filament is not a robust design by any means, especially in applications that involve slamming doors and boot/trunk lids.  Apart from that the light emitted is more pleasing to me than the yellow light from older traditional lighting, but that is a matter of taste and may not be to everyones liking.

I will add that there are a lot of LED’s out there stating that they are ‘white’ when actually their output contains an element of the blue spectrum – this often causes problems at MOT or inspection time, as the testers seem to need to see a ‘pure white’ rather than one diluted with a blueish tinge – That gets the thumbs down under the – ‘No blue lights should be fitted to the vehicle’ rule.  In my view this is a little petty, given that in reality the emitted ever-so-slightly bluish light, is not even on the same page as ’emergency services blue’, but I suppose a law is a law.

While I was choosing suitable festoon LED’s to replace the existing tungsten filament lamps I came across some T10 push in LED replacement lamps.  These would be ideal for the sidelights up front in the headlamp unit, the ones I was looking at had built in SMD resistors to offset the lamp load so that they would not trigger the bulb failure dash warning lamp.

t10 led1

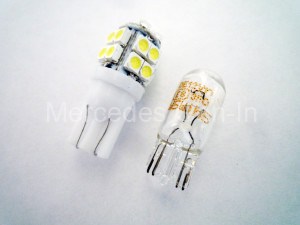
The T10 LED replacement that has an oversize base that will not push through the opening in the R129 headlamp

My chosen festoon lamps were ordered from China (Also with resistors so that I could use them in the number plate lamp holders too)   The T10 push fit LED’s were ordered from the UK – no guessing which LED’s were delivered first!

t10 led2

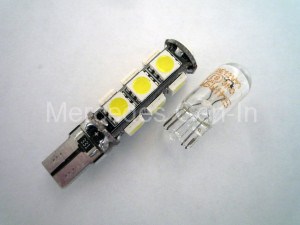
My chosen T10 sidelight replacement – what an amazing light output!

I had previously upgraded the side lighting on my Vito W639 and was going to use some spare LED lamps I had in the SL application.  The problem I had was the receptacle in the SL headlamp reflector was only just large enough to insert a glass T10 lamp (not surprisingly 10mm diameter)  The China T10 replacements I had in the drawer were a little oversize on the plastic moulding flange, and although I could probably have forced the holder and LED into the lamp housing, I did not fancy dismantling the headlight to remove an LED that had been pulled from its holder and had fallen inside, when or if I ever had to remove or change it!

sidelight led sl

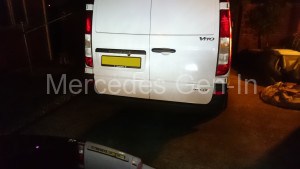
Almost as good as headlights ! – well you get the idea.

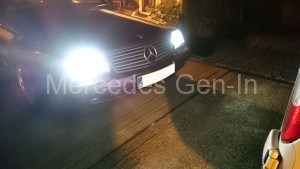
I ordered up the UK LED’s and within a couple of days they arrived.  Expecting similar performance to the Vito LED upgrade, I fitted the T10 replacements.  WOW.. These were just amazing.  Pure white and very, very bright with the added bonus that they fooled perfectly the SL’s bulb fail circuit.  I could not believe how good these lamps were.  Indeed they were almost as bright as daytime running lamps and at night the forward illumination from the two LED side lights was just staggering. (see photos)

led side lights output

White light output with good intensity as can be seen here.

Within a few weeks, the delivery of my LED selection from China arrived.  Once the weather had improved sufficiently to allow me to open the doors of the car and work inside without getting drenched, I got to work to swap out the footwell and door card puddle lamps.

Mercedes SL interior lighting LED upgrade

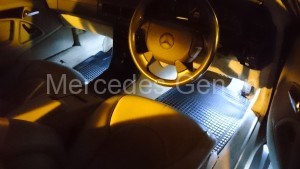
Footwell and door lighting works well.

Pulling the lenses/holders was straight forward as was changing the tungsten festoon’s for the new LED units.  I was pleased with the results – again pure white and excellent illumination, now matching the dome lamp LED’s done previously.

festoon led

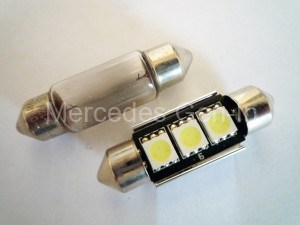
LED Festoon lamp replacement.

festoon led back

Heatsink for heat dissipation of the LED’s and built in resistor.

I fitted festoons with integrated resistors, not because they are covered by any lamp fail warning, but because I simply ordered a larger quantity of the lamps I needed for the number/reg plate lights.  The number plate lamps were also a breeze to change, unscrewing the stainless steel screws (2 per lens holder) and lowering the holders was as easy as swapping the bulbs and slotting the holders back in place.  These LED’s also worked brilliantly, they did not trigger any lamp failure and the light was nice and white (although I must admit – not as ‘piercing white’ as the front T10 LED side lights) Very pleased with the results indeed.

ledplate

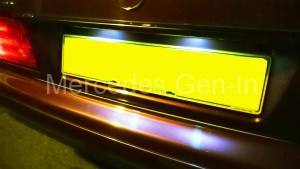
Good illumination and LED’s do not trigger lamp fail warning.

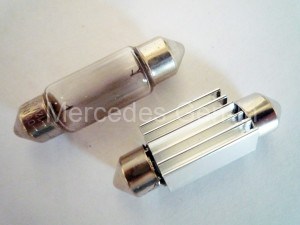
As you can see the quality of the LED’s both from China and the UK is very good, they look well made and built to last. So far 6 weeks and no problems – not that I expect to have any, because the Vito’s upgrade was done some 18 months ago and the LED’s are still going strong.

The side light LED T10 type resistor equipped replacements can be found here.
The LED festoon type, with integrated resistor and heatsink, for interior and number plate illumination can be found here.

When time allows I have some dash and instrument lighting that is out and in need of attention, so that ones on the list!

Mercedes Sprinter Turbo Blown – Symptoms

This will not be a lengthy post as turbo’s are covered in many other areas of this site, but I did think it would be useful to show with a few images of what the symptoms of a blown turbo look like and to back it up with a little additional text.

Sprinter turbo blown

Depending on the level of failure, the following symptoms will show themselves. Huge amounts of billowing white smoke from burning oil within the exhaust system due to failed turbo seals.  (engine oil is pushed at high pressure past the turbo seals directly into the exhaust system and intake tract) This smoke in the early stages of failure may appear as a slight ‘whisping’ of white exhaust output, usually coinciding with some oil marking or dotting on the rear doors, almost like someone has flicked oil from a brush.  These are the first indicators that all is not well.  You may notice a higher than normal oil consumption and possibly a louder than normal ‘spooling’ noise from the turbo itself, maybe even a metallic ticking, increasing with engine load.  It goes without saying that there will most probably be some power loss and even an engine management lamp illumination / limp home situation.

Sprinter blown turbo

When the turbo does fail completely, it does so in a number of ways.  The two main types of failure are fairly major, being either catastrophic and non-catastrophic.  The former is where the bearings collapse completley on the turbo and send metal parts directly into the engine sump, usually finding that during this, all the engine oil dumps almost immediately into the intake tract and exhaust, so fast that unless the engine is halted immediately, irreparable damage is caused by oil starvation to big ends and mains.  Good night engine…

The more preferable (If that is possible!) and latter type of failure, is where the indications of turbo trouble give fair warning and are immediately heeded by an informed owner driver, thus preventing certain engine damage, caught at least before the engine oil pressure warning lamp illuminates!  White smoke – stop the van and check oil level – immediatley, if dangerously low arrange for vehicle recovery and turbo replacement.  You may just be lucky… and be able to at least minimise the damage caused.

Sprinter blown turbo

Often when the turbo fails it dumps huge quantities of engine oil into the intake tract in a very short time – starving the engine of its oil pressure and life blood!

The majority of turbo fails are due in the most to oil starvation (the main cause – turbo bearing seal failure) that prevents a suitable cooling lubrication path to the high speed rotating spindle which in turn rapidly disintegrates the internal bronze bearings due to heat, causing very rapid spindle seizure and enevitable destruction.

Blown garrett turbo Sprinter

If you suspect in any way that you may have turbo issues STOP the engine and check it out, as to continue running the power unit could easily cost you a complete engine and not just a turbo repair on the Mercedes Sprinter / Vito diesel engines (Including those derivatives utilised in Mercedes passenger cars.)  You have been politely reminded!

Mercedes Sprinter T1N – Front towing / lashing eye failure.

I was called out today as a quick favour to assist in recovering a vehicle that was stranded with a blown turbo a few miles from the clients base.  Being happy to be asked to ‘ride shotgun’ in the disabled vehicle on a rigid bar tow was something that I had done many times before so was unconcerned of what lay ahead.

We arrived at the carpark where the van had been standing overnight and coupled up the rigid bar to the towing eye to the front of the vehicle and to the pin and eye tow bar on the L200 tow vehicle.  This is common practice for both the AA and RAC for short distance recovery.  We had also purposely chosen a time when the roads would be at their quietest to carry out the recovery.

towing1

Adjusting the drivers seat in the Sprinter so I could see over the tow vehicle is essential, as it takes any surprise out of any manoeuvres the towing vehicle may make during the journey. So off we set – navigating about 5 miles of winding country lanes before we hit the dual carriage way back to base.  Obviously the ignition was in the on position to unlock the steering and allow brake lights and indicator signalling without the engine running.  The brakes and steering are very unresponsive due to overall weight of the van and the lack of power assistance in both cases.

towing3

We made it out onto the carriageway and maintained a steady 45 mph on the straight clearway.  Then something happened that came straight from a TV comedy or big screen production… BANG! The towing eye gave way from the chassis and the towing vehicle ripped off completely the front of the Sprinter and proceeded to drag it some way up the road.  We both coasted to a stop and surveyed the damage.  After the initial wonderment of what had actually just happened, we both enjoyed probably one of the funniest moments of the last five years, before lashing the front crossmember with the elasticated tow rope and covering the remaining couple of miles back to base.

As we discovered at the roadside, what had actually happened is the towing eye had been completely ripped from the chassis due to corrosion of the weld points.  As it parted company with the chassis, the eye that extends through a cutout slot in the plastic front bumper skin had dragged with it the complete front – totally detaching it from the vehicle.

towing2

I suppose in light of the fact that corrosion played a big part in this release, I for one will always double check the condition of this vital welded section before using it in any towing or lashing situation – It would have been a more interesting time if this had given way in any other place than on a straight clear road.  I have always used this towing eye as a transportation hook, on Both commercial vehicles and cars ( aka – RAC and AA recovery) and I would like to make the point in this posting that: No matter what your vehicle, Mercedes or otherwise, if it is more than just a few years old it would be a good practice to go and have a look and satisfy yourself that everything is absolutely in order!

P1020029

However this is probably one of those moments that I will keep remembering for a very, very long time… 😉

Heavy scrubbing noise from front tyres when cold – (R129) Mercedes SL & Others

When I first came across this problem I was worried that I had serious front suspension trouble, in fact it sounded so like there was some part of the wheel/tyre catching on a suspension component I used to stop and check my tyres were still inflated!  This problem only ever occurred when the car was cold and had been standing all day or overnight and never revealed itself when the car was warm.  It was noticed when applying a generous amount of steering lock either left or right, needed to negotiate an exit from a tight parking position.

This went on for weeks.  I researched what the issue could be and all that was written was: Worn lower arm bushes, top mount worn , play in ball joints… etc – to be honest enough horror reading material to scare the most ardent of owners!  But I was not convinced, as I could see nothing wrong with anything and all components were in good order with no play, back-lash or wear present.

I came by this totally by accident, it was a YouTube video posted by a chap with an almost new Porsche 991 – the noise and vibration effect was identical to what I was suffering on the Mercedes SL (R129)

Although my tyres were past there best, still more than legal but approaching time to change I was convinced this was tyre related. After some investigation and reading obscure posts and questioning seasoned performance mechanics it became apparent that this was not an uncommon problem.

P1020014

Continental Contact tyres – worn but with some life left


The scrubbing/rubbing noise seems to be more prevelent with Continental Contact 2/3 tyres and often accentuated if the tyre is starting to cup or feather on the edges. However it is not a product of a worn tyre or even an anomaly of a particular brand – it is due wholly to steering geometry angles and cold tyres!

From my reading on the subject some Porsche dealerships have offered an opinion to owners that this noise or juddering effect takes place more commonly below ambient temperatures of 40 degreed F or 4 degrees C (That is most of the time here in the UK!) Owners of Mercedes vehicles have reported exact noises and effects similar to that experienced by Porsche owners.

Having spoken to several mechanics and in particular to one industry expert on the subject his comments are worthy of note:

Hi Steve, now you come to mention it, I think I have noticed that happening in some of my cars – and especially the 2004 Passat when I’m using full lock to get out of my driveway. I also borrowed a Porsche Panamera last summer, and from memory that did it, too.

I think it’s because modern cars have such a tight ‘lock’ that when you turn the wheel fully in either direction at least one of the tyres – the inside one, I guess – is almost literally being pulled/pushed diagonally across the ground, rather than rolling as cleanly as it should. I’d imagine it would be worse when the tyres are cold – ie less supple and less grippy than when hot – but then again the ambient temperature when I had the Panam was pretty warm. Maybe that has less bearing than the angle they are operating at…

So there you have it, it is a little known phenomena occurring mostly with cold tyres, made worse in some instances by tyre choice, wear or age. You live and learn….

Mercedes front tyre scrubbing noise

Replacement Pirelli P7 front tyres – ready to go on the SL


Differential Oil Change – Mercedes SL (R129)

This is a simple task carried out with only a few points of note.  Often the pinion seal of this type of hypoid differential passes oil, as long as it is only minor and not gushing they can continue to run for years and give no real trouble.  This leaking problem is also common to most W124 series, and the later 190’s.  Obviously the point of note here is; if you ignore a bad leak here and the oil runs dry, it can result in damage to the pinion bearing or worse still the internals of the Diff .   Other commonplace diff leaks are from the rear cover and drive shaft output seals.

P1020003

I had decided to drain the oil as it gave me good opportunity to see how much lubricant existed in the diff, also so I could gauge if any remedial work needed to be planned or just to ignore it for a season and monitor its progress.  I chose the latter, as neither combinations of small leaks looked to be too serious – compared to ones I had seen that needed new seals.  Added to this, the fact that there was a good amount of oil drained out of the diff, the leak was not sufficient to pose any any great danger.

To change the differential oil, raise the rear of the car to a comfortable level and clean off the area with a wire brush around the filler and drain plugs.  Then use a good penetrating oil if they look like the ones on my car!  The fill plug will be found on the upper left side of the diff casing looking at the back of the vehicle masked by the exhaust pipe and the drain plug on the lower right.

P1020004

You will need a 14mm hexagon drain plug key, the one I use uses a 21mm spanner or socket to apply the required force.  Insert the  key into the fill plug, tapping it fully home before applying any turning force so that it does not slip out. If it proves stubborn to undo, try tightening it a little first – once the rust is broken, it should undo nicely as it is a taper fit thread in the casing.

P1020006

IMPORTANT NOTE- Always remove the filler plug first, as if you cannot get this open, its far better to know now than when you have drained the oil contents and are unable to refill the differential!!  This is very good advice indeed for any gearbox or diff job you may attempt in the future.

Once the fill plug is removed, remove the drain plug and allow the oil to drain into a suitable container.  Once empty, refit the plug and dispose of the old oil. If you choose a modern semi-synthetic gear oil like Autolube’s 75-90 EP then the 1 litre bottle will have a short dispensing spout. The specified oil amount is approx. 1.5 litres.  Have a good look at the drained oil and see if it looks to hold a suspension of metallic particles or is clear and maybe just dirty.  Any metal pieces or chips, heavy contamination etc. indicates that probably the differential is not in the best of condition!

ep75w90-syn-gear-oil-lg

On the R129 SL there is quite a technique to getting the oil into the diff from the bottle if you do not own a pump of some sort.  The technique is as follows. Pull up the flexible spout on the oil bottle, (leaving the screw cap seal on the tube spout) and feed the container into the area above the exhaust pipe and intermediate box.  The position you will find allows the bottle to lie horizontal with little or no tilt available, but thats ok.  Manoeuvre the bottle so that the sealed spout is within 20mm or so of the fill orifice, then unscrew the cap and quickly push the bottle forward into the hole.  Squeeze the bottle to get as much oil in as possible, this is unlikely to be much more than half its contents (0.5l), when you feel you cannot get any more out of the bottle, withdraw it and top up to full again from the new bottle. Re -insert and deliver another half litre.  Finally refill the bottle for a last time and fill to the level of the filler plug hole.  It is painstaking and it can be a little messy to refill to just ‘dribbling out’ of the filler hole, but without a delivery pump its the only way possible (Unless you have a length of garden hose, funnel and an assistant to pour the oil elevated from the side of the vehicle.)

Refit the filler plug and clean down the whole area with rag.