Technical SL R129

P0410 Secondary Air Injection Fix – Mercedes S Class W220


Mercedes P0140 Secondary Air Pump Problem 1

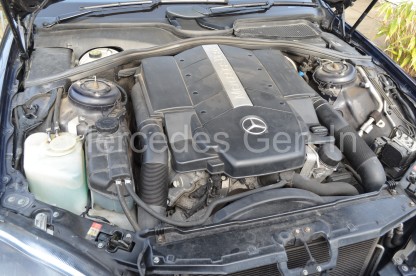
Mercedes Benz M113 Engine S Class S500

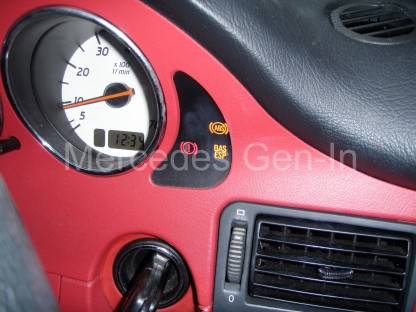
I have recently taken delivery of a used S Class Mercedes, 2002 model W220.  During the first few days of ownership the amber engine check lamp in the dash illuminated and stayed on. Plugging in the AUTEL diagnostics tool revealed a P0410 fault code relating to secondary air injection, so I set about troubleshooting and fixing the problem.

Mercedes P0140 Secondary Air Pump Problem 2

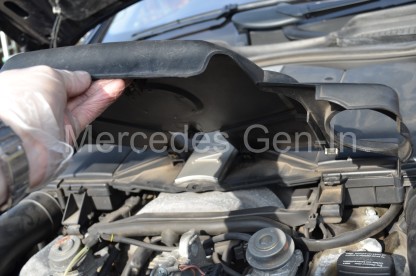
Remove front section of engine cover by lifting up and pulling forward.

Apart from aiding to prolonging the life of the catalysts and meeting lower emissions  targets the secondary air circuit does not effect the normal running of the vehicle if it is disabled in a particular way until a fix can be carried out.  You may remember older engines such as the 320 I6 of the R129 ran at elevated rpm’s until warm and held on to auto gear changes until the CATs were up to temperature – this is an alternate design.

Mercedes P0140 Secondary Air Pump Problem 3

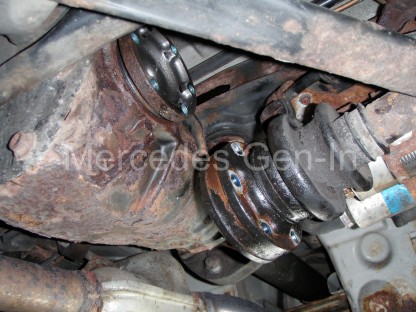
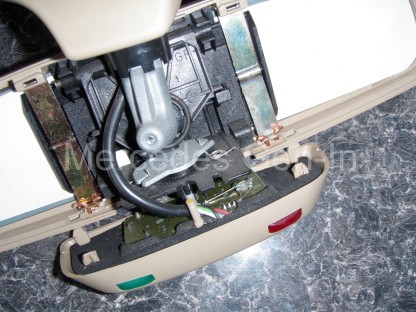
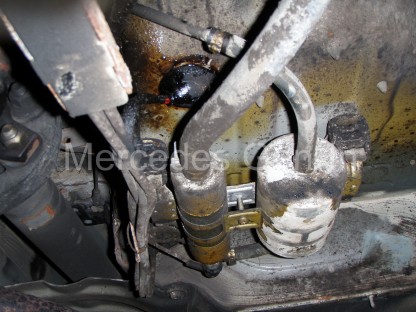
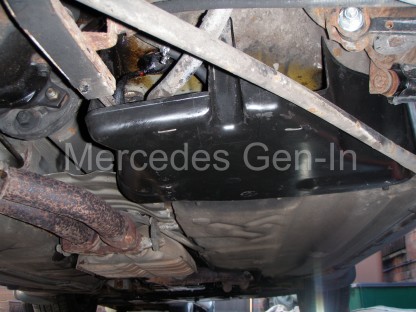
Air pump mounted between the ‘V’ of the cylinder heads at the front of the M113 engine

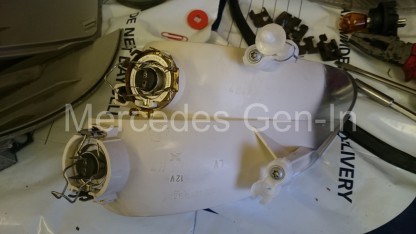
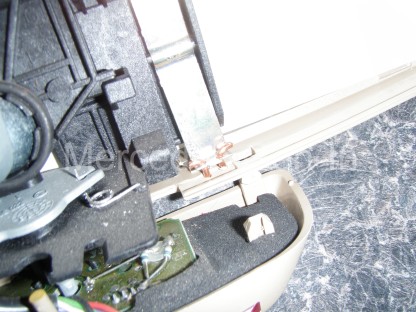
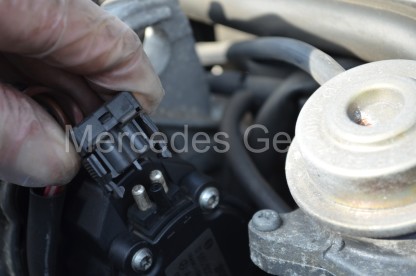
The way to disable the system is to remove and plug the single vacuum outlet (the base of the clear thin pipe to the left in the picture above) from the control solenoid to the air check valves, one either side of the v6,v8 and v12 variants, then simply pull the control relay from the right hand fuse board in the engine compartment. Relay N. or pull fuse 31 (40A) orange.  This will accomplish two things until you get chance to repair the system, although please note it will not extinguish the engine check lamp. It will prevent any electrical current flowing to the secondary air pump and it will also prevent the air check valves on the exhaust manifolds opening with the possibility of allowing exhaust gasses to exit via the disabled air pumps delivery pipe.

Mercedes P0140 Secondary Air Pump Problem 4

People have wrongly assumed that the secondary air system only operates at start up, this is not strictly true.  What happens at a variable point during the drive cycle when certain engine conditions and running criteria are met, is that the secondary air pump is cycled for a short burst, check valves are opened and the ECM monitors and compensates for a change in the O2 levels measured in the exhaust gasses.  Here is some info on the conditions that are required to be met for a check to be made by the ECU/ECM.  It is worth noting that it takes faults to be detected on two engine start/run cycles for the engine management lamp to illuminate on the dashboard.

Mercedes P0140 Secondary Air Pump Problem 5

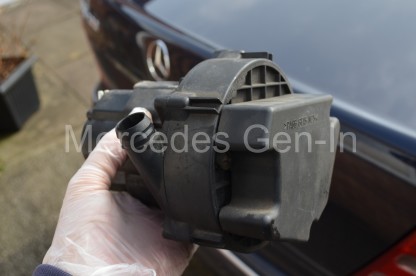
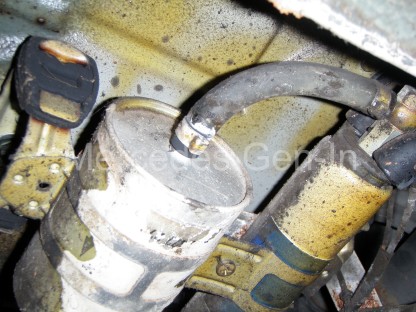
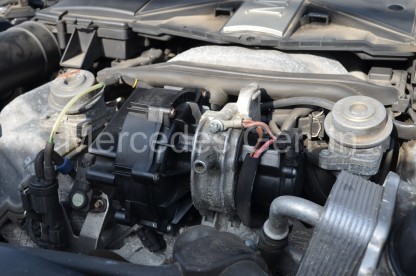
Mercedes – Secondary air injection pump.

It does this among other things by monitoring fuel trim and by identifying emissions changes then comparing its findings to an inbuilt reference map.  From this it can conclude that the secondary air circuit is functioning correctly – engine management is happy!  Should it detect a incorrectness or deviation from the changes expected within the combustion gas control loop, then it will flag up a secondary air injection error.  The reason it checks in this manner during the drive cycle is it can effectively test out all components in the circuit in a few seconds, air pump, air supply piping, electrical controls, check valves and actuating vacuum etc.  If even one of these control sections is giving issue, then its comparative live testing will result in a fail and flag the P0410 fault code.

Mercedes P0140 Secondary Air Pump Problem 6

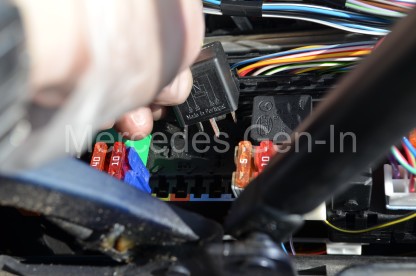
Both control relay and fuse located in right hand fuse board.

On start up from cold the secondary air pump relay ‘N’ is commanded to close, this applies voltage to the air pump DC motor protected by a 40A fuse, Fuse 31.  At the same time the electrical solenoid controlling the check valve vacuum is energised, allowing vacuum to pull open both diaphragm caps.  Air is collected and pumped into the check valve heads by the twin vane air pump into a rubber supply hose that interconnects both air check valves. Air enters the open diaphragm caps and passes through a pair of non-return ‘reed’ valves into the exhaust header or manifold on each side of the engine (In a V configuration – obviously only one check valve if this system is used on any in I4 or I6 engines)  Pumped air then mixes with the combustion gasses and achieves the engineered effect of raising CAT temperature and assisting in burning off any traces of enriched combustion fuel, cleaning up its act during the initial start cycle.   The pump/blower running time is usually between 45 and 90 seconds after which the turbine will cease to rotate, check valves will close and unassisted combustion will continue.  Only after the engine has warmed up and at some further point during the current drive cycle will the system be checked once more for correct operation.

Mercedes P0140 Secondary Air Pump Problem 7

Secondary air injection control relay ‘N’ Right hand side fuse box under bonnet/hood. MB part No. A002 542 1319 Has built in coil suppressor resistor. Bosch Part number for this item cross references to: BOS 0986332040

Mercedes P0140 Secondary Air Pump Problem 8

Secondary air injection protection fuse 40A – Fuse 31- Orange Maxi-fuse

There are several faults that can occur to raise the P0410 code and resulting amber warning lamp, but often it is down to a failure of the secondary air pump itself.  What commonly happens is that the normally open TYCO power relay N ‘splashes’ its contacts and sticks closed, due in most to continued contact arcing. The relay is rated at 35/40A and the current drawn by the secondary air pump under full load can be as high as 35A which as an inductive load pushes the relay to it maximum as far as contact rating is concerned.  Once the silver contact area of the relay has deteriorated unreliable operation will result.  Worst case is that the relay sticks on and the air pump remains powered beyond its 90 second period and running continuously to its final destruction.  Relays in this circuit as well as ones in the Air-matic circuit should, in my view, be changed as a service item every 50k or so miles to attempt to prevent costly pump repairs.  A new secondary air pump from Bosch will cost in the order of £300 for the part alone and maybe £35 for the correct relay.  The resulting maths is simple.

Mercedes P0140 Secondary Air Pump Problem 9

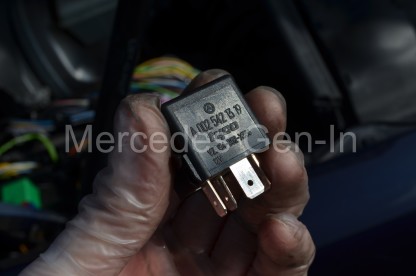
Control Relay ‘N’ MB part No. A002 542 1319

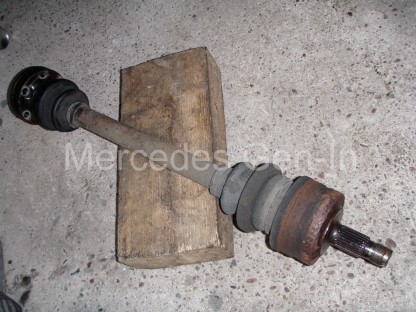
Testing the pump is straight forward, lift up and off the front section of the plastic engine cover and remove the air pump power connector, apply 12v to the exposed contacts from an external source and listen to the sound the pump makes – if any. It should sound like a vacuum cleaner motor as it spins at a very high rate, if it sounds like its arcing or rough running its probably at end of life. If you have the means of monitoring the running current of the motor (DC clamp meter) ensure it is running to spec.  Removal is done by removing the single reverse torx set screw from the aluminium saddle plate that clamps the pump between the front of two cylinder heads.  Once this forward facing saddle plate is removed, work loose the rubber connecting hose from the pump outlet and once free, remove/jiggle the pump free from the car.  Replacement is an exact reversal of this procedure.

Mercedes P0140 Secondary Air Pump Problem 10

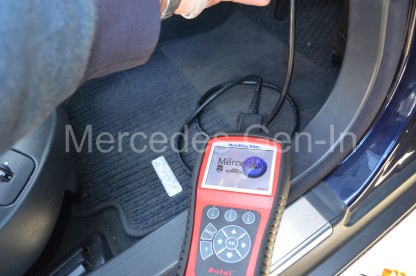
OBD port under dash area next to driver footwell.

The pump if faulty must be replaced along with the N control relay and if blown Fuse 31 (40A).  As it is most probable that the pump failed because of the relay it should be changed as a matter of course in all cases as we would not want the new item damaged in the same way as the old one – just for the sake of a new relay!

Mercedes P0140 Secondary Air Pump Problem 11

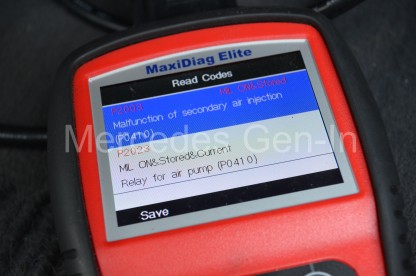
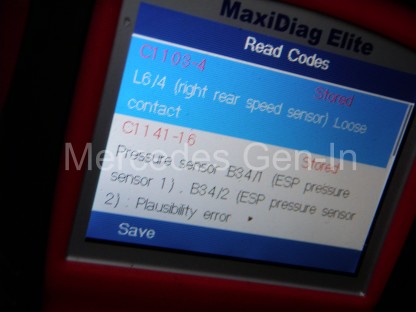
P0410 Faults recorded and cleared with Autel MaxiDiag Elite. Once erased you will need to cycle the ignition for this fault to fully clear.

I have dismantled both the N relay and secondary air pump so that you can how the items are made up and the issues that cause the relay to stick and the motor to self destruct, there are a few additional photographs below showing the detail of this ‘post-mortem’ carried out on the damaged parts for useful info.

Mercedes P0140 Secondary Air Pump Problem 12

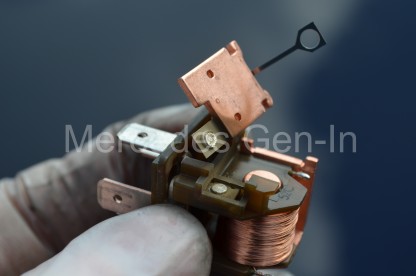
Burned contacts from relay ‘N’ that stuck closed causing the secondary air pump motor to run to destruction.

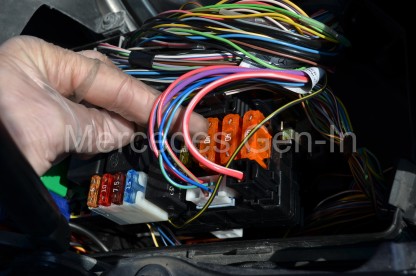
Replacing the ‘N’ relay is simple, locate it in the central portion of the right hand (drivers side UK) fuse board k40/7 module or SAM in the engine bay (right side fuse box detail here), fuse 31 is there also, and is the most inboard of the three 40A orange Maxi-fuses located toward the front edge of the SAM.

Mercedes P0140 Secondary Air Pump Problem 13

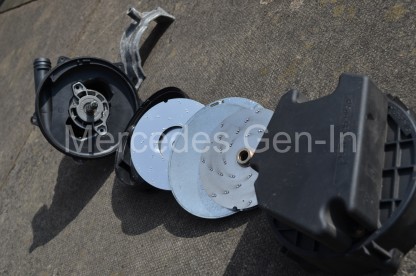
Internal parts of secondary air injection pump.

Obviously when you have completed the work you will need to erase the fault code flag from the ECU with a suitable code reader, in this instance I used my Autel. The standard OBD port is under the dash next to the drivers foot well, near the bonnet release on UK cars.

Mercedes P0140 Secondary Air Pump Problem 14

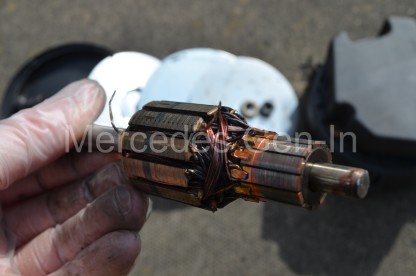
Burned out rotor of the air pump, probably due to overheating.

Once the work is completed, leave off the plastic engine cover until you have started the car from cold, you can then hear the fan running and monitor at what point it shuts down (45-90 seconds after cold start) if it continues to run much beyond this time there is likely to still be a problem somewhere and you are best to disconnect the motor until it is further investigated as it is a high power, high rpm motor that is not at all rated for extended use beyond its designed short duty cycle.

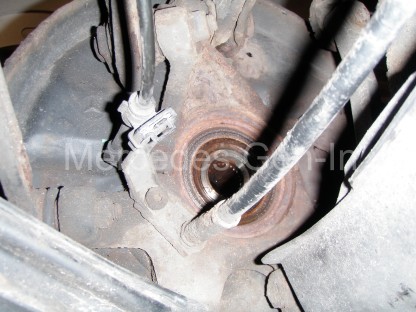
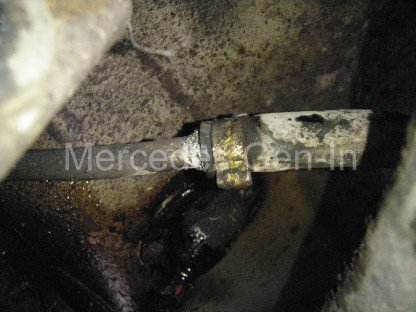
It is worth checking the vacuum actuation components and piping with the pump motor housing removed, any hoses that are split or look bad should be replaced. A word of warning – do not pull or disturb the slightly thicker flexible vacuum pipe that disappears into the central ‘crutch’ between the front of the cylinder heads, if this becomes detached/broken then the complete engine has to be stripped to reattach it.  You are best to identify this hose before working in the area – In my view it is best left undisturbed!

Mercedes P0140 Secondary Air Pump Problem 15

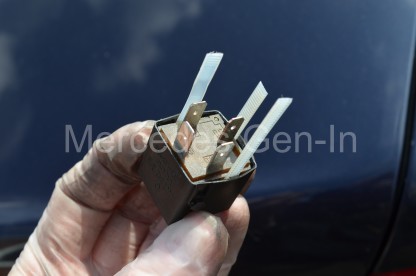
How to safely remove the case of a power relay for inspection. Pry each side carefully with a screwdriver just enough to insert a cut section of cable tie, once all four sides are like this the relay will simply slip out of the case without damage.

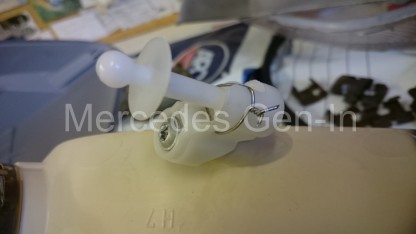
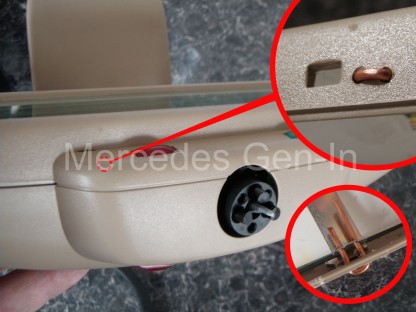
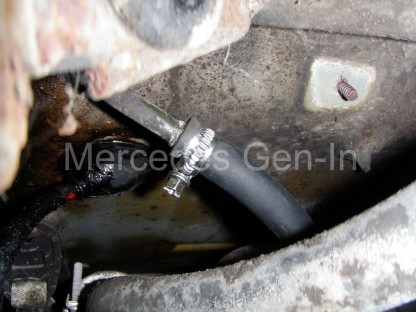
In the vicinity of the black vacuum solenoid that diverts supply to the air check valves is a small blue plastic vacuum check valve, these have been known to stick and cause incorrect operation of the air injection check valves.  Often in colder weather, moisture accumulates in this device rendering it intermittent in operation, as the weather warms and it dries out then the problem disappears, only to return once the weather dips back to winter humidities again.  If you can replace this part while you are in there, do so, its cheap and readily available through the dealer parts network or from several web based pattern part sources.

Mercedes P0140 Secondary Air Pump Problem 16

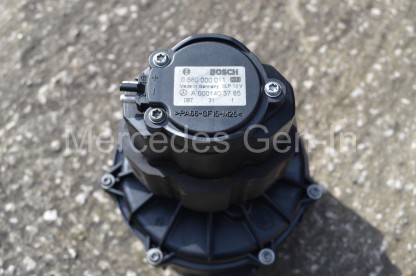
Label on the air pump showing both Mercedes and Bosch part numbers, For the S500 W220 and ML320 W163 the MB part number is: A000 140 37 85 If purchasing used parts check these two numbers against your replacement.

Once you are satisfied all is well, refit the top plastic engine cover, check the fuse box lids are locked closed and clear any leaves or debris from the bulk head drain holes/flaps before shutting the bonnet and congratulating yourself on a job well done!  A job that would have cost in the region of £1000 with not much change, if it were to have been done at a Mercedes dealer.

Mercedes P0140 Secondary Air Pump Problem 17

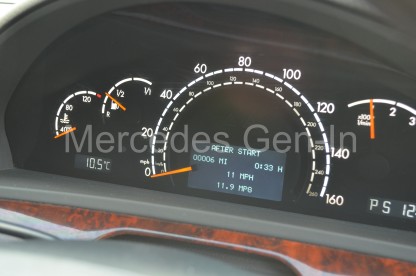
Test cold start, listen for the pump to run and switch off anywhere between 45 and 90 seconds after start. Note – fault light cleared in this picture.

As of the 12th of March 2016 I have stock of a full set of tested used parts available (Air Pump, Relay and 40A fuse) available as a ‘kit’ to carry out this repair following the above instructions – contact me for more detail and purchase information if required  steve@mercedes.gen.in

Mercedes Headlamp Adjustment Repair – Most Models


Here is a quick fix that will restore your failing or ‘wobbly’ headlamp back to a working condition.  If you notice that the headlamp leveller is not working correctly and on inspection the internal reflector seems loose and ‘disconnected’ from the lamp body – it probably is!  Caused by the internal ball and socket arrangements breaking that secure the reflector to the adjustment threaded rods.

If you are lucky the ball and socket arrangement will have just popped out and you should be able to snap them back in place once you can see exactly what you are doing.  The best policy is to remove the lamp unit and work on it at the bench or table.

Usually there is only two or three fixings that hold the lamp into the vehicle body and removal is in many cases quite simple (At least on the R170 SLK we have here)

Mercedes Headlamp Repair 1

On removing the bulb access panel you should be able to see the issue.  There are three attachment points to the reflector, looking from the back of the right hand lamp there is a ball and socket on the vacuum leveller adjuster (could be electric in some models) to the lower left and two points of attachment top and bottom on the right, these are usually a cream/white nylon part, the socket of which is screwed to the rear of the reflector.  Its worth noting that if when you shake the lamp you can hear broken parts inside there is likelihood that one of the sockets has become brittle and broken.  As far as I know, even though these small plastic socket parts look to be replaceable, I have yet find a source. It would mean in most cases a replacement lamp to rectify the fault, used or otherwise its an expensive fix for an otherwise serviceable lamp.

On the R170 SLK once the indicator unit has been removed, by slotting a screwdriver down the 10mm hole at the rear of the lamp body and flexing the latch access can be made to the steel spring clips that hold the polycarbonate lens to the grey lamp body. Once these clips have been removed the lens and body can be carefully levered apart.  The front chrome surrounding lamp trim simply pulls forward and allows full access to the reflector.

Note at this point that if you touch the shiny chrome reflector with your fingers it will mark, equally if you try and rub it with a cloth, even light polishing will damage the reflector.  I have found that using a fresh pair of vinyl un-powdered gloves prevents any handling marks and is a great aid to working with the reflector parts as it prevents any damage.

Mercedes Headlamp Repair 2


Once apart the reflector pivots can be inspected, it will be clear if just pushing the unit back together will be your fix or if further intervention will be needed if you spy broken or missing parts.  In the case of the SLK lamp, one of the nylon sockets had lost one of its three retaining ears allowing the ball to spring out of place very easily.  What was required was to retain the ball and push it into contact with the two remaining ears, giving a secure and durable mounting to the broken part.

Taking a small jewellers screwdriver (app. 1mm diameter) heat it with a cigarette lighter and melt two small holes in the plastic socket, next to the point where it fixes to the reflector body with the single torx screw.  The hole position should be so that they are level with the top flat edge of the nylon ball once it is fitted to the socket.  Thread a paper clip through the two holes and enclose its free ends around the ball whilst holding everything tightly in place.  With pliers twist together the two ends, applying tension to the socket and bridging the paperclip diagonally across the top flat surface of the ball where the retaining ear is missing.

Reassemble the lamp, threading the repaired parts back together, pushing it home into the receiver of the vacuum or electrical adjuster.  If possible always move the sockets around so that the broken one ends up on the headlamp leveller as this can be snapped into place more easily on reassembly than the other attachment points.  Often the sockets are the same moulded part fitted to different points on the reflector and this allows them to be positioned so that any repaired socket is under the least supporting stress (leveller position).

Rebuild the lamp ensuring to use a light smear of clear sealer on the headlamp lens to body gasket if it looks to be leaking or allowing any dirt build up under the lens lip. Clip back all the lens fixings and refit the lamp to the vehicle.  Adjust the beam pattern to the specifications required by rotating either the up/down or left/right adjusters, be sure to make any adjustment with the instrument leveller control set to ‘0’.

Mercedes SLK (R170) ABS Fault – Rear Reluctor Ring (Tone-wheel) Replacement


ABS faults can be complex to solve but often it is the simplest of things that causes those dreaded lamps on the dash.  If there is an issue with any wheel speed sensor arrangement on any corner, then this will prevent a number of things working correctly, namely ABS, TCS, ESP, BAS, Cruise Control/Speed Limiter and on the SLK power operation of the Vario roof too. So it needs to be fixed. It is now also a critical tested component in the UK MOT annual check – any dash warning lamps of this kind will immediately fail the inspection and prevent you from obtaining that valuable certificate.

Mercedes ABS Fault - Reluctor ring replacement 1

Intermittent ABS light faults are often attributed to dirty or poorly adjusted wheel speed sensors, even poor connections or weakly performing/damaged sensors can flag faults.  These faults are usually reasonably cheap to sort, though problems with the pump or controller can run into many hundreds to fix.  With this in mind, it is prudent to always check the simple things first, then move on to the ‘eye-wateringly’ costly parts when all other avenues have been followed and options exhausted.  So where to start…

Fault finding can be very hit and miss without a compatible Fault Code Reader that can access the MB systems protocol. There are many on the market to choose from and probably the most capable will be from the Autel range. Be sure what you are buying covers the ABS system, as often less expensive readers only cover engine fault codes and leave the purchaser no better off when it comes to tracking faults in the ABS, SRS or other Body electronics. I use two or three tools, the most flexible and economical is the Autel 702 Maxi-Diag Elite, this can be purchased for under £150 if you search around for the best deal.

Mercedes ABS Fault - Reluctor ring replacement 2

However if you don’t initially want to run to that expense and you may be able to find a friendly independent mechanic who can read the system for you and tell you where the problem lies.  Do remember that if you go to a dealer for a code read, it is likely to cost around £45 to find where the problem lies.  You will then have to take it back to get the fault cleared once repaired, so as you can see you are getting pretty close to the cost of owning your own powerful diagnostic tool that will stand you in good stead for the future. If you have an older Mercedes vehicle pre 2000, then you will have less choice of code reader and things get a little more complex – you can catch up on older vehicle diagnostics here.

There are common faults that can cause problems throughout the Mercedes model ranges, no different with ABS than any other system. If you get unwanted ABS activation at slow speed, when rolling to a braked stop.  This is often caused by the wheel speed sensor on one or more wheels not detecting its rotational impulse cleanly.  This is called ‘falsing’. The controller is being fed an inaccurate stream of speed signal impulses that makes it think that one of the wheels is skidding and it applies (wrongly) the ABS to that wheel.  On W124 models, this was often caused by the magnetic speed pick up sensor devices on the front wheel hubs attracting metal rust debris, ending up looking rather like a christmas tree of iron filings.  The pulsed electrical induction signal from the sensor as its paired slotted ring on the rotating part of the axle whizzes by, is masked by the ‘growth’ of collected iron and rust on the sensor head, making what should be a very clean and precise tiny electrical signal, into a low level ‘blur’ in layman terms.  Simply removing the sensor and cleaning it up in a great deal of cases will result in a cure for this problem. If this does not cure the issue you will have to look more closely at the condition of the slotted or toothed ring that can be seen at the base of the sensor hole, this part passes the nose of the sensor as the wheel rotates.  On the front wheels of the vehicle this ‘reluctor ring’ or ‘tone wheel’ is often a vertically orientated slotted disk mounted behind the brake disk, attached to the rotating hub. Unless corrosion has taken its toll, the front tone rings seem well protected from the elements and do not often give trouble.

Mercedes ABS Fault - Reluctor ring replacement 3

On the rear, most Mercedes cars have flat slotted punched-out reluctor rings ‘sweated’ onto the outer surface of the outboard CV joint casing, just as it passes through the hub carrier.  Often out of the factory this forms part of the complete half shaft and if it gets damaged a few years down the line, or as it often does – corrodes, then the complete drive shaft/joint had to be replaced at quite a tidy sum.

…Enter the wonderful world of the ‘Far East’ on that popular auction site. A wonderful factory somewhere in the world now produces just the 48 window (slots) 92mm reluctor ring (also common to SL R129 and many others) that you can fit to your existing half shaft and get things going for under £10 component cost. Needless to say it is quite involved to fit as you obviously have to remove the drive shaft from the vehicle to carry this out.  Link to reluctor ring seller.

Mercedes ABS Fault - Reluctor ring replacement 5

This article covers the fitting of a rear drive shaft reluctor ring to a 2001 Mercedes SLK200 R170, though the procedure will be common to many other MB models.  If you discover the faulty ring is on the side that has the exhaust passing by the drive shaft then you have a little more work ahead, as it often involves the partial removal of the exhaust system to obtain full access.  If however, if it is like in this case – on the right rear of the vehicle, no such removal is needed.

Reluctor ring replacement

You may wish to initially remove the wheel sensor to protect it from accidental damage. Then you will need to obtain a 32mm 12 point socket. With the hub centre embellishment removed from the wheel (Alloys), with the handbrake set, in gear, while on the ground, peen out the locking tab on the hub nut.  Fit the socket and with the aid of a breaker bar, remove the centre hub nut from the end of the drive shaft.  Spray a good quantity of penetrating oil onto the shaft end so it travels down the splines within the hub. You may need to slip a tube over the breaker bar to ‘crack’ the hub nut off, as if not recently removed it will be very tight indeed.

Mercedes ABS Fault - Reluctor ring replacement 6

Now raise the vehicle so the differential is at least high enough to be able to swing a 21 inch breaker bar beneath the car (those inboard CV-to-output flange bolts will be incredibly tight) Chock and make sure your working area is safe then remove the 6 reverse torx bolts from the inboard flange of the drive shaft.  These have been thread-locked with a compound that must be the almost as strong as the bolt itself!  It will take some muscle to remove these pins, so be prepared.  Always seat the reverse torx socket on the pin with a copper hammer, not only does this ensure the socket is seated as far as it will go onto the head but the ‘rapping’ helps to jar and break the joint.  Remember – good well fitting tools are important here as if you twist up the head with an ill-fitting socket, you will be left with a huge ‘near impossible’ job to remove it.

Mercedes ABS Fault - Reluctor ring replacement 7

Once all six flange bolts and tri-plates are removed the shaft can be pulled down towards the front of the vehicle.  In some cases you will have to remove the plastic cover over the fuel pump to gain adequate opening to ease out the shaft end.  Its a tight fit, but it will come clear and hang down just below the nose of the diff.  Now take a copper drift and stout hammer and whack the end of the drive shaft, it should with a few blows begin to move, once it starts to move tap it with care so it passes through the splined hub centre.  Support the shaft as you tap and once free, guide it out from beneath the vehicle.  While it is off, check the CV rubber dust boots on both ends for damage/wear/cracks/splits as this is a perfect time to change them.

Mercedes ABS Fault - Reluctor ring replacement 8

Remove all traces of the old reluctor ring and file the surface clean to prepare it to accept the new ring. File deliberately more material off the outer edge to allow a slight taper lead-in for the new ring.  Once you are satisfied that the area is nice and clean and smooth, prepare to tap home the new ring onto the CV joint casing. Heat up the new reluctor ring with a blow torch, don’t go too mad, just enough to make it hot.  Then with a gloved hand, place it centrally and tap gently around the perimeter of the ring to drive it home into position.  In this case it was easy to see the exact location and position of the old ring, if you are not so lucky then use a torch to inspect the opposite side of the vehicle to get the correct placement dimensions you need.

Mercedes ABS Fault - Reluctor ring replacement 9

Once the new ring is fitted, the drive shaft can be assembled back into place and the other parts built up around it, much in the same way as they were removed.  Be sure to tighten the hub nut to the same position as it was prior to removal so the lock tab can be tapped back into place.  If you can obtain 6 new flange bolts for the reassembly, then that would be best, failing that be sure to wire brush the old screw lock compound from the threads before reusing.

Mercedes ABS Fault - Reluctor ring replacement 10

Once the vehicle is back on its wheels on level ground, insert the code reader into the OBDII diagnostics port, then read and clear the ABS speed sensor related faults from the controller. Finally road test. You will most probably now have no warning lights on the dashboard and be able to enjoy once more a fully functioning set of connected vehicle features that were all lost while the fault was present.

SPECIAL NOTES FOR LEFT HAND SIDE RELUCTOR RING REPLACEMENT

Because of the proximity of the exhaust and restrictions of access for the removal of the left hand drive shaft it is possible to remove the lower link bolt (lower wishbone to hub carrier), the ball joint of the tie link and hub end of the pushing link (lowest fixing on the hub carrier)  See diagrams below to identify component attachments to be removed. Once these fixings are removed it is then possible to pull the hub at the bottom just far enough out to allow the drive shaft outer CV joint to slide out its hub spline and hang down to clear the carrier so the new reluctor ring can be fitted.  Just remember to pre load the suspension as if the vehicle was standing on level ground before retightening the removed bolts.  This is a practical alternative method to removing the drive shaft completely from the vehicle.

Fig-117 Fig-116


Mercedes SL (R129) Rear View Mirror Fix

I am not sure if it as a result of the awful condition of UK roads or the sudden hot spell we have had recently, but the rear view mirror started to rattle in a very metallic annoying way.  To be honest the way the mirror vibrates due to the inevitable convertible ‘scuttle-shake’ could be the long term underlying cause.  Anyway it was time to get it fixed!

Mercedes SL (R129) Mirror Repair 1

Having experience of the W210 E class and W202 C rear view mirror removal due in the most part to failure of filament indicator lamps, the SL (R129) presented little problem in ‘de-camping’ it from its sprung die-cast shoe above the windscreen.  The best way I have found to accomplish this is to slide two fingers up between the screen and the flat front part of the mirror support, cup your hand around the remainder of the mirror and lever it down in an arc from the screen, imagine that it is pivoting on the trim edge furthest into the passenger compartment.  Do not try a straight pull down, or using, as some people recommend:  ‘putty knife or spatula’  This is not necessary at all and you are very likely to cause trim damage using any tools at all!   The number one thing to be aware of is that the mirror has an electrical connector on a very short lead behind the section that unlatches.  You must control the unlatching of the mirror, as you may accidently over-pull and damage the wiring or connector (That is why the lever-down technique is good as you can quickly adjust the forces applied as it releases)

Mercedes SL (R129) Mirror Repair 2

Once the mirror is unlatched and the electrical connector disconnected the whole assembly can be taken the workbench or kitchen table!

First using a firm straight pull-outward, remove the dipping adjustment control knob and place it to one side.  Start by carefully prying the add-on light pod from its four peg positions. It will with care detach from the bottom of the mirror. (it is pegged into the rear cover and bezel)  Once this module is free, the rear cover levers out from the bottom, unhooking from two internal retainer hooks inside the top edge of the rear cover/bezel (one of these hooks was broken on my mirror too).  The complete back cover should now release from the bezel, allowing you to gain full access to the internals of the mirror.

Having now done this off the car – I realise that maybe the mirror back cover could be actually be removed in situ.  By unclipping the add-on pod at the bottom and hinging the cover out at the back, disengaging it from the bezel.  You could probably get access to refit a mirror holding spring without actually removing the mirror (maybe!) – Not really sure why you would want to struggle with this on the car, but I thought I would just mention it as it all adds to the DIY detail!

Mercedes SL (R129) Mirror Repair 3

As you can see the mirror glass and bezel is held onto the adjustment gimbal by a black plastic panel. On each side there is a flat spring metal clip that applies captivating pressure to the black plastic panel by trapping each end of the flat spring to the upper and lower edges of the bezel.  There are locators in the moulded plastic to facilitate this.

Mercedes SL (R129) Mirror Repair 4

These are the pair of springs that fall out – or worse, break the the retaining moulded section they latch into, so they no longer hold the mirror in place.  The springs then fall down and jangle in the bottom of the mirror housing, accompanying the rattling mirror glass.  There has been several owner forum write ups on this job, delving as far as refitting the springs, but in every case if there has been mention of the plastic breaking – then a replacement part has had to be sourced.  Matching your trim colour can be difficult with second hand parts and the later mirrors fitted the C class W202, S Class and their derivatives of the era, had an integrated one-piece pod for the alarm/locking indicators so were incompatible.  Much better I think to repair what you have to better than original if possible, than pay out a fortune for the exact replacement part.

Mercedes SL (R129) Mirror Repair 5

Just touching on how other ‘how-to’ write ups may mention bending the springs to apply more pressure to the mirror backing or even using foam pads to build out the gap between the back plate and increasing spring holding pressure – It is my view that by doing any of the above you run the risk of breaking the fragile moulded ears that locate the springs to the front bezel.  As long as the pressure applied is sufficient to hold the mirror to the backing plate then nothing more is needed – more than needed pressure on the plastic = more chance of stress and future breakage due to the harsh environment and extreme temperatures it is subjected to in the windscreen of your vehicle.

Mercedes SL (R129) Mirror Repair 6

I wonder if my mirror had maybe in the past had similar repairs or that over time (20 years) the plastic was no longer up to holding the pressure applied by the springs and eventually breaking off the moulded ears – who knows.

If as in the case of my mirror, the lower retainer ears for the springs were completely broken, the spring location point can be repaired quite easily with the use of a small drill, a length of 1.5mm solid copper wire (electrical mains cable) and some simple tools.

First take both springs to a bench vice and drill two 1.5mm clearance holes in one edge of the small upturn of the flat retainer spring.  Hold the spring in place and drill two matching holes in the lower part of the mirror bezel. Be sure that the holes you drill lie behind the small square holes that locate the add-on indicator light pod. As long as they remain behind this hole line, the repair will not be seen as it is fully covered once the pod is re-attached.

Mercedes SL (R129) Mirror Repair 7

Using snipe nose pliers, bend the copper wire to make an elongated ‘U’ shape staple with as tighter radius ‘square’ bends as possible.  Insert this through the bezel and locate the drilled end of the flat spring onto the copper wire legs. Position the flat spring as close to its original position as possible using the remaining upper locators for reference, then bend over the copper wire at 90 degrees to secure the spring.  Trim the wire to a length that just extends past the edges of the spring.  Repeat this for the other spring if necessary.

Now slide in the black plastic mirror support plate under the flat springs and position it correctly on the mirror back.  Fold down the springs, locating the middle ridge with the raised edge on the plate moulding.  Using a screwdriver, with the mirror and bezel on a stable flat surface, push the springs top edge down to latch under the remaining locators.  Once these top edges are snapped into position the mirror can be rebuilt.

Mercedes SL (R129) Mirror Repair 8

Hook the rear cover into the two retaining hooks and close the cover. Clip the add-on indicator light pod into the bezel to hold the complete case assembly in place.  Check around the bezel edge, ensuring that everything is located correctly.  If you have damaged or broken tabs that are used to hold the case together, use a spot of clear silicone on the mating edges of the case and tape it together until fully set.  Refit the mirror dipping knob, clean / wipe over the mirror and case in preparation for installation.

Mercedes SL (R129) Mirror Repair 9

If you feel the need, apply a light smear of grease to each of the two sprung loaded ‘pips’ that engage with the snap-in shoe mount on the car, connect the electrical plug and push back the newly repaired mirror into place.


Fuel Leak from Fuel Pump area Mercedes SL 320 (R129)

With the car idling in the street I went to close the gates and on my return noticed a growing pool of petrol beneath the car.  I opened up the yard again and parked the SL out of harms way until I could find time to have a closer look.

Mercedes SL (R129) Fuel Pump Leak 1

I was confident that it was a leak on the pressure side of the pump, as it only seemed to leak with the engine running, so it was safe to leave for a few days until time allowed.

The weather improved this week, so I lifted the car sufficiently to gain access to the fuel pump and filter assembly that lives under a plastic cover, just in front of the right hand rear wheel.  There are three plastic 10mm nuts holding the front edge and a single recessed nut high up on the trailing edge in a moulded extension of the cover.  Once these are removed the cover can be dropped to reveal the fuel pump and filter assembly.

Mercedes SL (R129) Fuel Pump Leak 2

On some models there are twin pumps fitted in series, the output of one feeding the input of the next. This SL320 model has the elongated single high delivery pump.  The whole pump and filter assembly hangs on rubber bushes, rather like ‘miniature exhaust hanger rubbers’.  The thick rubber fuel supply pipe (about an inch diameter) delivering fuel from the tank, comes from the above the differential and swoops down over the drive shaft connecting to the rear of the pump. The output from the pump is smaller bore and connects in a short ‘U’ shaped flexible link pipe to the head of the fuel filter.  Filtered fuel exits the in-line filter through an eight inch length of 15mm flexible hose at the rear, connecting to a 10mm steel spigot on the fuel pipe that runs over the differential and to the front of the car on the left side.

Mercedes SL (R129) Fuel Pump Leak 3

Everything looked dry and over the few days standing, there was no evidence of a fuel leak at all.  I started the engine and took a look at the pump section underneath with everything running. Dry as a bone!  For sure it was a monumental leak the other day and now it had totally disappeared.  I began poking and twisting the rubber hose connections and it was not long before I discovered the culprit.  As soon I touched the last section of rubber hose that joined the steel high pressure supply pipe, fuel sprayed out from the joint at a good rate of knots.

I immediately shut off the engine and inspected the pipe a little more closely.  The rubber and steel pipes were all in excellent condition not showing any signs of deterioration, but for a little surface muck, that when cleaned off left things looking as new.  The original hose clip on the joint was a factory ‘clic-clamp’ type, and the hose had deformed under its pressure over the years and become a relaxed fit on the steel pipe.  As the rubber pipe diameter was a little larger than my largest fuel line clamp I opted for a thin wall screw type line clip, that fitted perfectly and more than adequately secured the leaking joint.

Mercedes SL (R129) Fuel Pump Leak 4

Attempting to twist the other connectors both on the pump and in-line filter did not reveal any weakness in the other clamps, so I decided to rebuild the unit and call it a day.  Before I replaced the plastic cover, I ran the engine for a while and gave the area a good looking at with a torch, prodding and poking the running pump and its pipework to make doubly sure all was well before putting the cover back on.

Mercedes SL (R129) Fuel Pump Leak 5

Amazed by the amount of road muck that had collected inside the cover, I gave it a good clean out before refitting.  Lowering the car to the ground I was pleased at least that the leak had not turned out to be problems with the steel delivery hose that runs over the differential – as that looks an absolute swine to replace.

Mercedes SL (R129) Fuel Pump Leak 6