While parked the front near side spring broke on the 2008 Vito W639. I noticed a strange rubbing sound when I drove off and investigated. Having had many coil springs break over my 35 year motoring history I had a good idea of what to expect.
Vito broken springs often fail badly without retaining in the strut cup
Unlike a few coil springs that break and the remainder of the coil falls into the strut cup, the Vito generally performs in a more catastrophic manner. Because of the reduced shape of the spring and relative smaller diameter of the strut support cup, when the lower seated smaller spring turn breaks at its final coil there is little to stop the remaining larger diameter section of the spring rocketing down the damper strut.
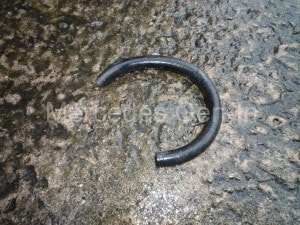
Here is the smaller diameter spring piece that often fails at the base of the coil
Usually the remainder of the spring will catch and come to rest on the flimsy bracket that supports the ABS sensor and brake pad warning cable restraint. My advice is if you ever think you hear anything unusual from either corner of the vehicle always have a quick look, as to continue at speed would be very dangerous indeed.
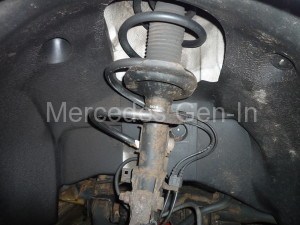
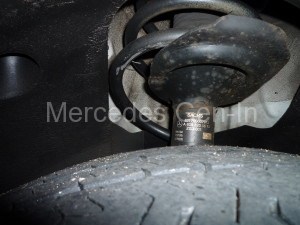
You can see how dangerously the spring falls over the small diameter of the support cup – poor failure condition
I managed to get the vehicle home and the next day set about replacing the broken spring. There are many sources of non-dealer spare parts for this model. You could choose GSF who supply a Lesfojers pattern part spring for about £40.00 or Euro Car Parts who supply the genuine OEM Sachs unit for a little over £60.00 (ECP Part No. 627222210) These units like the struts themselves, are a universal fit and not handed left or right, this is useful to know if you are sourcing used or breaker parts.
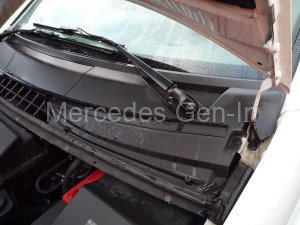
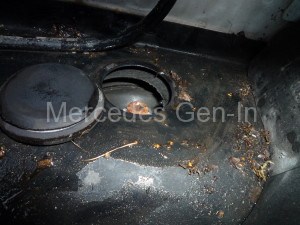
The strut top bolts are located beneath this panel
The job itself is quite straightforward and as long as you have a competent local garage or the equipment to compress and swap the spring over for you it is well within the realms of the DIY mechanic.
Raise the bonnet and remove both wiper arms noting their position. Take care to pull off each washer fluid pipe from the scuttle deck without breaking the fittings. Now remove the plastic scuttle that lies beneath the wiper arms. There are four plastic fixings/rivets, 2 on each side and a row of torx screws on the bulkhead lip. Lift up the central flap that covers the pollen filter and remove the two torx screws and stainless steel filter retainer band. Raise carefully the released plastic trim at each corner and disconnect the lower supply pipes to the washer jets. This is quite thick 8mm hard pipe and can be a little stubborn to remove, a straight pull down works best. Once the washer fluid supply pipes either side are free, remove the two large grommets from the wiper spindles and now you may remove the full length plastic panel. The panel once jiggled and unlatched from the windscreen lower seal, will lift up the windscreen towards the roof line, through the gap created by the open bonnet. You will need to fiddle the off side corner free, as it catches on the bonnet stay hinge. Lift away the panel and store it carefully until needed.
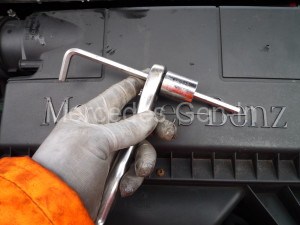
Pass-thru socket required to remove the strut top 21mm rod nut
7mm long series hexagon key and pass-thru socket wrench
In the area of each corner, under the wiper rack you will find a large grommet, remove the required cover to give access to the strut top nut. You will need a pass-thru socket and wrench that will enable you to hold the strut rod with a 7mm long series hexagon key, whilst undoing the 21mm top nut. Access is restricted and you may struggle without the correct tools, especially as the wiper rack can hamper both vision and tool operation. A reader has added this useful tip: “Hi Steve, As an alternative to using a through socket for the nut at the top of the strut I used a spark plug socket from a half inch drive socket set, the type with nut type flats on the outside so a spanner can be used instead of a ratchet. My torx drivers fit through the centre just the same as a through socket only a lot cheaper as most socket sets include such a tool.” – Many thanks Trevor! Now unscrew the strut top rod nut almost to its end, just leaving a finger-tight couple of turns to full removal.
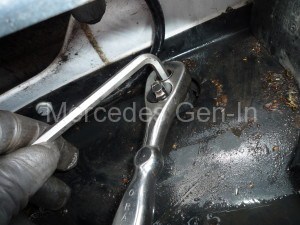
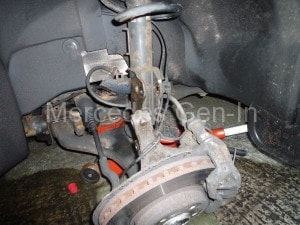
Strut mount beneath protective grommet – restricted access
Now raise the vehicle and remove the road wheel. Either support the van from its sill jacking point or front sub-frame, to allow the front wishbone to fully descend once jacked. Remove the plastic support clip that retains the ABS and pad sensor cables from the strut, unclip the brake hose support at the rear and find a selection of wooden blocks in preparation for the next stage.
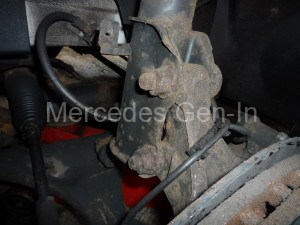
Upper and lower hub carrier bolts. Top bolt is a cam type adjuster to control camber angle – be sure to mark its position before disassembly
Remove the roll bar drop link using a torx socket and 18mm spanner, rest it out of the way of the strut. Mark with paint the upper cam type (camber) adjuster bolt on the strut hanger to hub. Use a 21mm spanner and socket to remove this pin and its matching non-adjustable lower relative. Carefully pull the hub out of the strut mounting and support it on the blocks of wood to prevent damage to the brake pipe or attached cabling.
With the lower fixing of the strut free, support it while you undo the final turns of the strut top rod nut. The strut can now be removed towards the front of the vehicle.
Support the hub carrier on wooden blocks or other support
Recently I have started to use the services of a local garage to ‘swap’ springs over on struts as although possible, using the cheap or sometimes even ‘professional’ threaded rod type compressors can be hazardous. All Mercedes front struts springs are under immense compression and it makes far more sense to pay £10 for the pleasure and have someone do this with the proper floor mounted spring compressor – usually in a fraction of the time it takes to do it with rod type compressors and also without the associated risk of injury! Well worth it in my book… Just a note, be sure to take note of the condition of the top strut mount, as this is a perfect time to replace it if worn. Also if your collapse caused the top mount to come apart, make sure all the ball bearings that are contained within the top swivel race are recovered and replaced correctly before refitting the spring onto the strut.

Strut with new spring fitted
The newly sprung strut can then be refitted to the van. Feed the strut into the wheel arch tower. It is better to fix the strut to hub bolts loosely first as this will aid reassembly. Clip back the brake hose and cable support. Use a scissor jack under the hub or have an assistant hold the unit up to feed the damper rod through the chassis, so you can replace the top nut and washer, only to finger tightness this at this point.
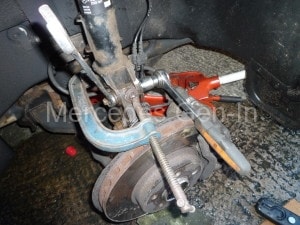
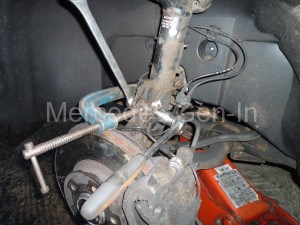
Use the G clamp to apply pressure to hold the hub carrier in its correct position while tightening the carrier bolts
Ensure correct camber angle by realigning to your paint marks
Now tighten the lower bolt on the strut to hub flanges and just ‘nip’ it up. Place a G-Clamp onto the raised locator pip on the hub casting and the other side at the back of the strut leg. Apply tension to draw the eccentric adjuster into contact with the raised stop on the side of the strut flange, rotate the cam adjuster to its marked position adjusting the G clamp as you go. This will ensure the hub carrier is drawn back fully to the adjuster while you tighten the upper clamp bolt fully. The position of this adjuster is critical to the camber angle adjustment of the road wheel and care should be taken to get it back in its correct place, as if not, without doubt tyre wear and handling will suffer. Retighten the matching lower fixed pin in the hub carrier and build up the rest of the wheel assembly. Once you have lowered the vehicle to the ground you can finally fully tighten the strut top nut and build up the complete wiper panel as a reverse of disassembly.
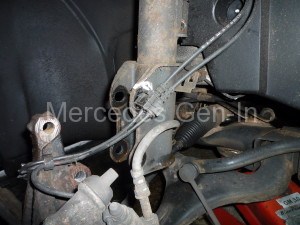
Hub carrier mount showing paint marking to upper eccentric cam bolt
Test the wipers for correct positioning and road test the vehicle. Job well done!