Technical SL R129

Differential Oil Change – Mercedes SL (R129)

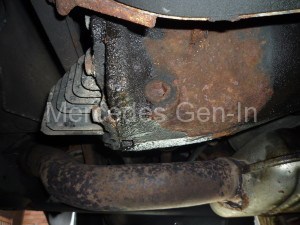
This is a simple task carried out with only a few points of note.  Often the pinion seal of this type of hypoid differential passes oil, as long as it is only minor and not gushing they can continue to run for years and give no real trouble.  This leaking problem is also common to most W124 series, and the later 190’s.  Obviously the point of note here is; if you ignore a bad leak here and the oil runs dry, it can result in damage to the pinion bearing or worse still the internals of the Diff .   Other commonplace diff leaks are from the rear cover and drive shaft output seals.

P1020003

I had decided to drain the oil as it gave me good opportunity to see how much lubricant existed in the diff, also so I could gauge if any remedial work needed to be planned or just to ignore it for a season and monitor its progress.  I chose the latter, as neither combinations of small leaks looked to be too serious – compared to ones I had seen that needed new seals.  Added to this, the fact that there was a good amount of oil drained out of the diff, the leak was not sufficient to pose any any great danger.

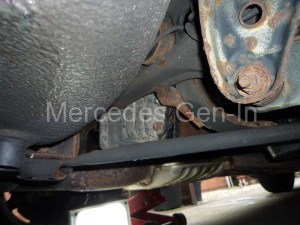
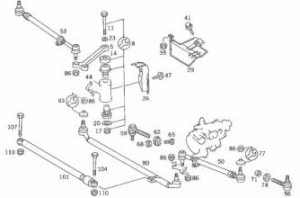
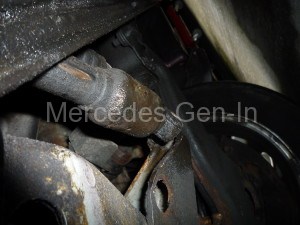
To change the differential oil, raise the rear of the car to a comfortable level and clean off the area with a wire brush around the filler and drain plugs.  Then use a good penetrating oil if they look like the ones on my car!  The fill plug will be found on the upper left side of the diff casing looking at the back of the vehicle masked by the exhaust pipe and the drain plug on the lower right.

P1020004

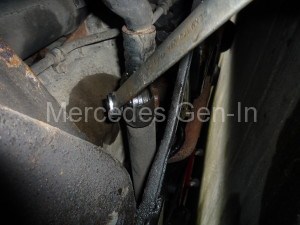
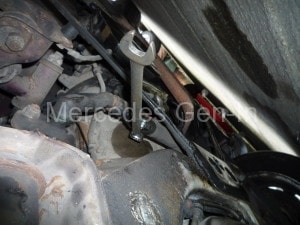
You will need a 14mm hexagon drain plug key, the one I use uses a 21mm spanner or socket to apply the required force.  Insert the  key into the fill plug, tapping it fully home before applying any turning force so that it does not slip out. If it proves stubborn to undo, try tightening it a little first – once the rust is broken, it should undo nicely as it is a taper fit thread in the casing.

P1020006

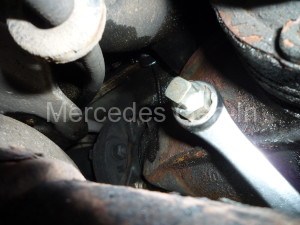
IMPORTANT NOTE- Always remove the filler plug first, as if you cannot get this open, its far better to know now than when you have drained the oil contents and are unable to refill the differential!!  This is very good advice indeed for any gearbox or diff job you may attempt in the future.

Once the fill plug is removed, remove the drain plug and allow the oil to drain into a suitable container.  Once empty, refit the plug and dispose of the old oil. If you choose a modern semi-synthetic gear oil like Autolube’s 75-90 EP then the 1 litre bottle will have a short dispensing spout. The specified oil amount is approx. 1.5 litres.  Have a good look at the drained oil and see if it looks to hold a suspension of metallic particles or is clear and maybe just dirty.  Any metal pieces or chips, heavy contamination etc. indicates that probably the differential is not in the best of condition!

ep75w90-syn-gear-oil-lg

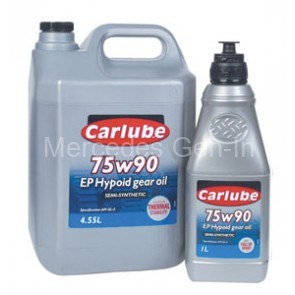
On the R129 SL there is quite a technique to getting the oil into the diff from the bottle if you do not own a pump of some sort.  The technique is as follows. Pull up the flexible spout on the oil bottle, (leaving the screw cap seal on the tube spout) and feed the container into the area above the exhaust pipe and intermediate box.  The position you will find allows the bottle to lie horizontal with little or no tilt available, but thats ok.  Manoeuvre the bottle so that the sealed spout is within 20mm or so of the fill orifice, then unscrew the cap and quickly push the bottle forward into the hole.  Squeeze the bottle to get as much oil in as possible, this is unlikely to be much more than half its contents (0.5l), when you feel you cannot get any more out of the bottle, withdraw it and top up to full again from the new bottle. Re -insert and deliver another half litre.  Finally refill the bottle for a last time and fill to the level of the filler plug hole.  It is painstaking and it can be a little messy to refill to just ‘dribbling out’ of the filler hole, but without a delivery pump its the only way possible (Unless you have a length of garden hose, funnel and an assistant to pour the oil elevated from the side of the vehicle.)

Refit the filler plug and clean down the whole area with rag.

Steering Damper Fault – Mercedes SL (R129) and others.

The issue with the Mercedes steering damper across many of the model ranges is that it is often ignored and as such goes unnoticed, until either a new owner takes up ownership or it is noticed by someone ‘in the know’ who recognises that it is no longer doing its job.

It is in reality a shock-absorber for the steering, it applies a linear damping force to the connecting steering tie bar (the rod/bars that tie left to right wheels together that is moved by the steering box)  One end is attached to the tie bar and the other to the chassis.  Forces are acted upon by the gas/oil filled damper against a fixed point on the chassis.  Physically the unit looks just like a small shock absorber/damper, the type of which you would normally see on a rear wheel suspension setup for instance.

Steering Damper MB

The symptoms can be varied but often manifest themselves as an uncontrolled gentle wobble at slow speed over uneven ground.  A good example of this would be – if waiting to turn right on a crosshatch marked section of road, trickling along, moving very slowly at nothing more than a ‘snail’s-pace’ in a straight line.  The front of the car will often appear to rock from side to side slightly and this motion is often undetectable in the steering wheel. (The nature of steering box and relay link steering is not the most positive steering feel out there, compared of course to rack and pinion set-ups)

r129 steering gear

You may also notice some wandering at speed, although on the older E series, SL and 124 series this is more likely resulting from a combination of ‘saggy’ aged lower arm bushes in conjunction with a worn out and ineffective steering damper.

P1020009

For the attributed low cost of this item and the relative ease in which it can be DIY fitted in a matter of minutes, it is hardly worth avoiding to change it – handling and ride can only be improved.

P1020010

Raise a front corner of the vehicle to a reasonable height to allow unrestricted movement beneath. Remove the plastic under-belly cover to improve visibility and overall access.  Look towards the rear of the engine, about where the gearbox mates to the block and just beneath you will see the steering tie bar. Connected to this and running parallel, you will identify the steering damper, one end attached to the rod, the other to the chassis.  Using a 17mm spanner above the chassis fixing point on the left hand side of the vehicle (from looking at the front) ‘back’ the through-pin and with a 17mm socket ratchet, undo and withdraw the nut and pin.  The attachment to the tie bar end is also 17mm but has a captive nut at its lower point.  A combination spanner will make light work of the nut. Once undone, remove the captive square section nut from the eye.  You may have to apply a little left hand lock to the steering to enable the pin to clear the underbody bracing struts.  The steering damper can now be removed and replaced with a new unit. Refit the damper locating pins and nuts then replace the plastic under tray. Lower vehicle to the ground and test out your new and improved steering !

P1020012


The cost of the steering damper unit is around £30 for a pattern part from GSF and it will take around 20 minutes to complete give or take a tad, to change it.  Time well spent.  I have yet to remove one of these dampers that has not been faulty as they often forgotten because they are hidden away and all but a few people are aware they exist.

View the video clip above showing a worn steering damper – when the gas/oil escapes over time, seals fail etc the damper becomes generally worthless and ineffective. This particular one is totally gone with as you can see no damping action at all.  Also when it was fully extended the rod grated and scraped – One place for this damper, (the bin)  and doubly certain that in this condition it shouldn’t remain fitted to any car!


Synchronising the single button IR Mercedes Key

synchronising the mercedes Infra Red key

This is quite a simple task if you have changed the batteries or for whatever reason the key no longer correctly locks and unlocks the car as it used to.

There are principally three variations on a theme and these are outlined below:

The following instructions are for the square flip out key (not the later DAS pear shaped keys)

Model W124 (with code 885)
Model W124 model year 01-03-96
Model W129,W140,W202 model year 01-12-94 up to 31-05 97
Model W210 model year up to 28-02-97

Point the remote key towards the rear view mirror receiver.

Press the remote button just once.

NOTE: For vehicles model year up to 12-93 – lock or unlock car with the remote key flip out blade within 30 seconds in door lock

Mercedes C class models from Jan 1994 with control modules 202 820 40, 26 and 202 820 43 26. Turn on ignition to position 2 with folding key within next 30 seconds.

W210 E class cars as from December 1994 with part numbers:

210 820 21 26
210 820 22 26
210 820 27 26
210 820 28 26
210 820 32 26

Mercedes remote locking receiver

Point the remote key at the interior mirror, press remote button twice then turn key in ignition lock to position 2 (within 30 seconds).

Test function of key, it should now be synchronised!

If the key fob now locks and unlocks the doors correctly, but the red and green lights flash alternately red/green unusually on the rear view mirror – replace the batteries in the key fob remote.  This alternate flashing is the Mercedes indication of low batteries in the remote fob/flip key – it is not widely publicised.

You can watch a video of how to change the key fob batteries here.

Mercedes SL (R129) Dome Light / Map Light – LED Upgrade

SL R129 LED Dome Light Mod

I suppose if you are reading this you are considering upgrading your Mercedes SL’s current dome light / map reading light to LED lamps.  Simple you might think. You may have tried already and be wondering how I managed to get it work, well here is the detail.

Mercedes SL LED dome light modification

There are several sources of LED lamps to replace the Ba9s miniature bayonet cap bulb and you might think it is just a matter of swapping out the standard filament lamp for the newer LED replacement…. wrong!  If you do this you will find that it will just not work, not illuminate, flicker or blink – ‘nada’.  The reason behind this is that Mercedes in their wisdom decided to polarise the voltage connection to the lamps in the reverse of what you would expect, ie. the tip in this case is negative 12v.  This is related to the way in which the dome light control switches work and their dual function.

So what do we do, put the old lamps back in and admit defeat… NEVER !  I chose these LED Ba9s bulbs as they were based in the UK and I were delivered quickly as opposed to the many retailers in China who take 6-8 weeks for delivery.

I looked at the replacement LED Ba9s lamps and decided that it would be possible to take them apart, reverse the polarity and rebuild the lamps to work in opposing polarity to how they were intended.  Its intricate work but well within the capability of someone who owns and has used a soldering iron.

Mercedes SL R129 LED Dome Light Mod 1 Mercedes SL R129 LED Dome Light Mod 2


First remove the dome light lens and holder assemblies from both fittings by levering them on one of the long edge corners.  Once removed, you will have to carefully push in the two small tags on the reflector contact frame to release them from the clear lens part.

Remove the old bulb and take off the plastic support by releasing the two clips to leave a bare metal frame.  Offering the old bulb up to the holder from the reflector side of the assembly note where material will have to be removed with a needle file to insert the bulb from the front of the holder and not the rear as it is currently designed.  There is even slides in the plastic holder bush to allow fitment from this side but no slots in the base to allow the bulb to be slotted and turned.  See the pictures that show both original configuration and the notched modified part.  Carry out this modification to both left and right lamp holders and proceed now to modify the Ba9s LED lamps.

Mercedes SL R129 LED Dome Light Mod 4 Mercedes SL R129 LED Dome Light Mod 3

Quickly heat up the tip of the LED lamp with a soldering iron until the solder is molten, then bang the bulb on a hard surface, the hot solder will be ejected leaving a hole and connecting wire. Pull carefully on the LED structure and free it from the cap.  You will see the LED unit is polarised and it is this we will be swapping over.  Unfold the thin wire that is bent over the edge of the plastic holder, make it as straight as possible, in most cases it will be too short to reach the tip (its new connection point).  Using fine pliers, bend a small hook onto its end. Use some suitable fine wire and bend one end into a similar hook and couple the two ends together.  Mechanically crimp together and solder the joint using as little solder as possible.  Now bend the longer section of wire that used to go to the bulb tip, over the edge of the plastic holder in a similar fashion to how the original wire was bent. See photographs.

Mercedes SL R129 LED Dome Light Mod 5 Mercedes SL R129 LED Dome Light Mod 6 Mercedes SL R129 LED Dome Light Mod 7


Push the LED assembly back into the cap, threading the longer straight wire through the cap tip.  Push the LED assembly fully home into  the cap and quickly re-solder the tip making sure you do not overheat the wire in the process.  Clip the remaining wire from the tip and allow to cool.

Mercedes SL R129 LED Dome Light Mod 8 Mercedes SL R129 LED Dome Light Mod 9 Mercedes SL R129 LED Dome Light Mod 10


Check your work with a test meter and if you wish to double check test the LED lamp on a 12v DC supply.  Remember that the tip will be polarised negative now!

Mercedes SL R129 LED Dome Light Mod 11 Mercedes SL R129 LED Dome Light Mod 12


Insert the modified LED lamp into the holder and turn it a few degrees to locate the cap pips in the dimples provided.  Refit the plastic lens to the reflector frame if you have not done so already and clip the assembly back into the dome light.  Test out the function of your new modified LED lamps and then pat yourself on the back, as it is a very unique feature in the Mercedes SL R129 vehicle to have LED dome lights, for this very reason.  If you search the web you will see many owners who have in my view almost ‘bodged’ a 36mm festoon type LED bulb into the fittings.  Suffice to say I have further read about blowing fuses and intermittent operation due to poorly made connections, in one case on a popular MB forum the lamp control module required replacement at a huge sum. If anything touches the exposed cross head fixing screw that lives inside the dome light pocket – expect trouble.  The fitting was never designed for any other lamp other than the Ba9s and that is how it should remain for robustness of operation and safety’s sake!  It really does not take too much effort to do the job properly.

Mercedes SL R129 LED Dome Light Mod 13


Mercedes R129 SL 320 (M104) Timing Cover Leak – Alternative Fix

Mercedes SL320

Mercedes SL320 1996

Mercedes M104 Engine Leaks

Mercedes M104 3,2 6cyl Engine

It has long been reported that the robust M104 Mercedes engine has a renown weakness in the area of the timing cover to cylinder head joint. Because of a design weakness, it is common if not obligatory for these engines to leak at this point. The often publicised method of repair is to remove the front timing cover and replace the ‘C’ gasket that seals upper and lower halves of the timing cover.

M104 leak Point

I have read many ‘how-to’ posts and owners write-ups on this problem, and in all but a very few cases the seal made by the ‘C’ gasket only fails in this one weak spot. (left hand combination joint, above the alternator support bracket) In many cases once disassembled the gasket has proved to be sound and in good condition, apart from in this key area where there is practically no material for the seal to press against causing a troublesome unpressurised weeping leak.

SL 320 Oil Leak 
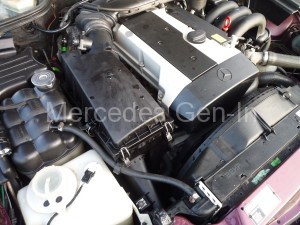
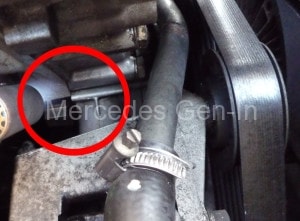
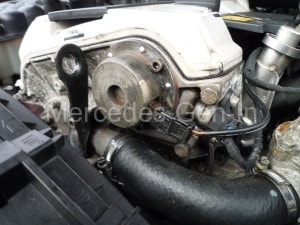
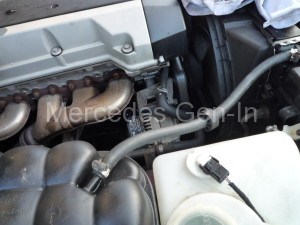
The leak itself is caused by the internal casing design that is leaned at an angle, this allows localised pooling of oil fling from the timing chain and subsequent leaking from the poor seal area between head, block and upper timing cover. Bearing this in mind, knowing that the leak is not a ‘pressurised’ leak from an oil-way or gallery, it is only oil escape to atmosphere by a poor external seal. Although not serious and frequently the amount of oil lost in everyday use is slight, it still makes a mess and is annoying at the very least.

A couple of US guys had tried with some success the sealing of this area externally and I decided this was what I was going to try for myself as there is really nothing to lose – it would either work or it wouldn’t !  Worst case would be the timing cover seal would need replacement to fully stem the leak, so nothing really lost in trying this method first.

I set about gaining access to the troublesome area, on the R129 Mercedes SL 320 access is made possible by removing the air box and plastic cam chain housing decoration panel only. Once these are removed, clean down the area with Gunk or Jizer de-greaser. Use a selection of bent pieces of wire and rag to clean the area thoroughly, raking out any oily crud that lies in the seam between the upper and lower covers. When you are satisfied the area is spotless and clean (the cleaner and more time you spend de-greasing here, the more chance of the repair working) Finish off by either a tooth-brush over with methylated spirits or carb cleaner.

M104 Engine Oil Leak Timing Cover P1010925


Use a gas blow lamp to apply localised heat to ‘dry off’ and warm the area for a coupe of minutes, take care when doing this that you don’t damage any other components, although the area is quite clear of any combustibles, cables and plastics, just remember to fire-watch! Choose a good quality RTV silicone sealant, high temperature and rapid curing. Using the supplied nozzle on the RTV tube, cut to its smallest hole, inject the sealer sealer into the area cleaned. As the silicone builds, squidge it into the gaps with your thumb working it into the seam and corner area of the join. Apply more sealant and push it into the corners with a small wooden stick (Coffee stirrer) and really work the area well. Now apply the final squirt and smooth the area off, neatening as much as you can without disturbing the main blob of sealant, if you are particular how it looks.

Mercedes SL Timing Cover Oil Leak 
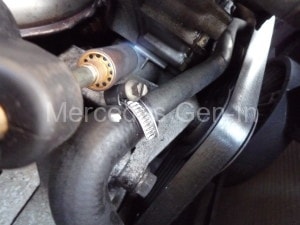
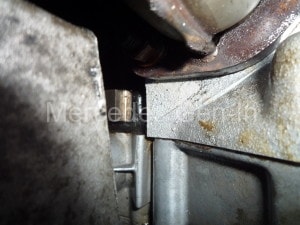
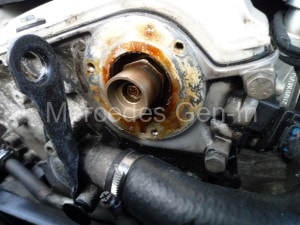
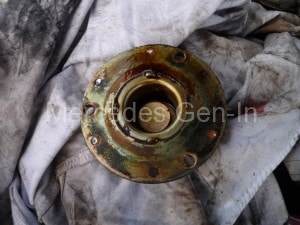
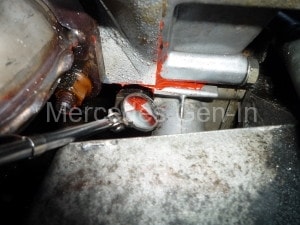
While the plastic front cover was off I noticed a leak from the lower edge of the variable valve timing clutch on the end of the timing cover. I removed the three cap head screws that fix it to the cover and remade the gasket, clearly this original gasket had hardened and was allowing oil seepage down the front face of the timing cover. Cleaning the finished front area as much as possible to allow monitoring of any further oil leaking over time, was in order before leaving the RTV silicone sealant to fully harden for the rest of the day. Re-build the front cover and air box to complete the job.

Mercedes SL VVT Solenoid Oil Leak

Mercedes SL 320 VVT Solenoid Oil Leak

I have now monitored the leakage for a day or two now and thus far it has not returned. I was unsure if most of my leaking was down to the VVT clutch gasket or the more complex seal point on the timing cover. However and whatever has been rectified in this operation has currently stemmed the oil flow from the front of the engine, it will be interesting to monitor the situation over the next few months and see if it returns, but as of now I am pleased with the outcome, for what was basically very little effort. P1010930 P1010931