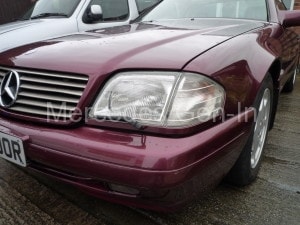
Here you can see my Christmas purchase of a 1996 Mercedes SL 320. This is set to replace the E320 that was damaged and written off a couple of years back, when an oncoming driver decided that there was not enough room on their side of the white line and for no reason decided to drive in mine, running me off the road. When I went to view the SL I noticed that the near side headlamp was heavily condensated inside and the lamp reflector had just begun to deteriorate within.

It was the first job that I had on the list as it detracted to the overall appearance (and it bugged me). It was quite a simple task, although needed some care when removing the glass lens from the housing. As you can see from the photograph above it was a cold day when I tackled this one!!
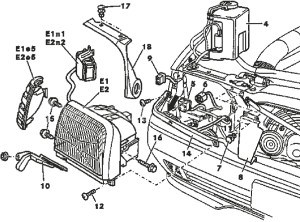
Firstly to remove the lamp raise the hood/bonnet and remove any trim pieces from the radiator side of the lamp body. Reach inside the inner wing corner area from inside the engine bay and release the clip on the indicator lens and pull this out from the front. It locates and slides into the outer side of the headlamp body, remove the indicator lamp housing completely by pulling off the electrical connector and placing the unit in a safe place.
Inside where the indicator has been removed, on the headlamp you will see 2x 8mm hex head self tapping screws fixing it to the front panel, remove these. Tilt back the headlamp wiper nut cover and remove this 8mm nut, carefully pull off the wiper arm and jet assembly. Remove the washer hose from the white protruding fluid coupling.
Undo the two cross head self tapping screws that attach the lower lamp trim piece, one to the bottom corner (bonnet/hood edge) and the other inside on the wind edge where the indicator was removed. Pull the trim piece over the wiper shaft and let it hang down away from the work area. Do not remove it from the rubber trim section as this is a nightmare to reattach to the trim piece!
Now working from the radiator side remove the single 8mm hex head long self tapping screw from the middle of the lamp side. (This is located in a larger hex plastic adjuster assembly, do not change the position of this outer part as it will alter the lamp position/aim)
Pull the lamp forward disconnecting both the square electrical connector and purple vacuum adjuster hose. The lamp should be free to remove from the vehicle.
 Once you have the lamp removed, the lens glass can be removed by firstly removing the L shaped rubber bonnet/hood seal from the outer case by pulling the centres of the plastic rivets that hold it to the lamp body. Once removed you will see 4 clips reaching from the glass lens housing to the main body, 2 on top and 2 underneath the headlamp assembly. Using a paint scraper or similar tool lever each clip up just enough to push the housing apart. Work your way round to release all four clips then withdraw the lens away from the main body. You will now see the lamp seal in its groove. This can be removed and cleaned before reassembly. You may now carry out any repairs you require inside the lamp before reassembling and refitting the lamp housing.
I repaired a hole in the front of the lens caused by a road flint or small rock. To do this I cleaned the lamp glass on the inside and dried all components with a hair dryer. I then mixed a small quantity of epoxy resin (Araldite). On the outside of the glass I placed a small piece of Sellotape over the hole and lay the lamp glass on the table, inside facing upward. I then used the two part epoxy to fill the hole on the back of the lamp. As most glass ‘hole’s in such a way that bursts a larger piece out of the back than the damage on the front, it makes a perfect repair surface profile.

Once the epoxy has dried, do final cleaning to the lamp internals, do be aware that if you try to clean the reflector in any way, it will scratch/mark and if it has begun to deteriorate the silvered coating will come off very easily and leave you with a lamp without a usable reflector, best left alone if at all possible! Reassemble the lamp and refit to the car using the same method as removal.