
Here is a quick fix that will restore your failing or ‘wobbly’ headlamp back to a working condition. If you notice that the headlamp leveller is not working correctly and on inspection the internal reflector seems loose and ‘disconnected’ from the lamp body – it probably is! Caused by the internal ball and socket arrangements breaking that secure the reflector to the adjustment threaded rods.
If you are lucky the ball and socket arrangement will have just popped out and you should be able to snap them back in place once you can see exactly what you are doing. The best policy is to remove the lamp unit and work on it at the bench or table.
Usually there is only two or three fixings that hold the lamp into the vehicle body and removal is in many cases quite simple (At least on the R170 SLK we have here)
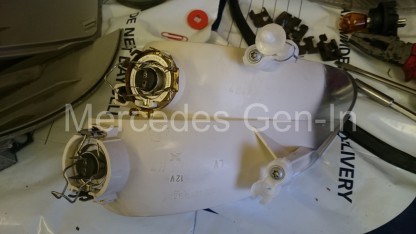
On removing the bulb access panel you should be able to see the issue. There are three attachment points to the reflector, looking from the back of the right hand lamp there is a ball and socket on the vacuum leveller adjuster (could be electric in some models) to the lower left and two points of attachment top and bottom on the right, these are usually a cream/white nylon part, the socket of which is screwed to the rear of the reflector. Its worth noting that if when you shake the lamp you can hear broken parts inside there is likelihood that one of the sockets has become brittle and broken. As far as I know, even though these small plastic socket parts look to be replaceable, I have yet find a source. It would mean in most cases a replacement lamp to rectify the fault, used or otherwise its an expensive fix for an otherwise serviceable lamp.
On the R170 SLK once the indicator unit has been removed, by slotting a screwdriver down the 10mm hole at the rear of the lamp body and flexing the latch access can be made to the steel spring clips that hold the polycarbonate lens to the grey lamp body. Once these clips have been removed the lens and body can be carefully levered apart. The front chrome surrounding lamp trim simply pulls forward and allows full access to the reflector.
Note at this point that if you touch the shiny chrome reflector with your fingers it will mark, equally if you try and rub it with a cloth, even light polishing will damage the reflector. I have found that using a fresh pair of vinyl un-powdered gloves prevents any handling marks and is a great aid to working with the reflector parts as it prevents any damage.
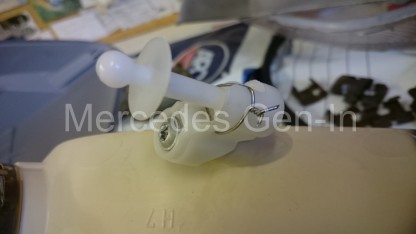
Once apart the reflector pivots can be inspected, it will be clear if just pushing the unit back together will be your fix or if further intervention will be needed if you spy broken or missing parts. In the case of the SLK lamp, one of the nylon sockets had lost one of its three retaining ears allowing the ball to spring out of place very easily. What was required was to retain the ball and push it into contact with the two remaining ears, giving a secure and durable mounting to the broken part.
Taking a small jewellers screwdriver (app. 1mm diameter) heat it with a cigarette lighter and melt two small holes in the plastic socket, next to the point where it fixes to the reflector body with the single torx screw. The hole position should be so that they are level with the top flat edge of the nylon ball once it is fitted to the socket. Thread a paper clip through the two holes and enclose its free ends around the ball whilst holding everything tightly in place. With pliers twist together the two ends, applying tension to the socket and bridging the paperclip diagonally across the top flat surface of the ball where the retaining ear is missing.
Reassemble the lamp, threading the repaired parts back together, pushing it home into the receiver of the vacuum or electrical adjuster. If possible always move the sockets around so that the broken one ends up on the headlamp leveller as this can be snapped into place more easily on reassembly than the other attachment points. Often the sockets are the same moulded part fitted to different points on the reflector and this allows them to be positioned so that any repaired socket is under the least supporting stress (leveller position).
Rebuild the lamp ensuring to use a light smear of clear sealer on the headlamp lens to body gasket if it looks to be leaking or allowing any dirt build up under the lens lip. Clip back all the lens fixings and refit the lamp to the vehicle. Adjust the beam pattern to the specifications required by rotating either the up/down or left/right adjusters, be sure to make any adjustment with the instrument leveller control set to ‘0’.