Technical Vito W639

Technical Vito W639

Vito (W639) Rear Coil Spring Replacement

If ever there was a job that took more time to consider than actually physically tackling the task then this is it!

Mercedes Vito W639 Rear Spring Replacement 1

Replacement of the rear coil spring on the W639 Vito is ‘super-easy’ and should not be a problem for even the most inexperienced home mechanic, saving you a great deal of money in the process.

Mercedes Vito W639 Rear Spring Replacement 8

First jack up the rear of the vehicle from the sill end buffer (jacking point) nearest the rear wheel with the broken coil spring. Remove the road wheel and place a stout wooden block beneath the swinging arm, directly under the spring cup and carefully lower the vehicle body on the jack. Lower it so that the swinging arm transfers some of the weight of the vehicle onto the wood. Now remove the lower shock absorber bolt (21mm socket and bar) from the swinging arm (or rear radius arm if you prefer that term).

Mercedes Vito W639 Rear Spring Replacement 3

Jack the vehicle once again, up and away from the wooden block. Once raised, use a lever if needed to pry down the rear edge of the swinging arm to release the spring from the upper cup/bump stop. The spring will come out easily, usually along with the rubber cushion mounting pad, either top or bottom as it feels the need.

Mercedes Vito W639 Rear Spring Replacement 5

Simply re-fix the mounting pad to the new coil spring, lever down the swinging arm once more and insert the new spring. Place the wooden block under the swinging arm again and lower the vehicle carefully with the jack to take weight onto the block, beginning to compress the spring to a point where the lower shock absorber eye is parallel with the threaded portion in the arm so the bolt can be easily replaced and retightened.

Mercedes Vito W639 Rear Spring Replacement 6

Check the ‘seating’ of the spring and if all is well – replace the road wheel and put the kettle on.

The Sachs OEM replacement springs (Sachs part number 627221840) that were used in this instance to replace the ‘stock springs’ were made of far heavier weight steel stock and did not taper in thickness towards the extremities of the coil ends as the original did. Assuming that because of this the new springs were rated as heavy-duty they would be best changed in pairs, its a simple job and there is really no excuse to change just one and have odd springs fitted on one axle – for peace of mind always change them in pairs!

Mercedes Vito W639 Rear Spring Replacement 7

Sprinter >2006 Cutting out and None Start – A Few Notes – Causes and Things to Check


Sprinters up to model year 2006 share some similarity with the later model when it comes to ‘mysterious’ cutting-out and repeated intermittent non-start issues, this article covers specifically the earlier 4 cylinder Sprinter >2006, although some of the items covered are also common to the later model. The points covered here are some common failures and do not represent an exhaustive list of issues that may be causing problems with your vehicle. You may find at least some clues that help towards your own fault finding from the information given below.

To start a Mercedes CDI diesel engine, there must be a set of conditions met that the ECU requires to initiate running the engine.

Fuel

The fuel rail must provide an absolute minimum cranking pressure of between 250 and 300 Bar, any less and the ECU will not allow the engine to start. Causes for this pressure not to be maintained could be due to internally leaking injectors, faulty fuel pressure regulator or its O-ring seal (see covering article here), faulty rail pressure sensor, High or Low pressure fuel delivery pumps. Equally any air resident in the fuel delivery system will hamper starting. Usually the seals used to terminate the clear plastic pipes from the low pressure to high pressure pump give rise to air bubbles visible in these pipes, which is not a good sign and will need to be further investigated. It is worth noting that unlike any circulating diesel feed system, the fuel exiting the high pressure pump is not self bleeding and any air held within the rail will take some time to clear should you open the system to atmosphere (for instance if you do a poor job of pre-filling a new fuel filter at service).

Sprinter >2006 Cutting out and None Start 1

It is worthy of note that the diesel pressures within the system of a running engine could be in excess of 1,600 Bar that is very capable of doing you some damage! – always use caution when inspecting and working on running CDI fuel systems.

Should at any point the measured pressure drop within the fuel rail, say if there were a serious ‘high-side’ leak or if you were to open a feed union to an injector the ECU would instantly cut the fuel delivery and shut down the engine as protection. Equally there is overpressure protection for the fuel system, where if it ever rises beyond a predetermined ‘safe limit’ the ECU operates the shut off valve on one of the three piston element heads of the HP diesel pump thus dramatically reducing delivered pressure to a safe level. This shut off device is the large tower like solenoid that extends from one element (there are three) of the high pressure pump, it has a two pin electrical connection and loom plug at its end.

Sprinter >2006 Cutting out and None Start 2

‘Live data’ is the best way of determining fuel system pressures and the operation of the engines attached control devices, but obviously in a running engine. You will have to inspect the fuel system of a dead non-start engine using the functional details above as a guide. Unless you have a major fuel leak or the delivery pumps have catastrophically failed, fuel related problems are not often sudden and tend to show themselves as intermittent transient problems for a period of time before they get to the stage where the vehicle will no longer start. More often non-start problems arise from the electrical system.

A really useful link on the Sprinter fuel injection system here

Electrical

For the most part the electrical system will be the major cause of any none or poor starting issue. There are two main timing sensors fitted to the engine: Crank Position Sensor and Camshaft Position Sensor.  These relay engine positional information to the ECU so that it can determine when to accurately fire the injectors so that the engine can run.  Any synchronisation errors that occur between these two primary angle measuring devices will cause an engine to slip into limp home if running, and if stopped, the engine will not restart until it gets valid signals from both.  The cam position sensor is mounted on the top rear of the valve cover slightly to the left of cylinder 4 (rearmost looking in) and gets its positional signal from a lobe on the cam. Due to its location directly above the exhaust manifold, it is subjected to regular extremes of heat and daily cycles of hot and cold.  It is not uncommon for this sensor to exhibit thermal problems, where a cold engine will start and run fine, then once warm, would falter or not restart until cool. Replacement of this sensor is quite cheap – sub £30, and even if it does not cure any problems you may have, it is best to ‘eliminate it from enquiries’ if there are any synchronisation errors recorded.

The crank sensor lives on the block seam of the engine and gearbox bell housing, just above the starter motor, it picks up its pulses from teeth on the flywheel. Generally it is quite reliable – if you have problems starting the vehicle it is often a good quick check to watch the tacho needle flick slightly as you crank the engine. If it flicks, then this is normally a sign of an impulse from the sensor reaching the ECU. If however the tacho needle does not flick on spinning the engine over, then suspect crank position sensor problems.  It is possible this sensor can suffer from thermal problems but not as frequently seen as with the cam sensor.

The connecors and cabling to the injectors are important things to check, if any connector to any single injector becomes disconnected, then the engine will not run, equally if one injector solenoid becomes disconnected when the engine is running the engine will die.  It is a known problem for the injector wiring loom that lies under the black plastic cable tray beneath the fuel rail to have issues whereby the injector cables rub and abrade against the metal surface of the alloy rocker cover over time. Once the cable insulation weakens and any of the conductors short to ground, it has a similar effect to disconnecting an injector – the engine will stop. You can cut strips of plastic bottle and slide them under the cable tray to insulate the cable from the alloy cover to test if you suspect this is an issue.

Sprinter >2006 Cutting out and None Start 3

The injector solenoid wiring can be easily checked for continuity and insulation to ground by removing the injector connectors and metering out the wires directly to the ECU under the dash.  The injectors connections are the large gauge wires on the push in connector to the far right looking at the ECU under the dash.  Release the ECU retaining springs to drop it down into the passenger footwell to make it easier to work on.

If you detect anything untoward with the wiring during your continuity checks, the first obviously place to look for broken cables and damage is to cut open the outer insulation on the section of loom that drops from the engine, over the left engine mount on its way to the rear of the battery shelf area. Here you will find the most mechanically vulnerable selection of sensor and engine management cables – be sure to check here first. Note: although not related directly to non starting, as previously mentioned in other posts, the turbo control, vacuum solenoid valve loom, hooks round the front of the radiator from behind the passenger headlamp and travels across the front crossmember. It passes the horn onward to the vac valve situated under the air box. Commonly this loom is found to be damaged or broken in the area where it snakes past the headlamp tinwork on the front panel. See here for more related fault finding detail.

If all fuses prove good, and the engine cranks but will not fire, then take a look at the ECU connectors. Remove each of the plugs and check that water, usually from a poor windscreen seal or rust-rotten screen surround, finds its way onto the ECU.  Over time the fine connectors and pins start to corrode and all manner or electrical issues ensue.  To remove the ECU plugs with lever tabs, push in the small locking pip just behind the upright grey lever, on the black part of the shell. Then bring the grey lever down over it and continue to move the lever to the horizontal in an arc, this will eject the connector from the multiplug.

Sprinter >2006 Cutting out and None Start 4

I have had instances where intermittent cutting out has been due to dry joints on the PCB inside the ECU alloy box.  To check this out – once all the cables have been removed undo the six torx head screws holding the cover plate onto the pressed aluminium ECU box. Once removed, lift off the plate and remove the PCB assembly from the pressed case.  You can now inspect each pin solder joint with a magnifying glass to look for a broken or poorly soldered/corroded joints.  Often careful re-soldering of the suspect joint will provide a suitable repair, obviously if its corroded rather badly, the chances are that the multilayer board is damaged and at worst a replacement ECU could be needed (very rare).

Sprinter >2006 Cutting out and None Start 5

If you ever get any code reader messages relating to ‘capacitor voltage low’ (Autel or none-Star diagnostic tools) I have always found these to be a good indication of faults connected to the CPS, and after replacement or repair to its connecting wiring, it has always fixed the problem which was originally accompanied by an engine that will just cease running for no apparent reason. My first advice would be when the only recovered code is one relating to ‘capacitor low’ then more often than not – its related to the CPS and well worth a try first!

Sprinter >2006 Cutting out and None Start 6

Notice the relay on the right has a ‘pushed-in’ terminal

If the starter does not crank at all, then it is good to understand that the start command is issued by the ECU and not the key!  This is because the ECU monitors the key security module and will disallow starting unless a valid key (with correct internal chip) is being used in the ignition switch.  Any problem that displays ‘KEY ERROR’ in the dash LCD module is connected to using an incorrect key, a broken or missing key code chip, or a problem with the key reader detection coil (around the ignition switch) or the key security module itself (SKREEM).  If the key signal is valid the start signal will be actioned by the ECU. In auto versions it will also look to see if the transmission is in neutral or park.  Once an ECU start output is active, the start relay is commanded.  It lives beneath the driver seat, accessed through the flip off side panel, once caused to pull in – this puts voltage onto the coil of the starter motor, via a black with yellow tracer wire in the loom.

Sprinter >2006 Cutting out and None Start 7

more clearly – the pushed in relay contact

I have seen odd instances where because of the nature of the size of the relay spades, they ‘give-way’ when pushed into the fuse board receptacle, pushing them up inside the relay case – misaligning the internal switch contact faces. Often a root cause of intermittent starting/cranking with just a ‘click’ – should obviously the battery and starter cabling prove to be in good order.  The dead giveaway here is if the headlamps stay bright and hardly dip when an attempt to crank is made, if it is not the relay and good voltage is reaching the stud terminal on the starter solenoid, then the chances are the solenoid itself is faulty and the starter would need replacement.

Sprinter >2006 Cutting out and None Start 8

Inside the relay – the silver plated contacts are pushed out of alignment making for poor or high resistance switching

You can of course quickly test the starter by ensuring the vehicle is out of gear and then shorting the large 13mm power stud/nut on the starter to the smaller 10mm nut on the solenoid with a robust old spanner or jump lead clip. If the starter is healthy, then the motor should crank. If not, then you are most probably looking at a faulty starter motor.  If it does crank, and will not turn over from the key, then you will have to investigate why following the information in the above text.

Sprinter >2006 Cutting out and None Start 9

I hope the above gives you a little information to help you fault find a few little known anomalies with the Sprinter and hopefully it leads to identifying  your starting issues.


Mercedes Headlamp Adjustment Repair – Most Models


Here is a quick fix that will restore your failing or ‘wobbly’ headlamp back to a working condition.  If you notice that the headlamp leveller is not working correctly and on inspection the internal reflector seems loose and ‘disconnected’ from the lamp body – it probably is!  Caused by the internal ball and socket arrangements breaking that secure the reflector to the adjustment threaded rods.

If you are lucky the ball and socket arrangement will have just popped out and you should be able to snap them back in place once you can see exactly what you are doing.  The best policy is to remove the lamp unit and work on it at the bench or table.

Usually there is only two or three fixings that hold the lamp into the vehicle body and removal is in many cases quite simple (At least on the R170 SLK we have here)

Mercedes Headlamp Repair 1

On removing the bulb access panel you should be able to see the issue.  There are three attachment points to the reflector, looking from the back of the right hand lamp there is a ball and socket on the vacuum leveller adjuster (could be electric in some models) to the lower left and two points of attachment top and bottom on the right, these are usually a cream/white nylon part, the socket of which is screwed to the rear of the reflector.  Its worth noting that if when you shake the lamp you can hear broken parts inside there is likelihood that one of the sockets has become brittle and broken.  As far as I know, even though these small plastic socket parts look to be replaceable, I have yet find a source. It would mean in most cases a replacement lamp to rectify the fault, used or otherwise its an expensive fix for an otherwise serviceable lamp.

On the R170 SLK once the indicator unit has been removed, by slotting a screwdriver down the 10mm hole at the rear of the lamp body and flexing the latch access can be made to the steel spring clips that hold the polycarbonate lens to the grey lamp body. Once these clips have been removed the lens and body can be carefully levered apart.  The front chrome surrounding lamp trim simply pulls forward and allows full access to the reflector.

Note at this point that if you touch the shiny chrome reflector with your fingers it will mark, equally if you try and rub it with a cloth, even light polishing will damage the reflector.  I have found that using a fresh pair of vinyl un-powdered gloves prevents any handling marks and is a great aid to working with the reflector parts as it prevents any damage.

Mercedes Headlamp Repair 2


Once apart the reflector pivots can be inspected, it will be clear if just pushing the unit back together will be your fix or if further intervention will be needed if you spy broken or missing parts.  In the case of the SLK lamp, one of the nylon sockets had lost one of its three retaining ears allowing the ball to spring out of place very easily.  What was required was to retain the ball and push it into contact with the two remaining ears, giving a secure and durable mounting to the broken part.

Taking a small jewellers screwdriver (app. 1mm diameter) heat it with a cigarette lighter and melt two small holes in the plastic socket, next to the point where it fixes to the reflector body with the single torx screw.  The hole position should be so that they are level with the top flat edge of the nylon ball once it is fitted to the socket.  Thread a paper clip through the two holes and enclose its free ends around the ball whilst holding everything tightly in place.  With pliers twist together the two ends, applying tension to the socket and bridging the paperclip diagonally across the top flat surface of the ball where the retaining ear is missing.

Reassemble the lamp, threading the repaired parts back together, pushing it home into the receiver of the vacuum or electrical adjuster.  If possible always move the sockets around so that the broken one ends up on the headlamp leveller as this can be snapped into place more easily on reassembly than the other attachment points.  Often the sockets are the same moulded part fitted to different points on the reflector and this allows them to be positioned so that any repaired socket is under the least supporting stress (leveller position).

Rebuild the lamp ensuring to use a light smear of clear sealer on the headlamp lens to body gasket if it looks to be leaking or allowing any dirt build up under the lens lip. Clip back all the lens fixings and refit the lamp to the vehicle.  Adjust the beam pattern to the specifications required by rotating either the up/down or left/right adjusters, be sure to make any adjustment with the instrument leveller control set to ‘0’.

Adjusting the (W639) Mercedes Vito Reverse Lamp Switch


This is a quick overview on how to replace, or adjust, the reverse light switch on the Mercedes Vito W639. to address issues I was having where my reverse lights weren’t coming on all of the time.

If I wiggled the gearstick around the reverse/neutral position, they would flick on and off intermittently. So the switch was (sort of) working and I also knew the fuses/bulbs were okay. So I decided to try and check the reverse light switch adjustment.

The switch is actually located inside the vehicle about 6 inches below the gear lever, behind the lower facia. To actually get to it wasn’t too difficult. The first thing to do was to remove the lower centre panel, this is only held on by 2x torx screws (T25 in my case) on each side.

Mercedes Vito W639 Reverse Lamp Switch Adjustment 1

Fig.1

Once that panel was removed, I took out the ash-tray and removed the surround from around the gear lever. This is just clipped in and should pull free without too much effort.  This should now allow you access to the 5 torx screws (still T25) that hold in this console.

There are 2 lower screws at each side (Fig 2), 2 just inside and behind the gear lever enclosure (Fig 3) and one at the top left (Fig 4).

Mercedes Vito W639 Reverse Lamp Switch Adjustment 2

Fig. 2

Mercedes Vito W639 Reverse Lamp Switch Adjustment 3

Fig. 3

Mercedes Vito W639 Reverse Lamp Switch Adjustment 4

Fig. 4

Once these screws have been removed you should be able to pull the facia away from the dashboard. There are just 4 locating clips (2 on either side) now holding it in. NOTE: Only pull the console out far enough so that you can remove the plug from the rear of the cigarette lighter before fully removing.  When the console has been removed, you should now be able to see the reverse light switch to the right and below the gear lever (right-hand drive vehicles) Fig 5.

Mercedes Vito W639 Reverse Lamp Switch Adjustment 5

Fig. 5

In the next photos, I have tried to show what is supposed to happen when you select reverse gear.

The flat plastic ‘shelf’ is supposed to push up against a sort of ‘L’ shaped spring steel lever (Fig 6) which, in turn, pushes up against a small micro-switch which is then supposed to turn on the reverse lights (Fig 7).  In Fig 7, the reverse light switch has been removed for clarity just to show in detail the steel lever and Micro-switch assembly.

Mercedes Vito W639 Reverse Lamp Switch Adjustment 6

Fig. 6

Mercedes Vito W639 Reverse Lamp Switch Adjustment 7

Fig. 7

Once I had taken the switch off, I simply (and carefully) bent it slightly downwards so that it made contact with the flat plastic ‘shelf’ section on the gear linkage. Refitted the switch and tested. All worked well and in the traditional vein of the Haynes manual, refitting was the reverse of removal. Although I’ve just realised, I forgot to re-connect the cigarette lighter !

Pete Johnson.

The above article was submitted to Mercedes Gen-In with thanks to:
Peter Johnson of ‘Enhance With Vinyl’
www.enhancewithvinyl.com

Mercedes Sprinter Clutch Replacement (T1N, NCV3, VW Crafter and other MB)


Clutch replacement on any vehicle can be an expensive job, especially if you are entrusting the job to a main dealer.  Although large scale and a little mauling, clutch replacement on Mercedes models can be well within the capability of a competent DIY’er with only a limited number of tools.  In this post we shall look at the replacement of the clutch mechanism (including Dual Mass Flywheel DMF) on the Mercedes Sprinter – both older and newer models.

Mercedes Sprinter / Crafter Clutch replacement

There are several important details often overlooked about the Self Adjusting Clutch mechanism or SAC, that the installer has to be aware of so that things go smoothly.  You will no doubt have read many horror stories on the web of people installing SAC clutch units only to find that on re-assembly they have no functioning clutch, then having to take it all apart again to do it properly!  The first thing to understand is how the clutch actually self-adjusts over its life and in this understanding it will allow you to assemble things in the correct manner, so when you put that last bolt in place you are certain things will work as they were designed.  If you are fitting used components, such as a second hand DMF (flywheel) or even a complete used clutch, this knowledge is ever more important.  You would also additionally need to know how check this if you were stripping and replacing the original clutch and flywheel from an engine only to replace it later, say if you were replacing a leaking rear crank shaft seal for instance.

You will remember from days of old that clutches on older vehicles used to have a different bite point as they aged, either right at the bottom or top of stroke depending on design.  This is not the case today with advancements in clutch technology.  Mercedes clutches and other vehicles too, now have circular adjusting mechanisms built into the cover plate and spring that move to compensate as the clutch wears, maintaining the release spring pressure and finger position.  This means that as a SAC clutch ages, it maintains the same spring operating position and ensures a constant actuating force to engage/disengage the clutch over its life.  Indeed it is almost impossible to tell if a modern clutch is ‘new’ or only ‘weeks from failing’ by the pedal position and feel alone – all thanks to the SAC.

When you purchase a new clutch kit you will almost always find that the clutch has been ‘set’, and is ready for installation. However it is always best to check that things are correct before fitting as I have known due to rough handling even new cover plates ‘spring’ into a full adjustment position – clearly fitting this as-is would result most probably in a non functioning clutch.

Mercedes SAC Clutch

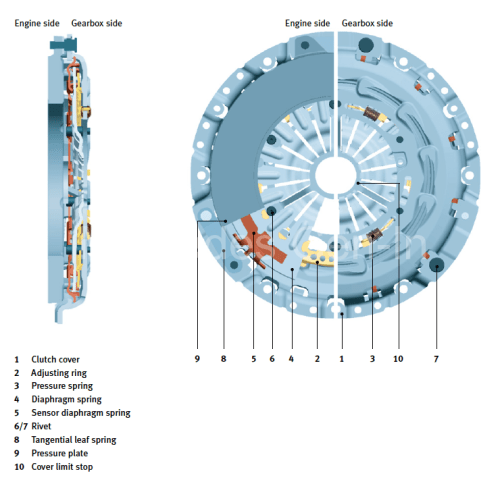
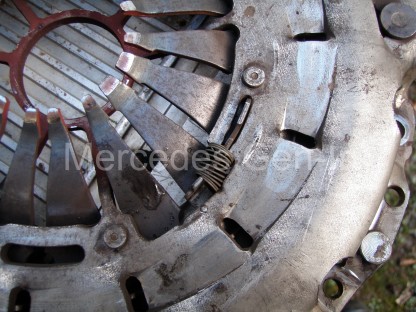
From the illustration above you will see the cover plate/spring assembly has an adjustment ring. (2)  Simply put, this circular ring is allowed to rotate if required a few degrees when the diaphragm spring is fully compressed (when the clutch is operated) Its rotational resting position is controlled by the combined action of a sensor diaphragm spring (5) and the main diaphragm spring (4), allowing the plate to slide round slightly, facilitating changing the pivot point of the main clutch springs as the driven plate wears. There are three small springs that pre-load the adjusting ring so that as the clutch wears the adjustment ring is forced to rotate slightly to drive what is in effect a ‘wedge’ into the forming clearances of the cover plate diaphragm spring at its pivot point, thus allowing clearances to be ‘auto adjusted’ within the installed cover plate.  More information about the SAC from LUK if you wish to view here.

The adjustment ring’s spring position can be seen to be fully extended on this worn clutch cover plate below, the photograph below that shows the adjustment ring in ‘set’ position, this is how the clutch needs to look before fitment. Always check this before installing the cover plate, even if just out of the box!  There are many expensive tools used for correctly setting the adjustment of the pressure plate once installed on the vehicle, whilst these are great to own, unless you fit clutches every day it is hard to justify their purchase, this post outlines how it is possible to carry out this work without the special setting tools.

SAC cover plate showing adjustment ring spring positions for a worn clutch

Mercedes clutch SAC adjustment ring spring set position

If you are using a used clutch, or simply refitting your original plate, it is important to check or reset the adjustment ring to the ‘set’ position shown in the photograph directly above. This can be achieved in a press used between the stamped steel cover plate edges and the diaphragm springs.  If you do not have access to a means of compressing the diaphragm springs so that the adjustment ring can be counter rotated and reset, you may wish to read on, but use great care – as there is a fantastic amount of pressure behind those diaphragm spring fingers and a truly huge amount of force is needed to compress them!  The following is an emergency measure, only to be used to get you out of trouble and is definitely not by any means a recommendation.

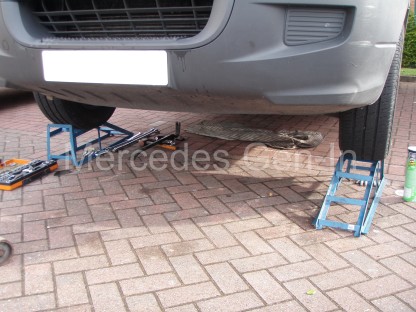
On a solid driveway, place a hydraulic trolley jack under the rear axle of the vehicle and raise it enough to fit the cover plate, supported on three stout short wooden blocks of the same size, resting on the flange/outer lips of the stamped steel plate only, NOT the pressure plate (form the wooden blocks into a triangular formation).  Using a very large socket that will generously cover the hole in the centre of the diaphragm springs, align this with the axle beam or lower shock absorber mount – use solid wood packing as needed.  When in position bring down the jack ‘very slowly’ to allow the axle weight of the vehicle in controlled contact with the socket via the wooden packing, depressing fully the diaphragm spring, almost to the cover limit stop. (shown in cut away diagram above)  Now carefully rotate the adjustment ring anticlockwise with a stout screwdriver until it rests fully against its stop and the three small springs are fully compressed.  Once achieved, jack the vehicle once more and remove the cover plate that is now set for installation.  Throughout this procedure please consider your own safety at each step of the way!

2005 Sprinter T1N Gearbox Removal

Now you can begin to remove the gearbox and fit your clutch.

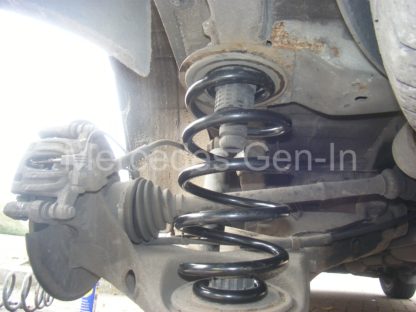
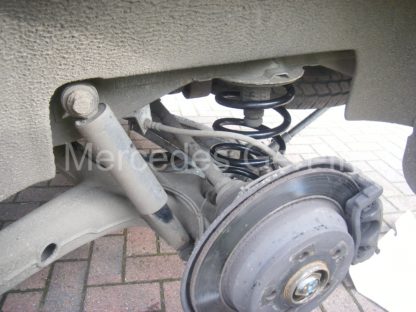
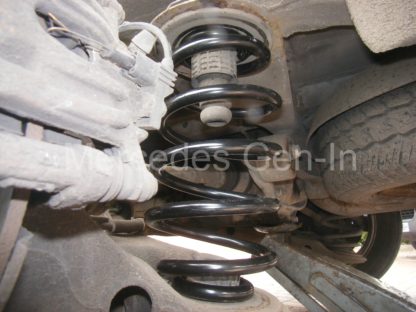
Working from ramps with additional additional 4-6 inch raising blocks if you have them, is the best way to achieve enough space to work comfortably around the gearbox, leaving yourself enough room to manoeuvre freely and eventually remove the gearbox from beneath the vehicle.  I always jack the vehicle onto ramps, this allows you to place one ramp forward and the other facing rearward, thus locking the vehicle from rolling either way to supplement the handbrake and rear wheel chocks.

Disconnect the battery before starting any work, as you will no doubt disturb the starter motor during the job. Also on later Sprinters,  W639 Vito and VW Crafter models remove the complete air box from under the bonnet, this prevents any strain on the plastic components, as the engine naturally tilts backwards when the gearbox support is removed.

Sprinter hoses and gear cables held out of the way

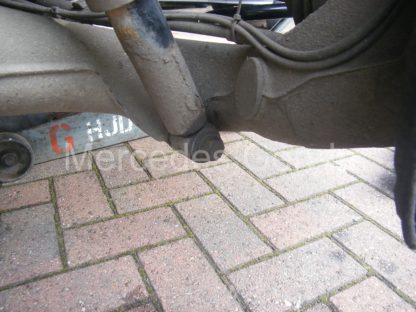
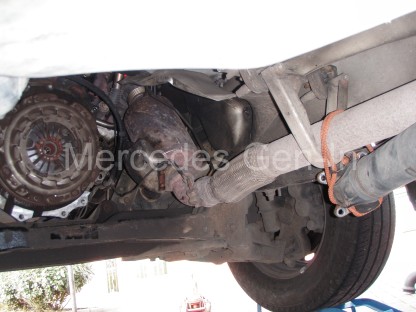
Use a trolley jack to support the plate that supports the back of the gearbox near the output flange.  Undo all the bolts that hold the support plate to the chassis rails on either side, allow the jack to be lowered and removed. This will drop  the rear edge of the gearbox down a little so that the rear gearbox mounting pin can be removed and the support plate taken out from beneath the vehicle.

Using a 16mm socket remove the four propshaft flange bolts from the gearbox output shaft.  You will now have to remove the drop protection ‘horse-shoe’ brackets and the two centre bearing bolts to allow you to drop the prop sufficiently to allow you enough flex for it to be moved out of the working area to one side of the vehicle.

Sprinter with DMF removed

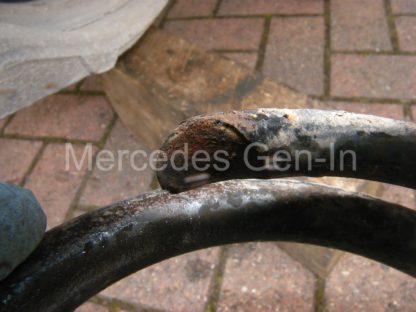
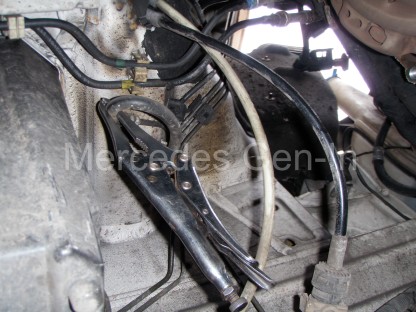
Now remove the gear selector cables, make sure you mark the shaft positions in the plastic ball-ends (amount of insertion) before you release them and tie them to one side. Put a latex glove under the cap of the brake/clutch shared master cylinder, before clamping off the flexible clutch hose from the chassis to gearbox. With a small screwdriver or pick, detach the hydraulic connection retainer clip from the gearbox hose coupling, keeping this in a safe place.  Pull out the hose and again tie it out of the way of the working area.  Remove any electrical connector or plug and tuck them out of harms way.

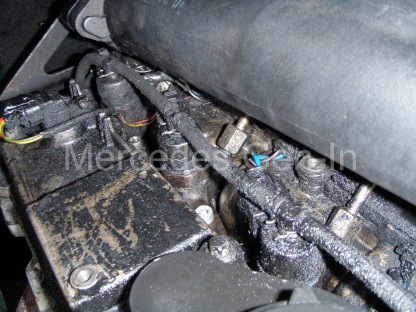
Now using at least a 24 inch extension bar and reverse torx socket remove all the ring bolts from the bell housing. There is no need to fully remove the starter motor, just let it rest in position.  It will be held in place by its thick cable. On T1N models up to 06, you will have to remove the exhaust support (2 x 12mm nuts) as this sits sandwiched directly behind the gearbox and will prevent removal unless fully removed.

Sprinter DMF Flywheel removed

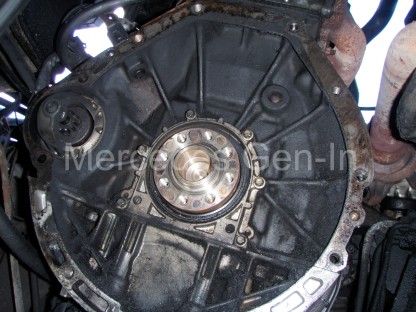
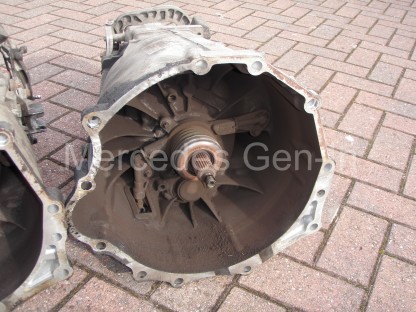
When you get to the last bell housing bolt, support the gearbox centre on the hydraulic jack, remove the final bolt. From the back of the gearbox pull, the casting should now separate from the engine block.  Manoeuvre the gearbox back and lower the jack. Take the gearbox from under the vehicle.  This is a great time to check for leaks or damage/wear to the selector mechanism. Checking the gearbox oil level is easier at this point too!

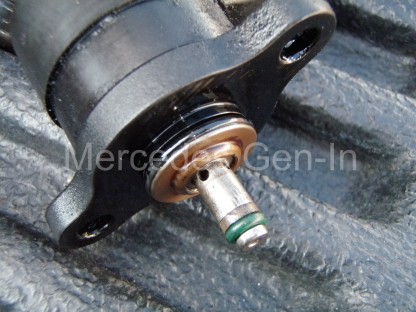
From inside the bell housing you can check the rotary smoothness of the thrust bearing, this is part of the release slave cylinder mechanism and cannot be replaced on its own. If you can afford it, always replace the slave cylinder when replacing the clutch, often if you purchase a complete kit it comes as a component part.

DMF Mercedes Sprinter Centre Bearing

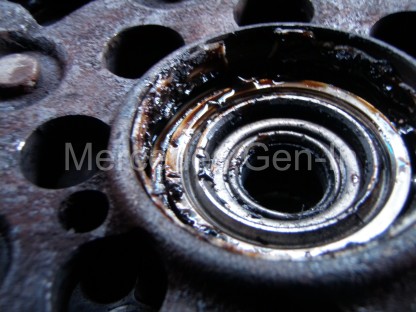
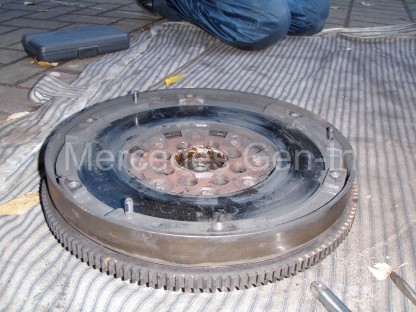
Always inspect the centre bearing in the DMF, if this is damaged it is not available as separate part from Mercedes only as part of the complete DMF flywheel! The bearing itself is a special construction of a blind roller bearing made by INA that acts directly on the input shaft end of the gearbox, this is concentrically inserted into yet another single row ball bearing race pressed into the DMF.

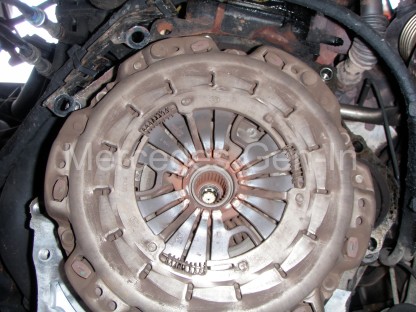
Remove the clutch cover/pressure plate from the DMF, locking the flywheel with a small crow bar or broad screwdriver on the ring gear. You may have to pry the cover off its locating dowels, be aware it is heavy and it could catch you by surprise and fall on you!  Once this is out, you can inspect the flywheel face for damage. The outer DMF section of the flywheel should only rotate independently about 10-15mm in each direction at its circumference in relation to the other fixed half, any more than this indicates the likelihood of a worn DMF.  If you decide to replace this, you will need a long, large torx bit to undo the eight flywheel mounting bolts from the crankshaft. Once removed pry the flywheel from the crankshaft, it sits on a single dowel peg and can take some working to and fro to remove it.   Always inspect the centre bearing in the DMF, if this is damaged it is sadly not available as separate part from Mercedes, only as part of the complete DMF flywheel!  The bearing itself is a special construction of a blind roller bearing made by INA, that acts directly on the input shaft end of the gearbox, this is concentrically inserted into yet another single row ball bearing race which is directly pressed into the DMF.

Replacement of all the parts is exactly as the removal, although be sure to reference the ‘set’ position of the clutch before refitting.

Sprinter gearbox inspection hole and bleed nipple >2006

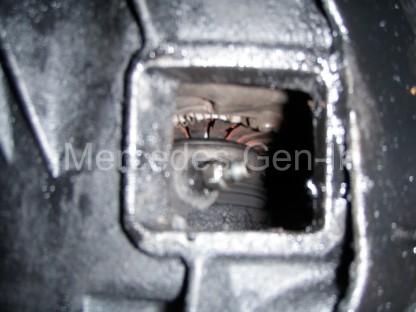
Bleeding the clutch system can only be achieved with a Gunsons EzBleed or other pressure bleeding equipment, no amount of pedal pressing, as you would assume similar to brake systems will not work – trust me, you will be very lucky to achieve success otherwise.  Once you have a good pedal feel and the slave cylinder can be seen to be pressing the diaphragm springs back and forth fully through the inspection hole, start the engine. Now press the clutch pedal several times, you should often hear a light clunk, this is the clutch adjustment ring finding its own position.  Select a gear and test the clutch, all should be well.  If for some reason it appears as if the clutch is not fully disengaging and baulking you from selecting a gear, check your work regarding air in the hydraulic system, if re-bleeding it proves to be good, then try starting the engine in gear, handbrake on, with the clutch down, this will often by inertia, force the adjustment ring from its set position to its new working position, a second pedal press should now settle it into its new operating position and you should have a good responsive light clutch.

VW Crafter Gearbox showing concentric slave cylinder and thrust bearing

I hope you have found this information useful.