
If you have a noise on your VW Crafter CR35 that could be best described as a ‘sticking hydraulic tappet’, a serious (and expensive) sounding, heavy rhythmic clicking from the top end – the chances are that it is nothing more than a faulty vacuum pump! In some instances it can be successfully diagnosed by ‘pumping’ the brake pedal several times while the noise is present with a running engine, often the noise decreases, indicating its relationship to the vacuum pump – though this is not conclusive in every case. Here is the noise perfectly recorded by someone on YouTube if you needed to refer to the sound your vehicle is making.
Stiction/wear of the moving diaphragm assembly within the VW vacuum pump on this model range is a common issue and a couple of hours work will restore your van to its former silent glory!
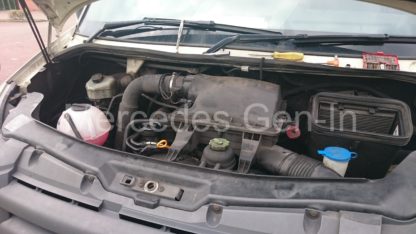
After undoing the induction hose clamp on the left hand side of the air box, uncouple the two sensors on the output side, slide off the battery starting terminal by releasing the clip and lifting it up and off the air box right side. lift up the front of the air box and release it from the two rubber fixing bungs. Release the oval induction pipe from the right side and remove the complete air box from the vehicle.
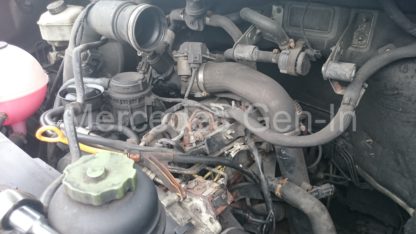
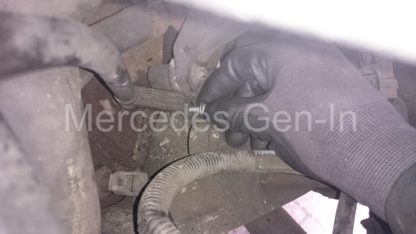
You will need to identify the vacuum pump which lies on the right side (looking in) of the cylinder head, if you need to, follow the hard black vac line from the brake servo to the pump. Although it only has two fixings – 13mm nuts – they are very difficult to access and will take some time and patience to remove and retrieve. You will most probably need to stand on a crate or small step to gain access to the engine bay as the lean in over the slam panel is often out of comfortable reach.
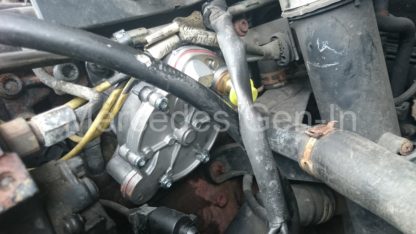
First unclip and remove the rigid vacuum supply hose from the brass spigot on the back of the vac pump, simply pull/twist and work this connection off and it will release. Just be sure to catch and replace the soft rubber inner sleeve at the push fit connection, as it often pulls out of the hose flare on removal. Tuck the pipe out of the work area toward the front of the engine and select a 13mm combination spanner. Remove the top and bottom fixing nuts on the vac pump base plate to cylinder head flange. The upper nut is hidden away down the back of the fuel lines and bleed off return, be careful how you work on this nut, as it is easy to damage the bleed off pipework or its unions. With some patience it will ‘free’ to a point where you can get your fingers to it for final removal. The lower nut is really no better sadly. The spanner has to be slid into position and worked through a very restricted arc to loosen and remove this nut. Neither upper or lower nuts will allow the use of a socket due to their location and oblique position under the body of the pump. As these two nuts are undone, the spring loading of the pump plunger will push the pump casting away from the cylinder head as you go, so take your time.
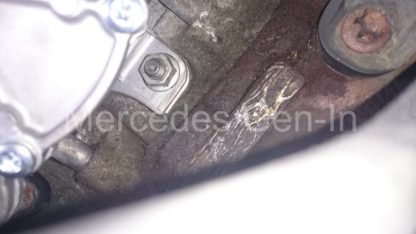
Lower dipstick tube fixing
With both fixing nuts removed, unclip the upper glow plug harness from the fuel lines and cut the selection of ties (3x) from the dip stick tube that hold a short loom section and the DC power tap that you previously removed from the right of the air box. Using a Torx bit, undo the single upper and lower dipstick tube fixing bolts, this will now allow enough ‘wiggle’ of the tube to allow the vac pump to be orientated and withdrawn from the side of the engine. If you rotate the pump about 90 degrees clockwise, once it is pulled off the studs, this is the best position to feed out the pump casting from the nest of wires and dipstick tube.
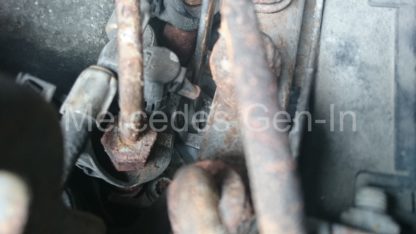
Upper pump bolt – restricted access
Lower pump bolt – restricted access
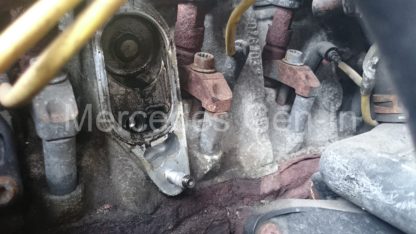
Refitting the pump is straight forward and almost a complete reversal of the above. After cleaning off the mating surface on the cylinder head, secure the new pump gasket with two or three blobs of silicone gasket sealer just to retain it as you feed the new pump back into position. Slightly wetting the rubber of the vac hose coupling will allow it to slip easily back onto the brass spigot. Once the engine is rebuilt check your work then start it, hopefully the annoying and overpoweringly loud clicking noise will be gone and once you have tested for good vac at the brake servo, by pumping the brake pedal and it feels normal, you can road test the vehicle.
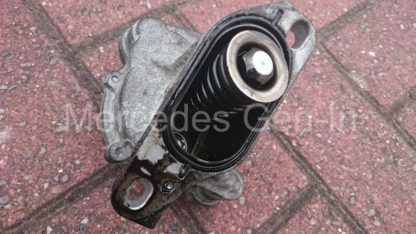
Post Mortem: The vacuum pump operates from a rod/actuator that runs on a cam lobe on the camshaft, on some of the earlier models of VW engine you can replace the short stubby actuation rod too while you have access to the area, but often it is the pump housing/body that is faulty and not the rod. If yours is a removable rod and you wish to replace it then simply pull this from the cylinder head and push in the new item.
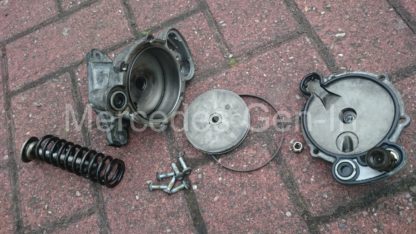
There are a couple of failure modes of this type of vac pump to consider, the first is the pump cylinder is quite large in diameter, 4 to 5 inches across and as the piston rod wears in its sleeve, this allows the piston to tilt over slightly causing it to ‘stick’ at its circumference on the cylinder bore during its spring loaded return cycle. It is this temporary sticking and subsequent release that can cause the clicking noise as the piston ‘jerks’ back to once again contact the rod that rides on the cam lobe. Obviously this sharp metallic noise travels along the camshaft and gives the impression that the noise is borne of a hydraulic tappet or valve gear component. The second failure mode is when the bushing on the piston actuator rod begins to oval or wear, this allows engine oil to enter the vacuum cylinder. There is no where for this oil to go so it remains inside the pump, hydraulically preventing a full return of the piston under spring pressure, this prevents the sprung loaded rod extending to its fullest stroke and causes a physical ‘clearance’ between the pushrod that runs on the cam – hence the clatter.
Here you can see in this example the internal parts of the old pump, dismantled so you can see the scoring to the vac pump bore, where over time the piston as been catching and scrubbing the surface. In the short video clip below you can just hear the noise the sticking piston makes as the pump is compressed, (the gulping noise in normal) imagine this amplified through the rocker assembly.
Aftermarket good quality spare parts are available for this item as it is common to a range of engines. You can expect to pay anything from £60 to £120 for a pattern part depending on source. EBay was half the price of a leading specialist discount car parts factor for the identical part! Part numbers are: VW 074 145 100 A VW 076 145 100 Pierburg: 722300690, VW 072 145 100 C.
EXELENT info
Many thanks Gary!
Glad it helped