
Mercedes Sprinter 2006-on and Volkswagen Crafter Clutch Master Cylinder Replacement.

Having recently replaced the clutch and slave cylinder on a Crafter CR35 with a LUK Rep-set, the driver complained that whilst setting off the clutch seemed fine, after a short period of ‘town driving’ the clutch became difficult to disengage.
What this actually meant was there did not appear to be enough travel in the pedal to fully clear the clutch and pressure plate – meaning there was ‘drag’ after the initial ten or more clutch presses of the day. This drag in turn made gears difficult to engage and at some point even disengage/pull out of gear, with the clutch pedal hard to the floor. Drive take up seemed to begin right down at the bottom end of the pedal travel.
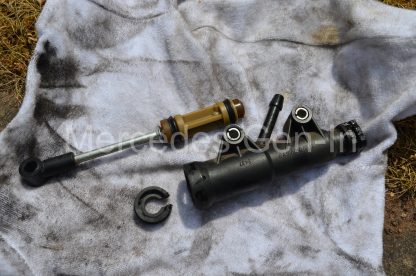
Having re-bled the system to ensure there was no air lurking in the system, I decided that the clutch master cylinder was at fault, possibly passing pressure and not allowing the full capacity of hydraulic fluid to be transmitted into the slave cylinder, shortening its stoke acting onto the pressure plate spring. It is worth noting that I had previously correctly ‘set’ the clutch cover plate assembly tension as described during installation described elsewhere on this site, so could confidently discount that as being any issue.
The replacement of the clutch master cylinder, whilst being a little bit awkward to get to, is quite a straight forward job and can be easily attended to in just over an hour – start to finish.
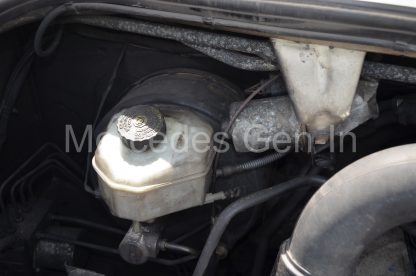
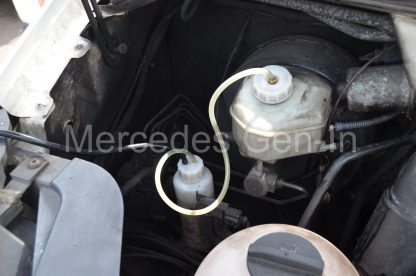
The first thing to do is remove the hydraulic feed pipework to the clutch master cylinder from the shared brake/clutch master cylinder reservoir. There is a semi-rigid, ribbed plastic pipe that feeds the cylinder fed from a spigot on the side of the brake master cylinder fluid reserve. Work this off gently, quickly pushing on a suitable size ‘blanking’ hose to stem the hydraulic fluid flow. A short length of flexible rubber hose, bent double at the end and secured with a tie-wrap is an ideal temporary blanking plug. Any fluid drips while doing the change over can be caught in a rag placed beneath the spigot.
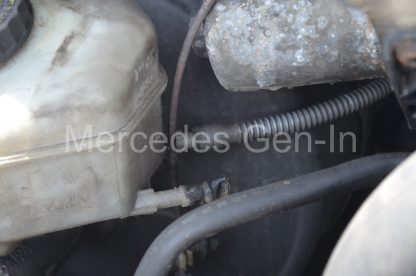
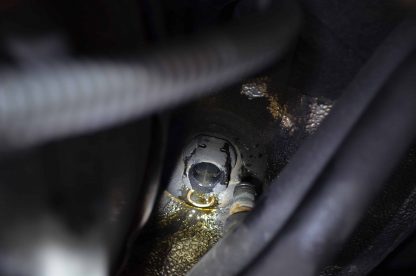
The next pipe to remove is the rigid steel high pressure pipe from the nose of the master cylinder. This connection protrudes into the engine side of the bulkhead to the right and slightly below the centre of the brake vacuum reserve (Right hand drive vehicles). To release the pipe from the master cylinder there is a small retaining clip that has to be pulled downward to release the high side hose. Its a fiddle to get at, but is best attended to with a 90 degree pick or suitable small screwdriver. Note – the clip is ‘retained’ and only pulls down about 10mm to release the pipe, once the pipe is removed, push the clip back up to the locked position so it can be pulled through the bulkhead grommet from the inside without fouling. Once the clip is pulled down, the pipe is released by grasping it and pulling outward, again be prepared for a little fluid leak.

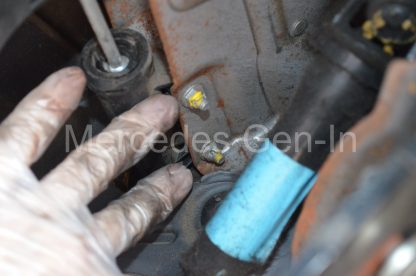
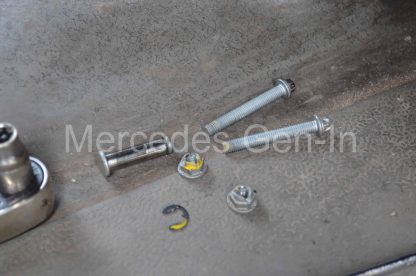
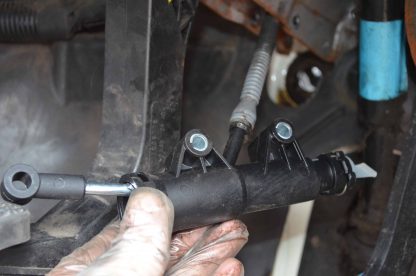
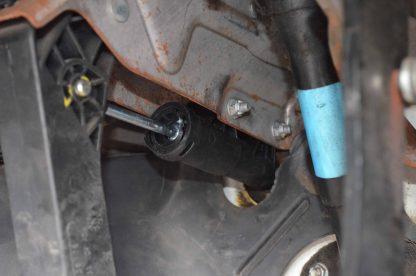
Now both feed and delivery pipes are disconnected attention can be drawn to the inside the drivers footwell pedal box area. First remove the circlip and peg that retains the master cylinder rod and eye to the clutch pedal, again a 90 degree pick works well to do this with the restricted space available. Now remove the two 10mm nuts that hold the twin through-pins holding the master cylinder to the pedal box frame. The opposite end to the nut is an E10 reverse torx, which will need to be held whilst undoing the two nuts. Slide both pins out from the pedal box towards the centre of the vehicle, once this is done grasp the master cylinder and pull it downwards and out into the footwell. Only pull the cylinder sufficiently to access the feed pipe spigot and ribbed hose which can be removed in the same way as the other end on the under bonnet brake/clutch reservoir. Once this is off, the cylinder can be taken from the vehicle.

Unbox the new master cylinder checking that is the correct part, remove its protective blanking plugs and offer it into the footwell, reconnecting the reserve feed pipe. Have an assistant gently pull the ribbed pipe back through the bulkhead grommet as you carefully feed the cylinder body back into position between the faces of the pedal box bracket. As it nears the correct position, use a suitable sized allen wrench to align the through-holes for the two fixing pins. When aligned, slot back the two pins and secure them using the E10 and 10mm wrenches. Feed in the eye of the actuator rod between the faces of the plastic pedal lever, aligning both parts to allow you to push through the peg and refit the retaining circlip.
From the engine bay, reconnect the high pressure pipe to the master cylinder nose. Just push the pipe in with its tapered seal until it ‘snaps’ locked in the set spring clip. Now remove the temporary bung and replace the fluid feed pipe back onto the reservoir spigot, checking for correct fitment and attending to any leaks.
Connect up a pressure bleeding system such as the Gunsons EZee-Bleed and pressurise the system. Its worth noting that without a pressure bleeding kit this job is pretty much impossible, as is true with most concentric clutch slave cylinder systems, especially ones having been fitted with a new (empty) dry master cylinder!
Crawl under the vehicle with some rag and open container, open the bleed valve to the clutch slave cylinder by rotating it. There are two types – a conventional steel bleed nipple that will need a small spanner or a plastic turn valve type where no tools are required, simply turn the tap clockwise to allow fluid flow and turn back to stem it. The pressurised fluid will flow from the bleed nipple, when it flows clear, without spluttering or visible, air close it off. Have your assistant operate the clutch pedal up and down a couple of times, both with the pressure bleeder connected and then with it depressurised. Repeat the procedure until a firm pedal is present. Even the smallest downward movement of the clutch pedal should result in some movement of the slave cylinder piston (thrust bearing) against the clutch diaphragm spring. This can be seen with a torch through the opening in the gearbox bell housing where the slave cylinder bleeder extends. If you are happy, then remove the pressure bleeder and check the reservoir for the correct fluid level.
Clean the work area with warm soapy water, as if you have spilled any brake fluid during your work it will easily remove paint over time and encourage rust in the engine compartment if left unattended.
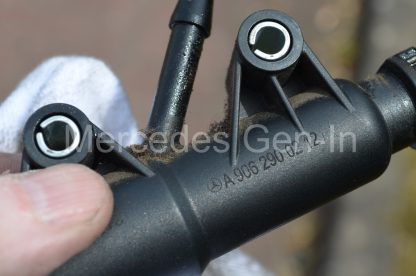
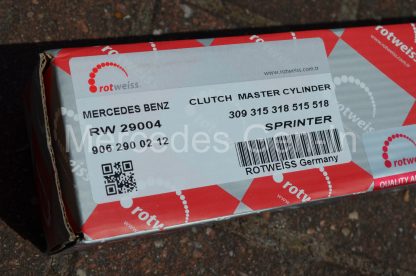
The OEM part number of the clutch master cylinder is: A 906 290 02 12
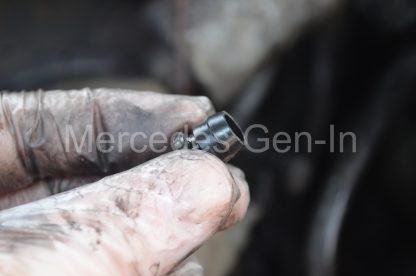
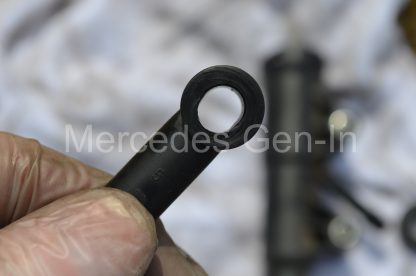
It is possible to get just a ‘seal kit’ for the master cylinder and rebuild the existing unit, however further compounding the problem with the unit described here was the steel pedal pivot had worn the eye of the actuator rod oval, as the picture below shows, resulting in restricted or diminished cylinder stroke. This is not a ‘kit’ part (only contain seals) so I would recommend only fitting a complete part. These replacement items are available circa £30 in pattern parts and in my view are a good investment over just replacing the internal seal kit.
Road test and be happy with the work completed!