
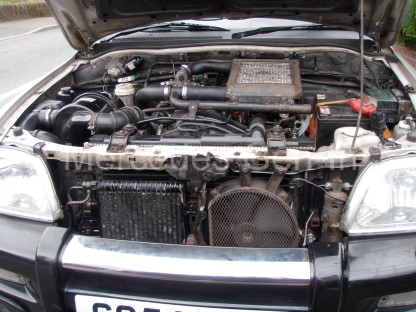
Driving along without a care in the world, Bang! Heavy steering and charge warning light on the dash, you pull over and lift the bonnet/hood – you are faced with a handful of drive belts, and a broken crankshaft pulley. There is pretty much nothing more you can do except phone for recovery.
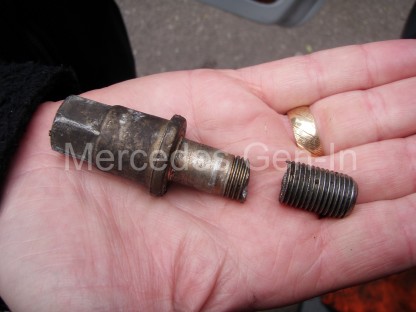
When you get to look at the damage you can see what events lead to this failure. The crankshaft pulley begins to slightly delaminate at the rubber damper sandwich, this in turn sets up a nice wobble on the crank shaft pulley that stresses the bolt at the end of the crank. As the bolt releases some of its grip, vibrating over over time, the pulley is allowed to move slightly on the crankshaft end, chewing gradually away at the woodruff key in the process. Eventually the key gets eaten away on one edge, making a nice ramp for the pulley keyway to rotate around.
Once this happens, catastrophically the pulley casting breaks at the boss and the retaining bolt gets sheared off as it breaks away. Sending the crankshaft end plate washer and bolt-half out of the engine bay with considerable force. If you are lucky they will hit the road, if not-so lucky then they may strike the underside of the bonnet/hood causing body damage. The pulley simply falls off and the belts stop turning – The vehicle although still running, is stopped by the driver, as something is obviously wrong.

Depending on a few conditions this can either be skilfully rectified or lead to huge bills for repair. The significant item that generally governs this route is the end of crankshaft. If this has a badly damaged keyway as a result, then major work will be involved to put the engine back to serviceable condition – namely a new crankshaft! £££
If the keyway is largley undamaged, then there is a very good chance you can sort this out with about six hours work, some new parts and a degree of patience. We were fortunate in that our keyway looked good, although there was little left of the key itself, so we proceeded to strip down the front of the L200 as we also needed access to remove the sheared crank bolt too. Believe me, if the keyway is badly damaged then the fact there is a sheared bolt in the end of the crank is the least of your problems! The keyway is virtually impossible to repair in situ and will probably involve a crankshaft replacement (or complete replacement engine depending how your parts/labour total adds up) So its a pretty serious situation to be in, in some cases a crossroads for the owner with regard to its continued ownership.
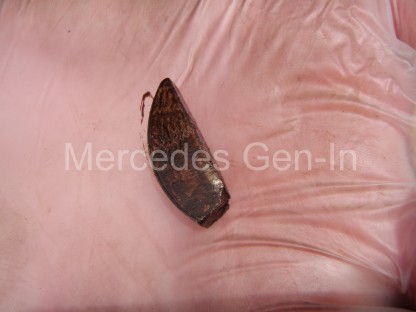
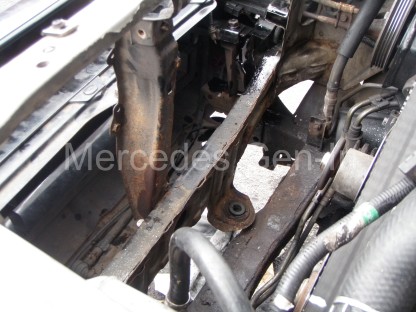
What was left of our key was jammed in the keyway and access with any tools is so restricted a fair number of parts have to be removed to facilitate a repair.
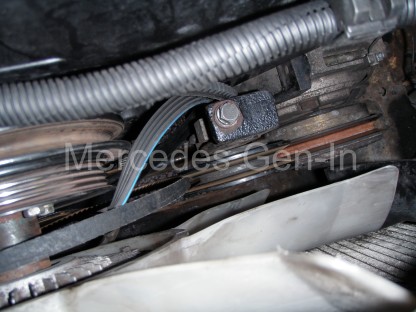
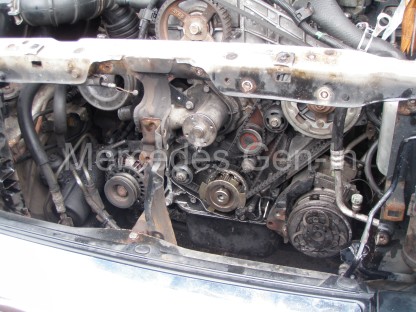
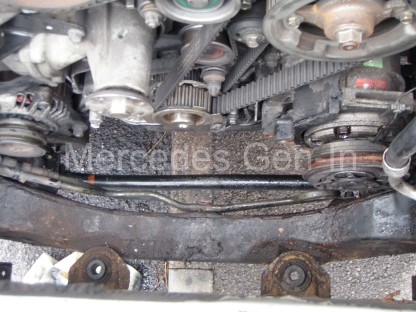
Remove the cooling fan and pulley from the water pump, undo and release the radiator, lifting it complete with cowl clear from inside the engine bay. Undo and unclip the front grille assembly, taking off the oil cooler banjos and supporting fixings, move this clear of the vehicle. Remove the bonnet latch and unclip the bowden cable from its mechanism.
Discharge the Air conditioning system, remove the AC fan and undo the two condenser pipe blocks at the right hand lower side of the grille aperture. There are two bushed fixings either side of the AC condenser that need to be removed, after which the matrix can be orientated: in on the front left and out backwards towards the engine on the right, lifting upward as you go. This will cleanly remove the AC condenser with a little jiggle work and some fiddling, it will clear the washer bottle without removing it.
Now you have the clearance to work through the grille into the engine compartment. You should now be able to see the full extent of the damage to the crank, if it looks good continue to try and remove the key from the keyway. The one we had was well embedded in the crank and no amount of tapping or prying would lift it, indeed there was a fracture in the key and the front 5 mm broke off when we began to try to remove it.
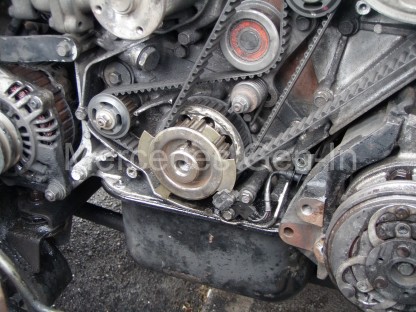
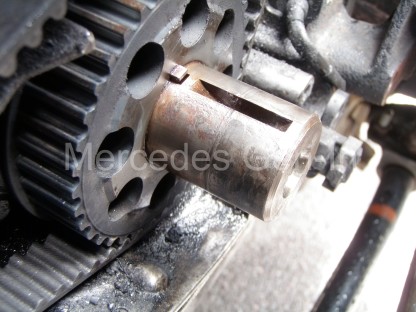
The only way forward now was to remove the timing cover. Remove the timing belt and timing crank pulley to gain better access to the seized key. Remove the cast tensioner arm from the AC belt route, upper and lower plastic timing covers. Take off the crank angle sensor below the steel ‘chopper’ reluctor plate. Tap off the reluctor plate and mark the timing belt position on all three pulleys with tippex. Undo the timing belt tensioner and pull the belt firmly to retract it as much as possible, retighten the lock nut. Slip the timing belt off all three pulleys and the tensioner.
Now work on the timing belt sprocket on the crankshaft and get it to pass over the damaged key and off the crankshaft boss. Once this has been achieved full access to the keyway is possible and you should be able to extract it from the keyway. Now is an ideal opportunity to dress any damage to either the keyway or crankshaft before reassembly.
Attention now needs to be focussed on the snapped crank bolt and how to remove it. Many times a well sharpened thin dot punch and accurate tapping at its edge can rotate the sheared threaded portion out of the tapped hole, bit by bit anticlockwise. If you are unlucky, then drill it out and use thread extractors to complete the job. You will have enough access to use a quality battery drill in the front of engine area, anything larger and you may be struggling to get access. If you find you need a slightly better line onto the crankshaft end, jack the engine slightly. Even more lift can be achieved by undoing the engine mounts, but in most cases this will not be needed.
Once the bolt is out you can begin to rebuild the engine, start by refitting the cam belt sprocket, cam belt and reluctor plate onto the camshaft, then fit your new key into the newly dressed keyway and refit the crank sensor with its two 6mm pins. Replace the plastic timing cover lower and upper halves, then fit a new crankshaft damper pulley, washer and bolt. Apply some thread lock to the bolt before screwing it home.
Get an assistant to select second gear, set the handbrake and chock the road wheels. With them sitting inside the vehicle using both feet on the brake pedal, pushing hard, use a breaker bar and slip tube to tighten the crankshaft pulley bolt. Once satisfied of good tightness rebuild the complete engine.
Tips to remember are to loosen all the belt adjusters while you have suitable access through the front of the grille before fitting the AC condenser and associated front grill components, oil cooler etc.
Fit new drive belts and tension correctly, top up the cooling system with antifreeze solution and check your work. When satisfied all is well, start and run the vehicle up to temperature.
Along the way, especially behind the grille area, you will find that half of the fixings you remove to take off components will snap and shear, be prepared to drill out and re-tap these failed fixings, generally a good drill and 6mm tap will be all you will need.
I hope this helps should you find yourself in a similar situation.
Hi. Intresting article as this has happened to mine. Garage have had the 06 L200 for nearly 4 months citing potentially incorrectly supplied crank as the reason for the delay. Apparently the crank was slightly too big so when the engine was at running temperature it was slightly laboured in cranking at start up. They stripped the engine again and found wear marks on the new crank so have also now changed crank (again) oil cooler/exchanger to ensure work can not be contaminated by metal debris.. Vehicle will now have new crank, bearings, oil pump, pulley, belts, exchanger, complete clutch. Struggling to get the garage to commit to the cost of my bill. How many hours of labour should realistically be charged for this I wonder? Thanks.
Hi Mark,
As far as I know (And please – consider that I may be wrong! ) there is only one size supply of a new L200 crankshaft. I presume when they say the crank was ‘too big’ they were referring to journal size. Apart from a new part, there would sensibly only be smaller crank diameters available, namely those components that have had material removed – i.e. re-ground crankshafts. One would then select a corresponding white metal big-end shell set (available in many + sizes) to match the reground shaft. These shells would be oversize (fractionally thicker than stock) to compensate for the material ground from the crankshaft.
I am hypothesising here, but probably more likely what has happened through incorrect parts supply or manufacture, is a new crank was ordered and ‘oversize’ shells fitted, making the whole assembly ‘too tight’. All new bearing fits on an engine rebuild such as this, mains or crank, should be tested for assembly clearance with a plastigauge. This is a ‘dimensionally known’ sized plastic element that is trapped in the assembled bearing, then parts torqued to the correct amount. The mating parts are then disassembled, and the now ‘spread out/squashed’ plastigauge has formed a ‘stripe’ on the bearing surface which is then measured and cross-referenced to the actual dry clearance of the bearing. This was clearly not done as a fundamental part of rebuilding the engine, as if it was, the issue would have been discovered. The parts were seemingly just delivered and built-up!
I understand your frustration and the pain to your wallet. Sadly, perhaps you are now discovering why some opt to replace the complete power plant with a warranted short-block exchange engine as an alternative to rebuilding their own. However sticking with the plan is the only option now and it sounds as if second time round it will come together, but caution – those clearances must be checked or how else would you know all was correct before building it up and running the engine.
On the cost recovery/negotiation side, it would not be difficult to prove some incompetency in the engine rebuild process, as if the clearances were not measured before building up and refitting the engine, you would want to know why – as the mismatch would have clearly been discovered early on. (Common practice as any time served engine rebuilder would have done). I would think on the face of it you should only be paying for one set of parts and labour plus the clutch for your job. I am speculating that for a competent repair shop to remove the engine, complete strip and clean then a thorough bottom end rebuild and engine refit, would be in the order of 25-30hrs – its a big job, by any stretch of the imagination!
I hope this helps you out a little, and I think the fact that the tolerances of the new components were not checked at all before rebuilding the unit are key here!
All the best
Steve
Plastigauge video below:
The bolt sheared in the crank , so I got it spared it out
It look like the last 20mm of the thread looks damage , please can someone inform me the size and the thread pitch of this bolt
Many thanks
Stephen
Hi Stephen,
This I do not know, sorry. However the best advice I can give is to hot-foot it to your local bolt and fixing specialist, they have thread gauges under the counter and can tell you what you want to know in a jiffy – in most cases by looking at it!
All the best
Steve