
I am not sure if it as a result of the awful condition of UK roads or the sudden hot spell we have had recently, but the rear view mirror started to rattle in a very metallic annoying way. To be honest the way the mirror vibrates due to the inevitable convertible ‘scuttle-shake’ could be the long term underlying cause. Anyway it was time to get it fixed!
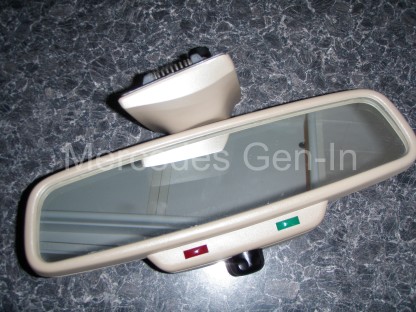
Having experience of the W210 E class and W202 C rear view mirror removal due in the most part to failure of filament indicator lamps, the SL (R129) presented little problem in ‘de-camping’ it from its sprung die-cast shoe above the windscreen. The best way I have found to accomplish this is to slide two fingers up between the screen and the flat front part of the mirror support, cup your hand around the remainder of the mirror and lever it down in an arc from the screen, imagine that it is pivoting on the trim edge furthest into the passenger compartment. Do not try a straight pull down, or using, as some people recommend: ‘putty knife or spatula’ This is not necessary at all and you are very likely to cause trim damage using any tools at all! The number one thing to be aware of is that the mirror has an electrical connector on a very short lead behind the section that unlatches. You must control the unlatching of the mirror, as you may accidently over-pull and damage the wiring or connector (That is why the lever-down technique is good as you can quickly adjust the forces applied as it releases)

Once the mirror is unlatched and the electrical connector disconnected the whole assembly can be taken the workbench or kitchen table!
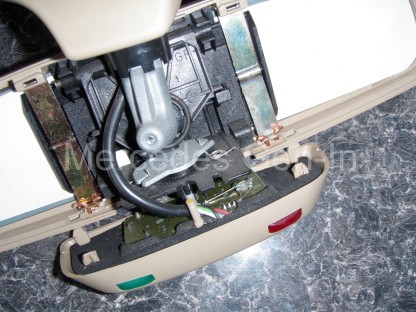
First using a firm straight pull-outward, remove the dipping adjustment control knob and place it to one side. Start by carefully prying the add-on light pod from its four peg positions. It will with care detach from the bottom of the mirror. (it is pegged into the rear cover and bezel) Once this module is free, the rear cover levers out from the bottom, unhooking from two internal retainer hooks inside the top edge of the rear cover/bezel (one of these hooks was broken on my mirror too). The complete back cover should now release from the bezel, allowing you to gain full access to the internals of the mirror.
Having now done this off the car – I realise that maybe the mirror back cover could be actually be removed in situ. By unclipping the add-on pod at the bottom and hinging the cover out at the back, disengaging it from the bezel. You could probably get access to refit a mirror holding spring without actually removing the mirror (maybe!) – Not really sure why you would want to struggle with this on the car, but I thought I would just mention it as it all adds to the DIY detail!
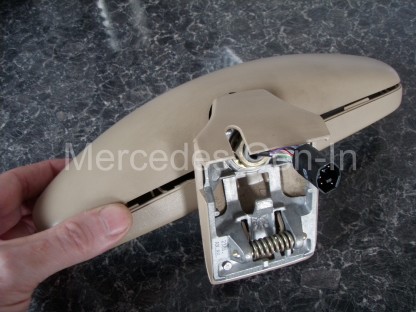
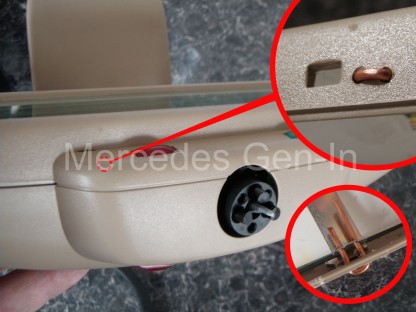
As you can see the mirror glass and bezel is held onto the adjustment gimbal by a black plastic panel. On each side there is a flat spring metal clip that applies captivating pressure to the black plastic panel by trapping each end of the flat spring to the upper and lower edges of the bezel. There are locators in the moulded plastic to facilitate this.
These are the pair of springs that fall out – or worse, break the the retaining moulded section they latch into, so they no longer hold the mirror in place. The springs then fall down and jangle in the bottom of the mirror housing, accompanying the rattling mirror glass. There has been several owner forum write ups on this job, delving as far as refitting the springs, but in every case if there has been mention of the plastic breaking – then a replacement part has had to be sourced. Matching your trim colour can be difficult with second hand parts and the later mirrors fitted the C class W202, S Class and their derivatives of the era, had an integrated one-piece pod for the alarm/locking indicators so were incompatible. Much better I think to repair what you have to better than original if possible, than pay out a fortune for the exact replacement part.
Just touching on how other ‘how-to’ write ups may mention bending the springs to apply more pressure to the mirror backing or even using foam pads to build out the gap between the back plate and increasing spring holding pressure – It is my view that by doing any of the above you run the risk of breaking the fragile moulded ears that locate the springs to the front bezel. As long as the pressure applied is sufficient to hold the mirror to the backing plate then nothing more is needed – more than needed pressure on the plastic = more chance of stress and future breakage due to the harsh environment and extreme temperatures it is subjected to in the windscreen of your vehicle.
I wonder if my mirror had maybe in the past had similar repairs or that over time (20 years) the plastic was no longer up to holding the pressure applied by the springs and eventually breaking off the moulded ears – who knows.
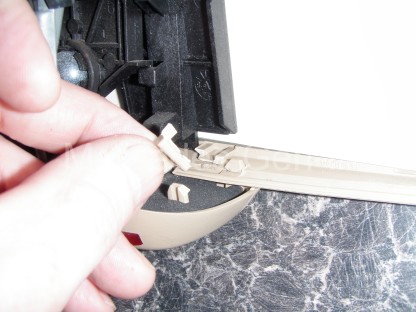
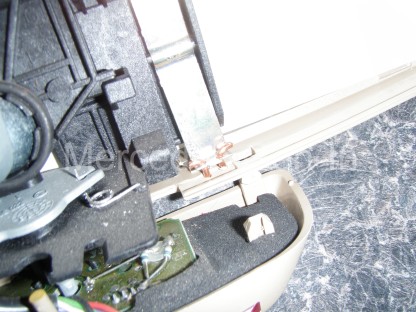
If as in the case of my mirror, the lower retainer ears for the springs were completely broken, the spring location point can be repaired quite easily with the use of a small drill, a length of 1.5mm solid copper wire (electrical mains cable) and some simple tools.
First take both springs to a bench vice and drill two 1.5mm clearance holes in one edge of the small upturn of the flat retainer spring. Hold the spring in place and drill two matching holes in the lower part of the mirror bezel. Be sure that the holes you drill lie behind the small square holes that locate the add-on indicator light pod. As long as they remain behind this hole line, the repair will not be seen as it is fully covered once the pod is re-attached.
Using snipe nose pliers, bend the copper wire to make an elongated ‘U’ shape staple with as tighter radius ‘square’ bends as possible. Insert this through the bezel and locate the drilled end of the flat spring onto the copper wire legs. Position the flat spring as close to its original position as possible using the remaining upper locators for reference, then bend over the copper wire at 90 degrees to secure the spring. Trim the wire to a length that just extends past the edges of the spring. Repeat this for the other spring if necessary.
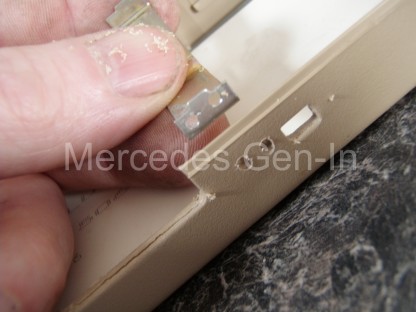
Now slide in the black plastic mirror support plate under the flat springs and position it correctly on the mirror back. Fold down the springs, locating the middle ridge with the raised edge on the plate moulding. Using a screwdriver, with the mirror and bezel on a stable flat surface, push the springs top edge down to latch under the remaining locators. Once these top edges are snapped into position the mirror can be rebuilt.
Hook the rear cover into the two retaining hooks and close the cover. Clip the add-on indicator light pod into the bezel to hold the complete case assembly in place. Check around the bezel edge, ensuring that everything is located correctly. If you have damaged or broken tabs that are used to hold the case together, use a spot of clear silicone on the mating edges of the case and tape it together until fully set. Refit the mirror dipping knob, clean / wipe over the mirror and case in preparation for installation.
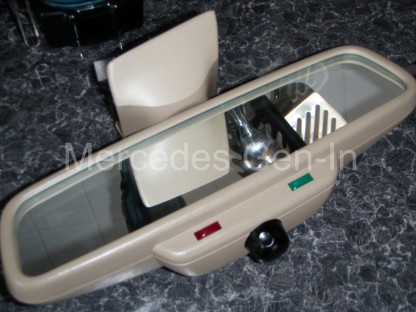
If you feel the need, apply a light smear of grease to each of the two sprung loaded ‘pips’ that engage with the snap-in shoe mount on the car, connect the electrical plug and push back the newly repaired mirror into place.
Hi I’ve followed this ‘how to’ as with all your guides it’s spot on. However I’m struggling on refitting the mirror. The nipples move freely although the spring is pretty strong, I’ve greased both nipples and fitting, but I’m struggling on applying enough force for it to engage.
I was wondering if you have a technique or knack that I’m missing?
Panic over. Roof off and it’s easy to get your fingers around the screen rail to apply pressure with your thumbs. 👍