
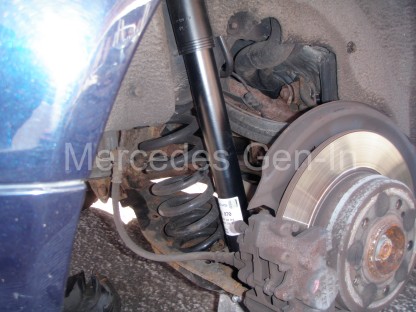
You may have already read of the problems here, including banging and knocking noises associated with faulty rear dampers (Gas strut/tube type) on the Mercedes C200 (W203). In this post we will detail how to easily change the faulty parts and get the vehicle back to specification.

While neither of the dampers removed had any visible signs of fluid leakage and had recently passed annual inspection, they were exhibiting knocking noises on slow speed movement over uneven ground. Internally a gas type damper has a charge of oil and a further charge of high pressure gas, usually nitrogen. As they age the gas escapes through the damper rod seals and leaves just the oil to perform all of the damping. When new, the purpose of the gas charge is to control small and light movements of the suspension, leaving the oil to take care of damping the larger travel and more violent bumps and bangs the car car is subjected to in normal road use. Calibrated internal valving controls the dampers rate and makes for a perfect combination of gas filled over hydraulic fluid dampers for vehicle use. However once the nitrogen charge has escaped over age, the damper will have difficulty controlling the smaller reflex movements of the suspension. larger travel may still be adequately catered for with just the remaining oil, but slow speed damping will, in most cases be poor. Due to the resulting little to no light damping due to the depletion of the gas charge, the oil is having to do all the work. Working harder and forcing oil through the metering valves more rapidly to try and compensate, heats up the oil which often froths as it passes back and forth through the internal orifices. Once air is introduced into the damper oil as frothing, it becomes ineffective as the air is compressible – any subsequent damping will be hampered by this condition. Over time, as the shock absorber ages, the first leakage is often the gas charge. It is this natural ageing that requires some diagnosis and the faulty dampers replaced accordingly.
Replacement is very simple on the Mercedes C200 model series and both dampers can be easily replaced in about one and a half hours.
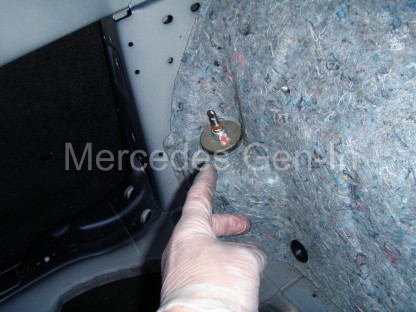
First empty the boot load area, remove the carpet liners from both sides and base of the compartment. There are two plastic mushroom clips at the top edge either side, once these are removed the carpet can be folded back to gain access to the strut tops once the hard plastic cross panel has been lifted. To do this simply pull the two D shaped mushroom clips and disengage the panels forward edge from the plastic spare wheel well retainer lip. This black hard plastic cover can now be lifted clear of the car.
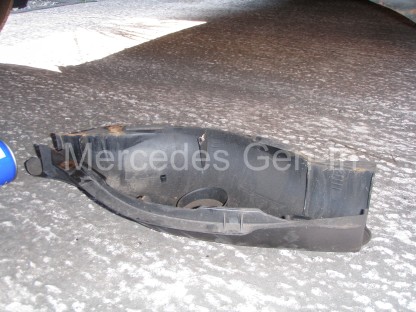
Working one side at a time, undo the road wheel lug nuts and support the vehicle on a trolley jack. Remove the wheel and spray penetrant onto the two 10mm head, self tapping screws that hold the plastic wishbone cover in position. Unscrew these two fixings and remove the plastic wishbone cover. Now spray the 16mm lower suspension nut with a similar penetrating oil.
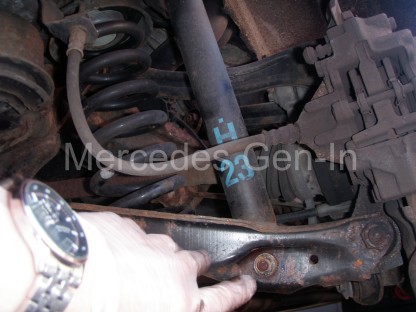
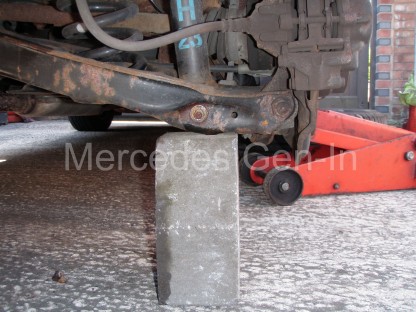
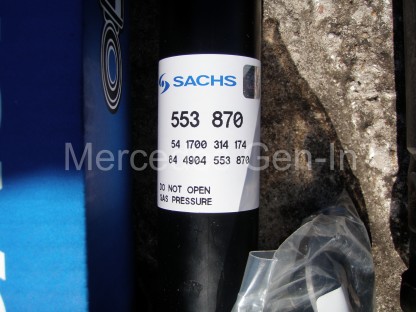
If the dampers are original fitment they will have an inverted torx head damper bolt head and a 16mm nut on the other end, your replacement will probably have a standard 16mm nut and bolt included in the kit. Place a support under the wishbone and lower the jack so the wishbone ‘just’ contacts the block and takes some of the tension from the suspension component. Undo the lower damper nut and tap the bolt through.
From inside the car use a 17mm spanner and undo the top fixing, you may need to hold the damper rod with grips to prevent it spinning as you fully remove the nut. Now take off the top plate washer and then lever out the ‘rubber donut’ from the protruding thread and sleeve. Discard these parts as you should have new components supplied in the kit with the new damper.
From under the wheel arch, use a stout screwdriver or short lever to force down the top of the damper so that it clears the mounting hole, once free, let it extend fully in a controlled manner. Tilt the top of the damper out into the wheel arch area and lift it free, pulling it out of the lower wishbone as you go.
Refitting the new dampers is an exact reversal of removal, be sure to fully tighten the top securing nut and use the supplied lock nut to prevent it undoing. Again you may need to use grips on the rod end to prevent it turning whilst you are tightening.
Once all fixing nuts and bolts have been tightened, refit the internal carpet and side panels. Do not forget to refit the plastic protection panels to the lower wishbones, clipping them into position before fastening with the special 10mm head self tapping screws (2x per side)
Conduct a road test and enjoy quiet safe motoring!
If you are interested have a look at the short 30 sec. video below, this shows how the first six inches or more of the old dampers stroke is virtually ineffective, though the lower section still has some damping capability. This is due to either gas escape or faulty/damaged/aged internal valving. New shock absorbers/dampers transformed the vehicle over rough roads and totally eliminated the rear end knock at slow speed.