For whatever reason you may be looking to purchase a used replacement engine, there are quite a lot of pitfalls that you may fall foul of if unaware. I hope to highlight some of the things to look for and be aware of when searching for that ‘mechanical bargain’ in the small ads or breakers yard. Indeed this guide could be used to assist you if you were about to purchase a used van and needed to know/check a few things out indicating the condition of the engine before you buy.
Probably the most obvious thing is, ‘can you hear the engine start and run’? Without doubt this is the best way to buy a used engine. Quite often engines may be removed from a scrap vehicle and sold on this basis. They will frequently be strapped to a pallet or resting on an old tyre waiting for sale and although there is little you can do about that, there is a few things you can check to be more positive about your potential purchase – especially as you will not be able to hear it run! Don’t forget to take along your torch on any reccy’ as you will need this for most of your checks.
If you do get chance to inspect an engine while it is still in the vehicle, make a mental note of the mileage and ask questions of the seller – even before you lift the hood/bonnet or turn the key. It goes without saying the reason for the sale should be credible, if the rest of the van looks good, one would ask why the engine was being sold – is it stolen and being parted-out? Just be aware.
Always better to hear a used engine running if possible
If the registration plate is still there make a note of this too, along with any vin number. The purpose of this is to have all the information to hand if you need to later double check if the engine is compatible with your vehicle, these are the details that a dealer or independent will need to cross check the parts on his system to confirm compatibility with your own vehicle if you are in any way uncertain.
Have a quick look at the engine in situ, dip the oil and look into the coolant expansion tank – it is that the vehicle was front ended, the radiator will likley be broken and there will be nothing to look for in here, but have a look anyway. It should be clean inside with no frothy oily mess and should not be coated with thick brown rusty sludge.
As with any other vehicle purchase if you can, you will want to hear it run from cold. It should start without hesitation and soon settle into an even idle. Try and gauge if it is as quiet as your own engine was when it was working properly. If there is no coolant, you will not be able to run it for long so quickly pull of the breather hose from the oil separator or turbo intake pipe and look for smoke and pressure here, if either is excessive walk away. This is an indication of worn bores and/or piston rings and really not what you want to be buying into. You can look for fumes and blow-by pressure at the dipstick tube also, but this is not always as conclusive as what can be seen at the breather pipe.
Can you here the turbo spool up? If you are in doubt remove the air cleaner cover or intake hose to the turbo body and dab the throttle. You should hear a healthy howl if everything is working correctly. Glance back to rear of the vehicle as you rev the engine and make sure you can still see the sky!
Below is a checklist to help you assess your potential ‘running’ or ‘palletised’ engine purchase, some items in this list may/may not apply:
Coolant Expansion Tank (Front right hand side slam panel area)
Should be clean inside, no brown sludge, no oily mayonnaise. With the engine cold and running, carefully remove the filler cap and place your hand over the coolant reserve neck, get an assistant to blip the throttle, there should be no pressure to lift your palm off the lip. Have a quick glance inside – no bubbles is good. Problems here could indicate a potential head gasket issue.
Oil Separator (Top of engine behind oil filler cap)
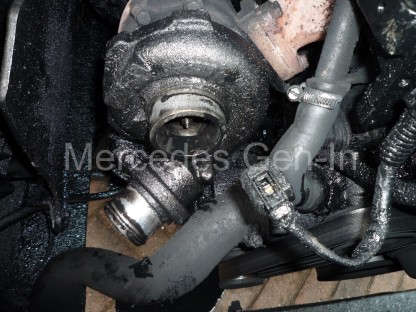
While it is normal for a high miles engine to be a little ‘wet’ with oil around this area, any white smoke or fumes beyond the ‘barely visible’ from the vent pipe that runs to the turbo inlet could signify worn bores and/or piston rings. Pull the pipe from either end and observe to be sure. Do not be too concerned by traces of oil here and also if the pipe is gummed with a little mayonnaise as in many cases this is normal.
Check for excess crank case pressure – inspect the oil separator pipework
Water vapour, moisture and condensation escape from the crank case and exit here to the turbo inlet. The device that is present on the lower pipe is not a sensor it is a small heater! This actually stops moisture and crank case water vapour freezing in the vent pipe in colder climates, blocking it.
Oil Dip-Stick
Pull this and check the oil level, there is not much to be told from the black oil that will be on the end but caution must be observed if there is any water droplets, froth or whitish deposits on the stick. As with the coolant tank inspection any issue here could mean that the head gasket may be suspected as leaking. Any obvious quantity of water in here could also mean that the oil cooler fixed to the side of the oil filter housing is passing pressurised water into the engine – not good. There should be little or no pressure, or smoking from the open dip stick tube.
Oil Filler Cap
Pretty much the same visual inspection applies as above. Do not remove the oil filler cap with the engine running – you will have an ‘oil-shower’, as the duplex timing chain runs directly beneath the cap. If there is a lot of oil around the filler cap it is not unusual for the cap-lip to be slightly split, allowing oil to pass out onto the rocker cover and run down the left of the engine finding its way onto and into the alternator!
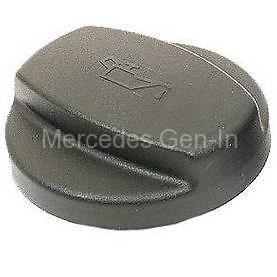
If there is oil around the filler look for a split plastic filler cap on the lip – Simple fix
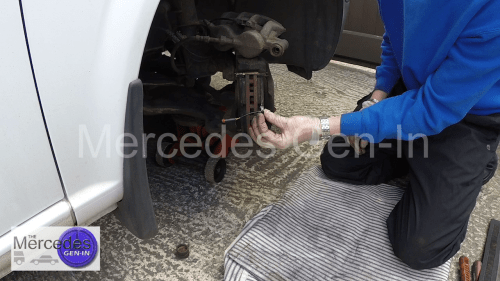
Leaks – Visual Inspection
Start from underneath with your torch, you will not need to jack the vehicle, just slide under and look under the front bumper. Places with oil staining and dripping will be very easy to spot. While most oil leaks can be fixed, there are some cost implications to be considered depending on what and where the leak is. A leak around the crank pulley for example will mean it will have to be removed and a new seal fitted, often if this has been leaking for a while the harmonic damper pulley (if fitted) may have suffered deterioration due to the oil. (See Harmonic Damper Pulley in the check list) Oil may be leaking from the rocker cover, do not assume this will be a simple fix, if it is going to be a problem all the injectors have to be extracted to remove the cover and replace this gasket, doing so can sometimes open a whole can of worms (Injector removal and so on). Lots of oil around the turbo body is not a good sign, it should be reasonably dry and in most cases the iron casting should remain red rusty. Look beneath the turbo and seek out where the turbo oil return pipe enters on the sump line. This could be oily, contaminating the surrounding area, indicating the oil return pipe seal requires replacement. (two gallons a min. circulate through here!) The turbo/manifold has to be removed to replace this commonly failing seal.
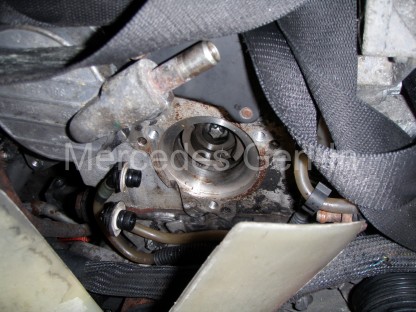
O ring seals are simple to replace to cure oil leaks on the HP Diesel and Vac pump bodies
Oil leaking from the area behind the vac pump (or diesel HP pump for that matter) and running down the face of the engine block are usually a simple fix. In each case this is a large diameter ‘O ring’ that seals against the block and is simple to rectify. Any diesel leaks should be investigated carefully and if found to be from the high pressure diesel pump (triangular shaped pump block on the front of the engine) head casting seams could indicate new seals or pump are required – not a cheap fix for a replacement pump. (It is worth noting to make sure the viscous fan central hex bolt is free and not seized before any engine installation, as this could hamper future diesel pump work)
Look also at the joint between the gearbox bell housing and the rear of the engine, any serious black engine oil presence here could indicate a crankshaft rear seal that is weeping. Not a huge job to do when the engine is out but best avoided if at all possible, certainly another tick or cross when you are debating your offer price.
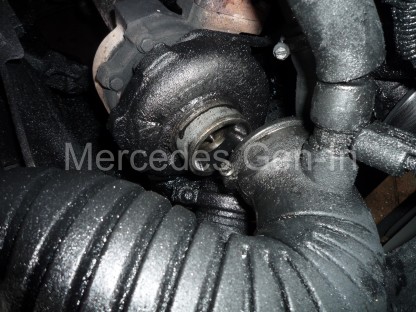
Water leaks should be easy to spot, especially if antifreeze is present in the system. It will leave tell-tale staining in the form of a coloured salty scale. Look at the water pump behind and up from the crank pulley there is a tiny hole in the pump casting nose, any staining or wetness here could mean the pump seal is failing and will be due for unit replacement. Obviously hoses are an easy fix if leaking and should be all checked before putting the engine into service in your own vehicle. Importantly include the small bypass hose at the rear of the block RHS above the starter motor area, this is a nightmare to replace once the engine is in situ due to poor access.
Noted leaks from any diesel related item or component must be investigated as these could be costly to rectify. (See Injectors Injector Cover in the checklist)
Harmonic Damper Pulley – Crank Pulley
While not a major issue to rectify if found to be suspect, it is worth checking the harmonic damper/crankshaft pulley that lives at the bottom front of the engine – it drives all the belts and is the main pulley from the motor crankshaft. This is made in two mating parts, bonded together with a rubber metalastic material that is designed to absorb crankshaft borne detonation pulses, reducing noise and vibration of the running engine.
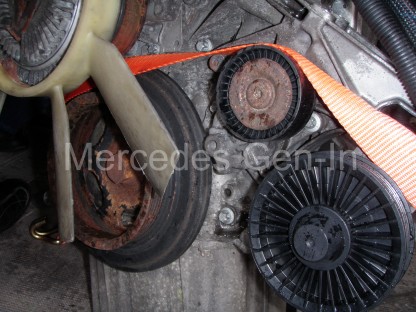
Pulley and idlers are worth a look
What happens over time is the rubber sandwich deteriorates (often through oil contamination) and the two pieces begin to part company. When things have got quite bad, the pulley begins to make a ‘clacking’ sound as it rotates (usually people tend to think its a far greater internal engine problem, as it can get very loud indeed) It is actually the pulley edge catching on the crankcase as it revolves. Its presence can sometimes occur only under load as the pulley flexes it can be hard to spot. Look at the pulley with your torch and identify the rubber seam circumference, if it looks tired and cracked then budget to replace this before you refit the engine as failure can result in expensive engine damage. In itself not a full diagnosis, but you can also try to gently pry bar the edge of the pulley away from the block to get an indication of any detrimental flexing that may be present.
Injector Cover – Injectors
This is probably the most important check that you will do and will be the most awkward, both from the point of view of asking the seller if you can take a few parts off to inspect it and also from the point of view it will take you about 20 mins to complete. What I would do is leave this as the final ‘deal breaker’. If you are happy with what you see, agree with the vendor a price on the proviso the injector inspection proves satisfactory and explain that without this inspection you are not interested, whatsoever – This is actually very true, as if overlooked and bought blind, the engine could land you with a bill approaching and exceeding what you have just paid for the complete engine! Of course if the injector cover is not fitted or missing further inspection is easy and far less of an issue for all.
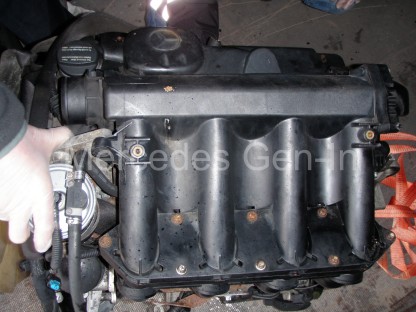
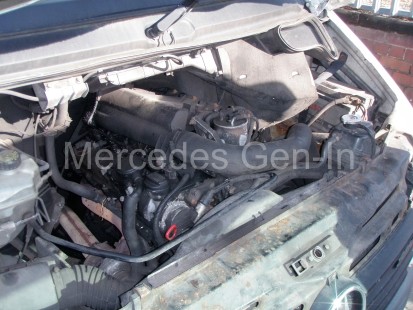
This looks a great clean engine…
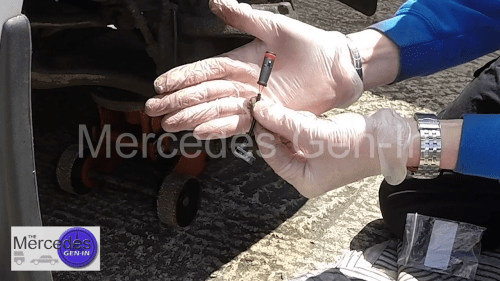
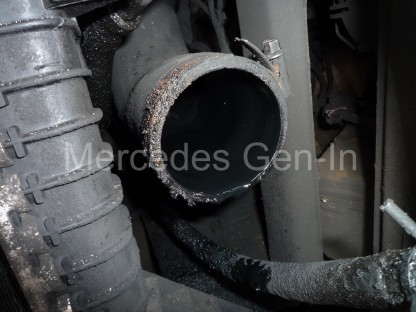
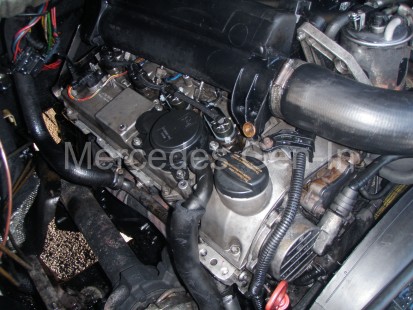
Having agreed your ‘investigation’, you will need four tools. A flat blade screwdriver, reverse torx socket wrench or a 10mm/8mm ring spanner and a 5mm hexagon key. Undo the turbo inlet hose from the inlet manifold and tuck it out of the way. Undo the 8x torx pins holding the top of the inlet manifold to its lower section, remove the single pin at the front near the fuel filter and the rear fixing pin behind the plastic manifold, on the top left looking in, just sneaking under the bulkhead. (This one is often not fitted/missing as it is a PITA to get at – again a measure of lesser quality servicing maybe!) Lift off the upper inlet manifold section. This will reveal the 6x injector cover hex cap-screw fixings. Once these are removed, lift up-and-off the injector cover. If it makes a ‘crispy crunchy’ noise as you begin to lift it away, you could almost refit it at this point and just walk away! Once you have the cover removed all should look fairly clean and oil free under there. Be aware the oil separator may have deposited a little oil around the adjacent area but the overall appearance should be clean and dry. Any black carbonous coal like substance and you will have some work to do. This condition signifies the injector seals have failed on one or more injectors and will need to be replaced, as combustion gasses are blowing-by the injector seats/seals and depositing carbon waste on the engine surface. The common name given in the trade to this condition is: ‘Black-Death’.
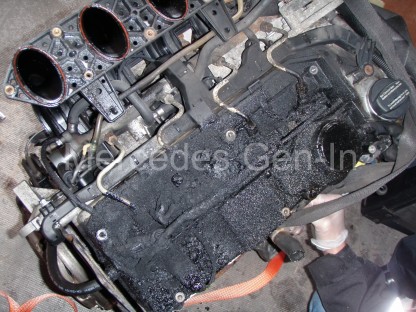
Mmmmm maybe its worth less than I first thought! A bad case of Black-Death… It should look like the first image at the top of this post.
The presence of any Black-Death around the injectors will and should drastically effect your offer price downward. This job is known to be very difficult to price, as issues encountered along the way could range from injectors that cannot be removed, stripped hold down clamp bolts and deep cut sealing seats in the head pockets due to passing exhaust gasses. Each extra issue encountered, over and above normal labour cost, will soon double or treble the overall cost of repair and caution should be heeded when making your offer. Be sure to make your bid based on a worst case scenario. There is plenty to read on this subject both here on Gen-In and on the web, just Google it and learn what you need to know.
If the vendor does not understand the issue you have uncovered, then simply look elsewhere, at least safe in the knowledge your decision was made wisely and with due diligence. Overlooking to check here can cost you dearly! Look at the engine above that otherwise looked a very good buy indeed. You have been warned.
Sound and Vision
Satisfy yourself that the engine sounds good (if you get chance to run it) and that there is no knocking or tapping noises over and above the normal engine song. Any metallic ‘Brrrrap’ possibly from a little end heard under a throttle blip, or heavy knocking noticed under load or overrun, then leave well alone and look else where.
Place your hand over the exhaust at idle and feel the regular pulses from the exhaust, if irregular there is a chance you have a slight misfire at idle and this may need work in the future. Poke your fingers up the exhaust pipe and wipe around, hopefully this is dry sooty-black. If its ‘sticky’ or ‘oily’ this is probably an indication of water or oil passing through the exhaust and in my view would be best avoided. Look at the emitted gasses from the exhaust – all but for a slight whiff of black soot, visible on a sharp jab of the throttle is good.
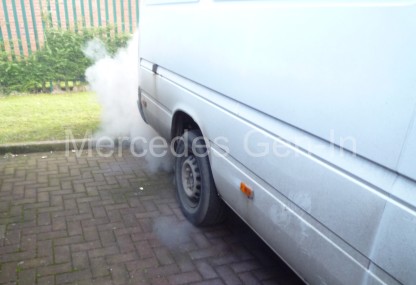
You don’t want oily smoke like this… Blown turbo in this case.
Any white smoke, as severely shown above indicates oil presence – worn engine or turbo. White smoke that ‘magically disappears’ or dissipates quickly is likely water from a suspect head gasket. Listen to the auxiliary belt as the engine idles, is it flapping around? Look at how it runs over the pulleys, is it straight or canted over? If not running true or overly noisy this could signify worn idlers or failing belt tension device. Check to see all the pulleys on the drive belt route are true and not wobbling, indicating worn bearings that will soon need replacement.
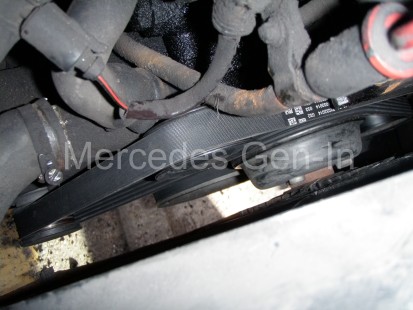
Check belts for flapping, running true especially round the harmonic damper/ crank pulley – this could indicate de-lamination
When you turn off the engine it should stop without fuss, any clicking or snapping, cracking noise could indicate that the ‘sprag-clutch’ on the alternator pulley is failing. Turn the serpentine auxiliary belt over with your fingers, if its cracked or worn it is usually a good indication the van has not been regularly serviced as this would have been changed under the maintenance regime.
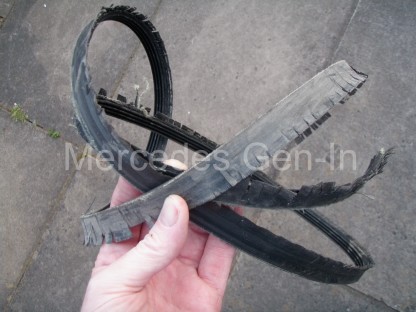
As a rule of thumb an auxiliary belt in this condition is an indicator of poor servicing.
Similarly the age and appearance of the fuel filter canister often gives away the lack of recent servicing. Overall you should be happy that the engine appears to reflect its mileage – remember you are not buying new and its unlikely that it is going to be perfect. It is mainly all about minimising your risk and getting the best deal you can without spending a fortune on rectifying a catalogue of unknown problems even before you get to grafting the replacement engine to your own transport.
Turn It Over Beethoven…
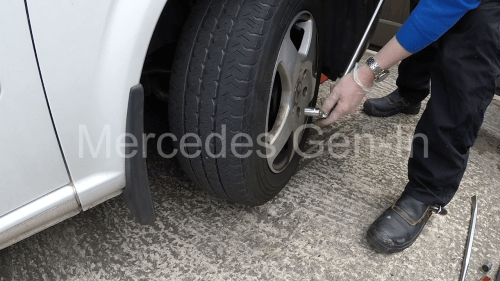
It goes without saying if you are buying a ‘static engine’ out of the vehicle, do make sure it turns over by rotating the flywheel, a simple thing to do but often forgotten in the heat of the moment – who knows how long the unit has been standing?
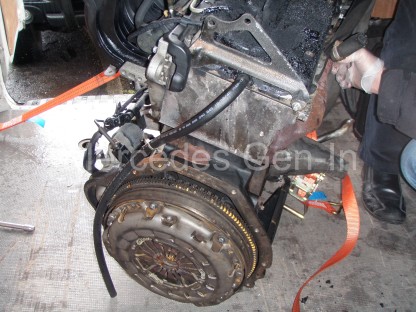
Turn the engine over a couple of rotations to make sure its all free
Electrical Loom – Model Year to 2006
If the engine has had its loom cut – often the scrap dealer considers just the engine to be of value and not the ancillaries – be prepared to negotiate your price down a little as its a time consuming job to swap your existing loom over to the replacement engine. I had a replacement engine come in that was ‘loom-cut’ about the point where it passes across the left hand engine mount. On this occasion I chose to cut our own existing loom section and solder/heat-shrink the individual wires to the ‘new’ engine to make up a serviceable loom. There were sixty wires or more to deal with, although time consuming it is possible, noting a few important provisos I discovered along the way when carrying out this task.
-1 Wire thickness is important when choosing your colour match – there are often pairs of wires sharing the same colour code and tracers only decernable from each other by their relative thickness. Make sure you get this correct,
-2 The ‘Twisted Thicker’ pairs of cables are injector cables and share the same colours as other conductors. Make sure you keep the twisted pairs together when joining.
-3 There are two identical ‘Black with Yellow Tracer’ wires in the loom bundle at this point. One goes to the starter motor solenoid, the other to Glow Plug No.2 Make sure you meter these wires out and ensure you have continuity to the correct points. The Starter cable goes back to the grey ECU connector and the other glow plug supply should route to the glow plug module loom connector. Just make doubly sure these two Black/Yellow wires that are of identical gauge are joined and routed to the correct point or the vehicle will not have a start signal to the starter. If after the rebuild you suspect this may have been overlooked as the starter does not spin, its an easy check to test continuity between the starter solenoid cable ring tag to the glow plug module supply. If it bells out then you will have to split the loom and swap over the two black with yellow tracer cables – a good reason to double check this in the first instance!
-4 If your purchased engine has its loom in place you should at least give the ECU connector plugs a once-over, as if its been standing outside for any length of time moisture may have begun to work its evil on the fine connections to the brain of the vehicle. If these look good thats great, but worthwhile treating them to a squirt of switch cleaner and moisture repellant before locking them home in the ECU.
And just before you hand over your cash…
Hopefully the above has given you a little insider knowledge to be able to assess wether the used engine you are considering is worth what the seller is asking and that you factor in any remedial work into your repair budget before ‘splashing the cash’. There are undoubtably some bargains to be had out there, equally there are also rogues who know the full nature of the faults/condition of their engines, looking for a fast return.
Always try and get a written warranty of some sort for the engine where possible, at least one that covers it running without issue when fitted. If you are buying from a local source maybe ‘in the trade’ and they are reputable, it is worth an extra few dollars/pounds over a private sale to have the security of even a one month warranty – It is worth remembering too that although your extra labour costs would be lost in any claim, removing and returning the faulty engine – often its better to secure the return (at least a large proportion) of your hard earned than not.
I am sure the opportunity to purchase from a private buyer will crop up and the normal ‘caveat emptor’ rules apply but with careful inspection and honest pricing, taking into consideration any faults noted, there are bargains to had from genuine people. Just remember, minimise your risk as much as possible by using care and vigilance – knowledge is power!
Obviously this has not covered every single check-point or eventuality, but it at least prepares you for what you may find on your mission! I hope that it has at least helped you out a little.