Technical Sprinter

Technical Sprinter

Sprinter Fuel Rail Pressure Regulator Problems – Poor Starting


The Mercedes CDI series of diesel engines have an electronically controlled fuel pressure regulator mounted on the end of the fuel distribution rail. This controls, as the name suggests, the fuel rail pressure. It relies on the seal made between a single small O-ring which is backed by a split fibre backing ring.  What happens over time is that the O-ring wears and often fails allowing pressurised fuel to bypass the valve and ebb away the required running pressure that the injectors need.  Often the problem becomes more noticeable once the engine is warm and poor starting results.

Usual symptoms for this can be laboured starting when warm and occasional non starting, if the fuel rail cannot maintain the required minimum of approximately 300 bar at crank to allow the injectors to fire.  If it is possible to monitor rail pressure using Live-Data, you may see the rail pressure dancing between 266 and 550 bar. Instability of pressure when holding a steady throttle will be the clue as to a problem with the fuel pressure control.  If you do not have access to a compatible code reader thankfully the repair is simple and not costly so easy and cheap to eliminate as a cause of poor warm/hot starting. (Under £10)

Sprinter fuel pressure regulator fault 1

Remove the upper section of the inlet manifold to allow access to the rear of the fuel rail, just under and against the bulkhead/firewall.  Identify the electrical connector and remove it, select a 1/4 drive socket wrench and appropriate small reverse torx socket and short extension.  Remove the two opposing pins on the regulator flange (left and right as fitted).  Pull out the fuel pressure regulator from the end of the fuel rail.

Sprinter fuel pressure regulator fault 2

Keeping the device clean, remove both the green O-ring and fibre backing ring from the tip of the regulator and replace with new components.  Refit the regulator assembly to the rail.  It makes it easier if you have the left hand threaded pin in place in the regulator flange mounting hole, before offering it into place. (left hand in fitting position, if standing at front of engine)  Once the two pins are re-fitted the electrical connector can be attached and the intake manifold upper half rebuilt.

Sprinter fuel pressure regulator fault 3

Back of the fuel rail where the regulator mounts (normally hidden from view)

It is important to note that a failing fuel injector can also deprive the fuel rail of its operating pressure. If you suspect that this is the case, perhaps after changing the regulator O-ring to find there is no difference to the fault then you must carry out or entrust a garage to do a diagnostic ‘leak-off test’ to prove the injector system is sound.  WARNING a failing fuel injector that is passing unmetered  amounts of fuel can soon damage the engine catastrophically, either through piston overheat or engine seizure and any suspected problems must be investigated promptly!  See this interesting and descriptive forum post regarding leak-off testing.

Sprinter fuel pressure regulator fault 4

Fuel rail pressure regulator seal kit part number

Mercedes Sprinter Gear Selection Cable Replacement

 
In this case one of the cable retainers to the Sprinter gear selector had broken away and required a new cable set to be fitted. For information a genuine new set of selector cables are approximately £100 plus vat from Mercedes Benz. Mercedes Sprinter to 2006 part number of cable assembly – A 901 260 14 38 Please note this part number is for ‘cables only’ and does not include any retaining clips for the gear selector or locking pawl adjusters on the gearbox lever arms, you would have to order these items separately if any of yours were broken or missing.

Before starting replacement work, if possible select neutral.

Mercedes Sprinter Gear Selector Cable Replacement 1

First unclip the gaiter from around the gear selector and remove the dash fixing self tapping screw beneath.  Now remove the cubby box beneath the pen holder by removing the two screws at the back and pulling it out, then remove the central dash fixing beneath, unclip the paper clip/note holder and release this hidden self tapping screw. Withdraw the plastic centre dashboard facia.  Note the position of the electrical connectors on the fitted switches behind and remove their plugs.  Disconnect the cigar lighter and LED illumination bar.  Once all electrical connectors are removed you can fully remove the panel and store it clear of the work area.

Mercedes Sprinter Gear Selector Cable Replacement 2

Remove the floor tool box lid and polystyrene foam wedge from the passenger side footwell and pull back the rubber floor covering. Undo the single fixing screw to the wrap-around console under-panel trim section on the passenger side and draw the back edge forward and out to unclip the centre join.  Once this first half is removed this reveals a central fixing that needs to be removed, along with a final single fastening on the opposing edge by the pedal-box.  Remove the remaining lower section.

Mercedes Sprinter Gear Selector Cable Replacement 3

Undo the two torx pins that hold the selector cable grommet to the floor.  Undo the two bolts that fix the gear selector to the dash frame, pull the assembly forward at the top and up-out of its retaining ears. Once released remove the spring clips from the cable retainers and unclip both the eye and ball ends of the control cables from the underside of the selector lever.  Remove the complete selector from the dash.

Mercedes Sprinter Gear Selector Cable Replacement 4

From underneath the vehicle, unclip both plastic lever cable locking pawls on the selector arms, open them up slightly to their disengaged position, being careful  not to damage them.  With a 10mm spanner and socket undo the pin and nut that secures the locking plate to the cable guide and remove it.  Slide out both cable restraints and pull the ribbed end sections of the cable inners free from the adjustment locking pawls.  From inside the cabin pull up the released control cables, threading them through the floor (two person job) and up behind the dash section to remove them.

Mercedes Sprinter Gear Selector Cable Replacement 5

Thread the new cables down through the floor, following the same route of the originals.  Offer up the selector and thread in both cables into the locator holes at its base.  Use the two steel slide fork clips to secure the cable outers by their retainers to the base of the selector assembly frame.  Clip in the cable ‘eye’ and press on the ‘ball joint’ to their relevant  levers under the selector lever.  Locate the gear selector into its lower dash locators and fold it inward, replacing the two upper fixing bolts.

Mercedes Sprinter Gear Selector Cable Replacement 6

Mercedes Sprinter Gear Selector Cable Replacement 7

Correct the cable lengths through the floor grommet and fix it in position by fastening the steel plate into the floor with its two pins.

Align the gear stick to an approximate central/neutral position, locate and push down fully the locking staple into the gear lever ball. This locks the lever in a known central ‘maintenance’ position.

Mercedes Sprinter Gear Selector Cable Replacement 8

From beneath the van, slide in the adjustment ribbed ends of the cables into the two pawls on the gearbox selector arms, once in position push the cable ‘outer jacket’ retainers into the brackets (Grey cable uppermost) and replace the locking plate.  With the gearbox in neutral, gauge the forward and backward play in gear selector arms and set the adjustment mid-way of the measured play, latching down the lever lock and pressing it firmly closed, captivating the selector cable end into the pawl type clamp on the gearbox selector arms.

Mercedes Sprinter Gear Selector Cable Replacement 9

Back inside the cab, withdraw the locking staple from the selector lever ball, latching it fully upward on its slide releasing gear lever motion.  Test gear selection.  It should be perfect, if not calculate where adjustment needs to be made and shorten or lengthen the rods underneath the vehicle using the pawl locks to obtain the desired result.

Rebuild the remaining dashboard and console in the same way as removal.


Mercedes Sprinter – Excessive Steering Wheel Column Play/Wear

 
While quite a large amount of free play in the steering column is allowed by the examiner on a current UK MOT test, usually free play here indicates wear that is due to the failing of the lower universal joints that direct motion from the steering wheel to the steering rack input shaft and is best avoided where possible. Incredibly although it may still be declared ‘within limits’ by the examiner, in reality it makes for tiring and sometimes eventful driving!

For the purpose of this article it is assumed that any ‘free play’ in your steering is not attributed to ball joint or steering rack/outer steering tie rod wear and that you have identified it in the steering column itself.

Mercedes Sprinter Steering Column Replacement 1

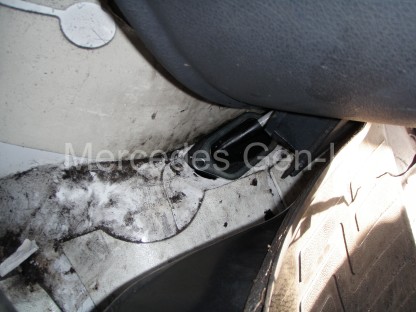
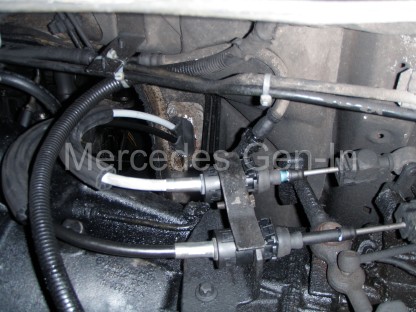
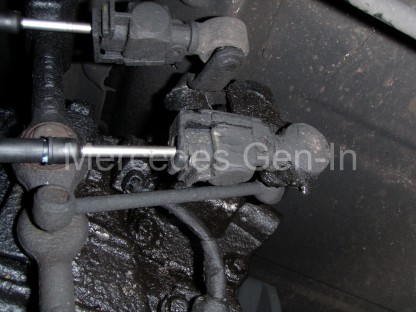
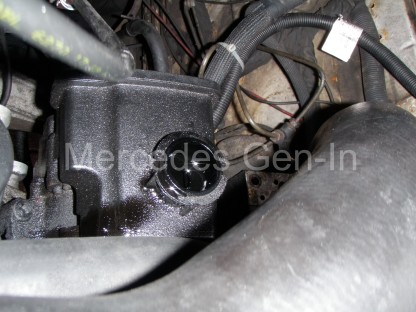
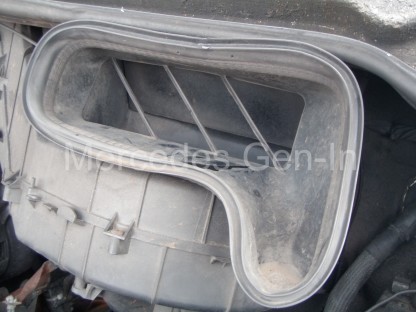
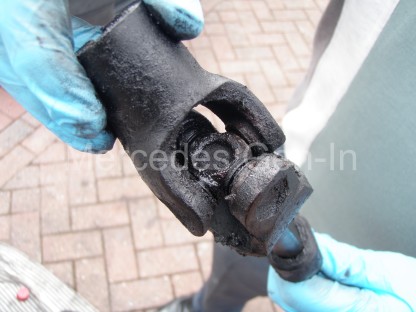
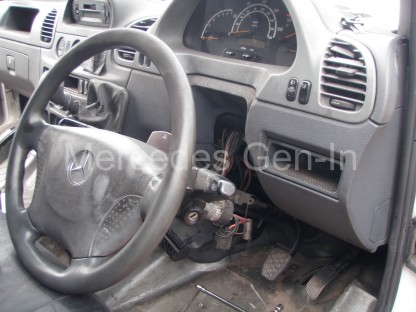
The steering column is quite basic in the T1N pre 2006 Sprinter models in that it is a straight shaft exiting through the floor beneath the pedals to a shorter flexible shaft that has two small universal joints (UJ) or couplings fitted to it. This allows rotational wheel movement to be directed to the steering rack which lies off to the side of the main column centre line. The upper UJ is well protected and shielded from the engine bay, living inside the cup of the steering column sleeve, screened from view as it enters the engine bay. The second joint is open to the elements and also extremes of heat from the nearby exhaust manifold and turbo unit, so often gets the worst of environmental conditions and temperature changes to cope with. Often it is this lower joint that begins to fail, bringing an element of rotational free play between any driver input to the steering rack itself.

Mercedes Sprinter Steering Column Replacement 2

Mercedes in their wisdom make the steering column joints (UJ’s) ‘sealed for life’ and these are non-replaceable units – the cups are pressed and swaged into the supporting yokes. (not circlips as used on more conventional types of UJ) This means that often the only route open to the owner is to replace the complete column.

Mercedes Sprinter Steering Column Replacement 3

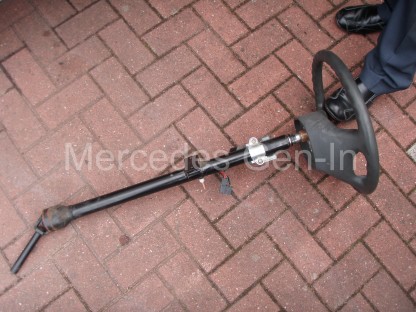
We were fortunate that we had broken a van only weeks earlier and had removed a known good steering column and saved it for spare parts. I had decided on this occasion to replace just the lower ‘telescoping section’ of the steering column as this was the only joint exhibiting wear, this in turn reduced the labour time slightly as there was no steering lock/ignition barrel swap to contend with when retaining the upper section of the original part. You may wish to replace the complete assembly, which is your choice – the method is pretty much the same except that you will have to remove the ignition lock barrel and refit it to the new part before assembly. It is also worth noting that the first thing to do before starting work to replace the whole assembly, would be to remove or at least loosen the steering wheel in situ.

The short-form job of replacing the lower column joint is as follows.

Disconnect the battery.

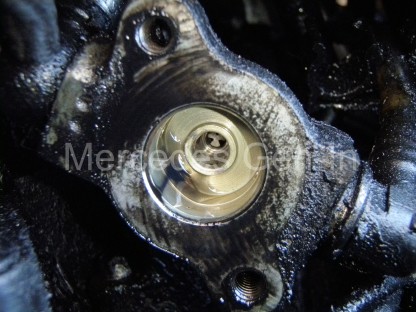
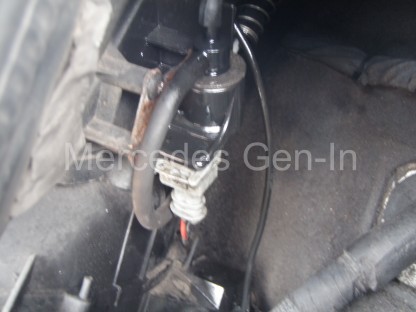
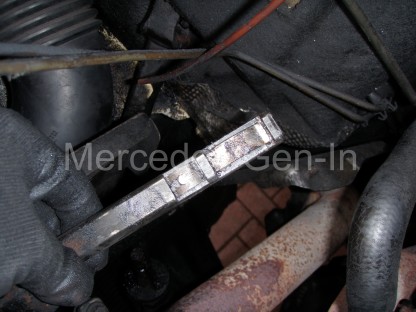
With wheels straight ahead, undo the single torx pinch bolt on the splined clamp to the top of the steering rack input shaft. Note the position of the gap in the clamp and how it aligns with the plastic ‘marker vane’ showing ‘dead ahead’ centre position. Spray some penetrant around the area as this spline joint is often bound with rust. Drive in a stout screwdriver or chisel/pry bar to open the joint clamp slightly to aid removal.

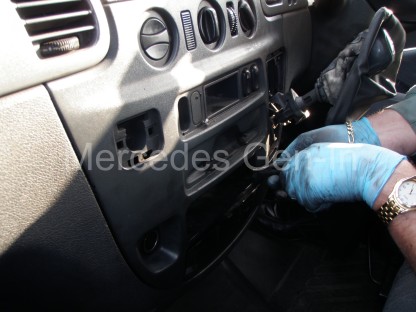
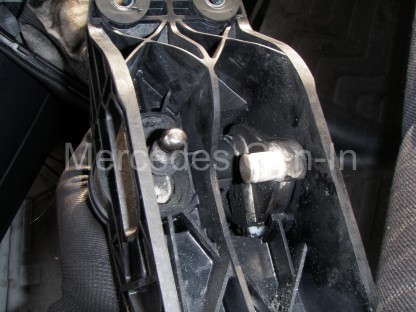
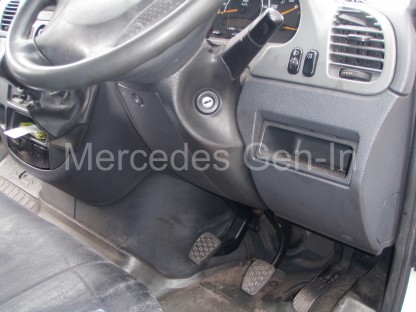
From inside the cab remove the lower fuse cover underneath the steering wheel. Now remove the lower trim cowl on the steering column, two cross head fixings at the top and a single 10mm nut retaining it at the base, central below the fuse board. Place the cowl out of the work area. Undo the second 10mm nut and washer on the lower centre of the fuse board tag and a single brass nut on the upper centre of the fuse board just below the steering wheel skirt. This nut/pin often binds – so do not be surprised if you have to break this captive nut free from the plastic moulding and refit the fuse board top mount with a tie wrap.

Mercedes Sprinter Steering Column Replacement 5

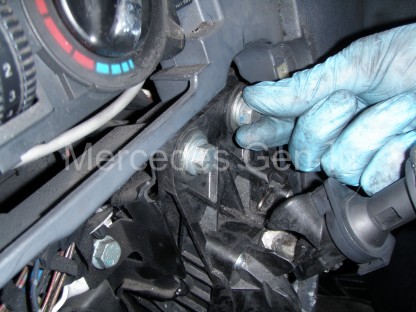
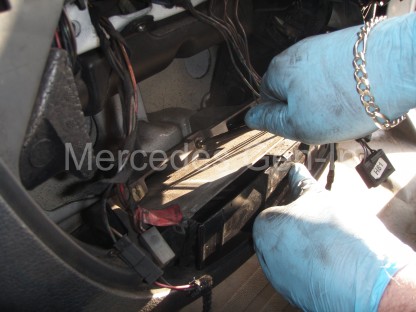
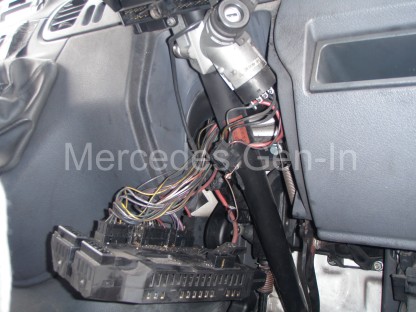
Once the upper and lower fixings of the fuse board are free, unplug the twin plug fuse board connector arrangement from the top of the column and lever it down off the lower stud.  Notice there is an earth connection wire and eyelet on the remaining lower fixing stud on the column sleeve.  Unhook and remove this too.  Unplug the right hand electrical plug from the back of the fuse board ( the one that goes to the back of the ignition switch).  Pull the fuse board across and down to the left leaving full access to the two 13mm steering column flange bolts.

Mercedes Sprinter Steering Column Replacement 6

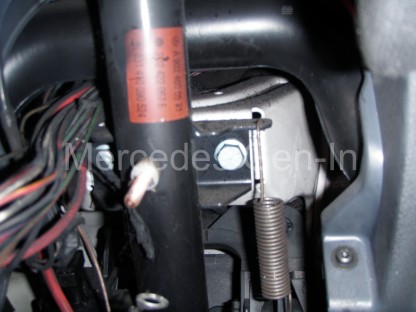
Undo both of these pins from their captive nuts on the under dash chassis near the pedal box, disconnecting the brake pedal return spring from the right hand side of the column flange mounting plate as you go.  Allow the steering column to gently arc downwards onto the seat, supporting it until the wheel rests securely on the seat bolster.

Mercedes Sprinter Steering Column Replacement 7

Mercedes Sprinter Steering Column Replacement 8

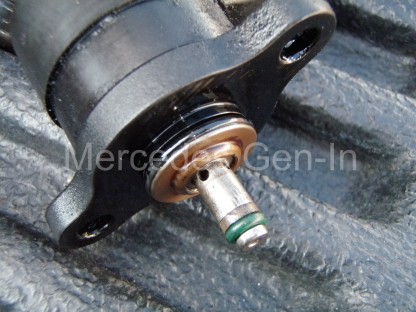
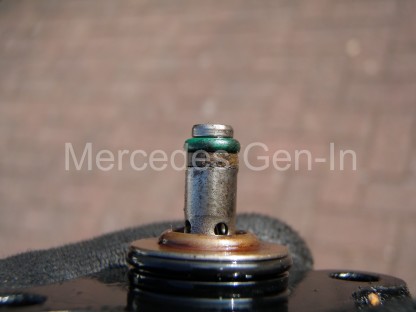
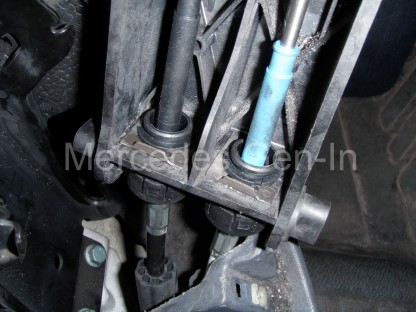
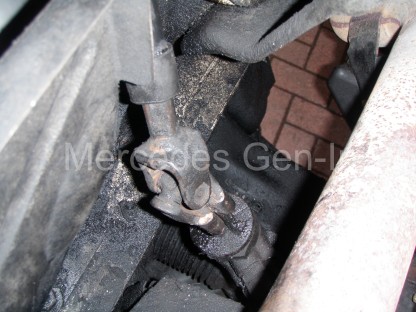
Jack the drivers side of the vehicle and get underneath with a long blunt drift and hammer.  Locate the drift directly under the splined joint on the steering rack input shaft and tap off the joint upwards.  Once the joint is free from the splines, articulate the end telescoping section behind the engine mount under the turbo.  Pull down the rubber end sleeve on the sliding lower section.  Pull out the extending lower shaft until it locks, insert a small screwdriver into the 6mm hole revealed in the upper tube section end when the rubber boot was removed, push this inward to unlatch.  This pushes in a clip that allows the rod to extend further out until eventually allowing it to be it fully removed from the tube section.  Be aware there are two spring ‘leaves’ (the part you press through the hole to release) the first to appear as you slide out the rod is the smaller one the second larger – these are to prevent column vibration in the sliding joint.

Mercedes Sprinter Steering Column Replacement 9

Once pulled out of the tubular section, the new or replacement part can be fitted and all the steering components built up as an exact reversal of removal. Be careful to align the splined joint exactly in the original position on the splined input shaft on the rack.  Rely on the plastic marker vane for this essentially accurate positioning.  If this is assembled incorrectly (a spline out) not only will the steering wheel be turned slightly when in a straight ahead position, but there is a high possibility that items that rely on the accurate referencing of the steering angle (ABS TCS ASR) etc will not work correctly unless the vehicle has a perfect straight ahead alignment of the steering wheel, rack and wheels.

Here is a short video showing the physical play/wear in the lower UJ coupling of the Sprinter steering column.

Mercedes Sprinter Power Steering Pump Replacement


It has been reported on many occasion by others that if a Mercedes Sprinter has been standing for many months then often the power steering pump fails on recommissioning. While unusual, I have seen this once but more common pump failures are those caused by internal seal or valve problems, due simply to good old ‘wear and tear’.

Mercedes Sprinter Vito Power Steering Pump Change 1

If your steering has gone heavy or assistance is non-existent then the likelihood of pump failure is high. A simple test to check if the pump is at least moving fluid is to start the engine and look into the power steering fluid reserve through the filler cap while someone turns the steering very gently. If there is no movement of fluid at all in here, the pump seals have either failed or the bypass has stuck fully open – neither which are recoverable circumstances for even the most accomplished mechanic. Replacement is the only way forward.

When you looked into the reserve, if there was obvious fluid movement then there is an outside chance that a seal in the steering rack could be causing your issue, often however you would be able to hear the passage of high pressure fluid in the lines with no accompanying assistance if this were the case. If the system is silent while it is running and been called into action by moving the steering wheel, then the highest probability is a failed PAS pump!

To replace the pump on a pre 2006 Mercedes Sprinter is a reasonably straight forward task. First raise the bonnet and remove the intake combustion air turbo hose from the manifold, releasing its other end just below the coolant header tank. Place this out of the way, visually checking it for splits and damage as a precaution while you have the item off the van. Now release the coolant cap a quarter a turn to depressurise the system (usual caution applies if the engine is hot) then remove the small bore coolant return hose from the top of the header tank. To identify this hose it goes to a forward facing spigot on the thermostat housing. Tuck this hose out of the working area.

Mercedes Sprinter Vito Power Steering Pump Change 2

Slacken the three reverse torx pins that secure the power steering pulley to the pump flange. Once these are loose select a 17mm ring spanner or multi-point socket and bar, slip this over the serpentine belt adjuster and crank it to release the tension on the belt and slip it off the PAS pulley. Let the belt fall just out of the way of the PAS pulley, but if possible do not allow it to completely unthread itself from its route from around all the pulleys, as it makes reassembly a little more complex and time consuming. Finish off by removing the ribbed pulley from the pump flange.

Mercedes Sprinter Vito Power Steering Pump Change 3

Place a cloth or sheet of plastic underneath the front working area of the van as some oil spillage will occur when the hydraulic connections are removed. Using an 18mm spanner or union wrench, undo the pump output hose from the forward edge of the housing, loosen the hose clamp from the fluid low pressure return pipe at the rear bottom corner of the reserve. Remove the high pressure hose and cover its end with a plastic bag or cloth to prevent dirt entering. Tuck it out of the way – up high if possible to prevent draining. Looking down onto the pump body you should now be able to see three reverse torx fixing bolts through the pump body casting, two on the left and a single one to the right of the pump fluid reserve. Slacken and remove these bolts leaving one remaining at finger tightness on its last few threads. Now swiftly pull off the return pipe and slip your finger over the end of the open spigot on the fluid reserve. While blocking and preventing the oil from running out of the pump with your finger, undo the final fixing pin and lift the pump out of the engine bay. The pump can either be drained immediately or placed in such a way that it can be emptied later.

Mercedes Sprinter Vito Power Steering Pump Change 4

It goes without saying, do not re-use any of the old power steering fluid in the hydraulic circuit or pump reserve – always use new.

Refitting is the reversal of removal, being sure to route the serpentine belt correctly on rebuilding the unit. Dependant on the failure mode it may be prudent to do the following (Thanks to Dennis Linden for the advice) In most PAS systems the filtration occurs on the return and debris is trapped inside the filter contained within the reservoir.  If you replace a component like a pump and the reservoir assy as in the Sprinter, it is recommended to initially leave the return pipe off.  Start the engine and direct the loose hose into a catch bucket. Now with an assistant continually filling “the pot” with fluid , turn the steering slowly lock to lock twice with the axle raised on stands. This will purge out all the old fluid and/or contamination like metal particles from the lines and the steering gear into the bucket – not the into the new reservoir and filter!

After the vehicle has been built back up, top up the fluid reservoir to the upper mark on the level cap dipstick, re-fit the cap and start the van. Turn the steering from lock to lock a couple of times, then stop the engine, check for any leaks around the unions or pipework and recheck the fluid level – top up if necessary. Restart the van and work the steering from full lock to full opposite full lock, a few times until the system is completely bled of air and operates normally in relative silence. Recheck the tightness of the pulley bolts and clean off any oil spills from the area.

Congratulate yourself on a job well done! If you lost the serpentine belt route from the pulleys when you removed the pump – here is the belt route map.

Mercedes Sprinter recirculated heater/cabin air not working – Repair

 
For older Mercedes Sprinters (Pre-2006) without air conditioning, the recirculated air function is controlled by pressing the heater distribution rotary knob on the dashboard. This in turn lights a red light in the centre of the control knob to indicate recirculation is selected. Pushing the control again will turn it off.

This is a very simple system to troubleshoot and it should be possible to get it working or at least identify the problem quite quickly when you know where to look.

The recirculation system is controlled with a block off flap covering and limiting outside air from flowing into the cabin from the large fresh air intake under the bonnet. If the system is working correctly, once the dash switch is turned on – the flap should close and when the switch is turned off it should open. This physical movement in conjunction with the dash switch position can be easily confirmed by looking into the air box intake.

Heater recirculation control - Mercedes Sprinter 1

To the right of the air box, up top, is a vacuum controlled sprung actuator that pulls the flap closed when vacuum is applied to it. The vacuum origin is supplied from the ‘T’ piece connector on the brake servo vac pipe junction that also feeds the turbo actuator control valve. The brown hard vac pipe follows up along the top of the bulkhead from left to right terminating at the top spigot of the three port heater box flap control valve. The output from this electrically operated valve is the spigot facing the front. The final spigot at the rear of the valve had a small filter allowing pressure equalisation of the actuator when the valve is deactivated.

NOTE: It has been known that a failure of the recirculation flap actuator valve (venting to atmosphere) or leaking supply pipework has lead to turbo boost control issues. This is because the take off on the brake servo vacuum pipe is shared with that of the turbo control circuit. Any vacuum loss here and the turbo actuator will ultimately be starved of its controlling supply, causing underboss and poor performance. Always add this simple check to your turbo boost problem troubleshooting as it is often overlooked. Frequently the pipe is dislodged when the battery is removed/changed because of its location.

The recirculation flap control valve is fixed to the upper right hand side (UK Models) of the heater box above the battery. It can be removed by undoing a single cross head screw and pulling the unit sideways off a small support post/moulding on the side cheek of the ventilation air box. Electrically there is just one connection to the valve. A 12v supply is applied to the valve solenoid when recirculation is required, changing the state of the vacuum valve to allow suction to be diverted to the actuator closing the flap.

Heater recirculation control - Mercedes Sprinter 2

Diagnosis is simple, check that you have vacuum at the pipe feeding the valve, check voltage is present across the two terminals at the electrical connector plug when the dash recirc-switch is on. Rectify either of these faults. If all seems ok but there is no movement of the flap, then temporarily connect the supply and actuator pipe together – the actuator should retract and close the flap – if it does not the solenoid control valve is probably faulty and requires replacement. If vacuum is present at the output of the valve (the port that goes to the actuator) then make sure the flap mechanism is free. You can operate the flap manually by moving the lever at the side of the cabin air box above where the actuation valve sits. If you have no movement and the valve is providing vacuum to the actuator, check the rubber hose has not come of the actuator. If this proves to be OK the only logical remaining problem could be with the actuator itself, most likely holing of the internal diaphragm causing a leak. If this is the case the actuator will require replacement.

Once things are back together and working normally again, you will be able to hear an obvious change in the rushing sound of the air movement through the cabin air ducts when the dash control is activated to select recirculation on either medium and higher blower fan speeds.