
Having a large fleet of Sprinter vehicles running on delivery routes has its problems and one reoccurring issue is the cargo area lighting being left on over the weekend and flattening the battery. Come six o’clock Monday morning the driver rings the boss to say his vehicle wont start off the lot.
The issue really is I suppose mainly that the cargo area door pin switches get damaged both through worn fold back rear door hinges and clumsy forklift loading, worn ill-fitting doors continually not helping the situation.
What happens is each of the rear interior light unit switches gets set to middle position (off) during the day and as unloading at the depot is done in the evening the switches are moved to the permanent on position to illuminate work. Obviously this is forgotten about when the doors are shut and they drive back to the parking lot at the end of the day. The van is then locked, keys placed at the lodge and off home the driver goes – lights still on.
So how do you modify the rear interior lighting so this does not happen? Lets take a look at how the current set up works.
Each of the three rear light units can be operated separately by their own wheel control. – Central position Off. Permanently On, or On when a door is open (pin switch activation)
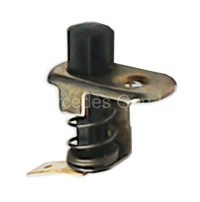
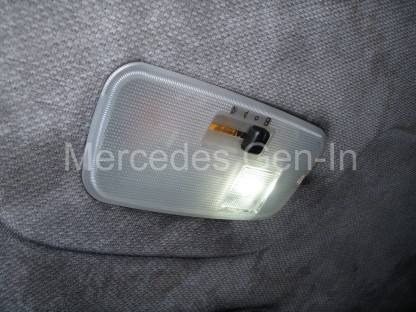
There are three wire terminations to the rear of the lamp assembly; these are plugged into the loom via a three pole-latching plug. To gain access to the rear of the unit and the connector, use a screwdriver to prize the right hand edge of the plastic lamp to the left and lever it out of the pocket in the steel body. Be careful as the central copper band you can see on the back of the lamp is live 12v supply and can short on the body if you do not observe some caution when taking out the lamp unit.
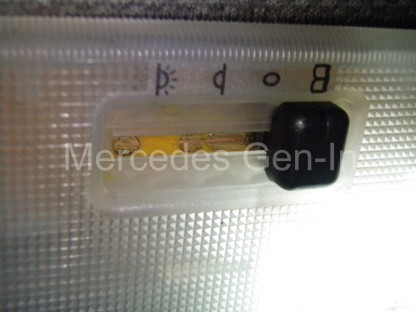
Once out of the body you can identify the wires into the plug by the following descriptions.
Nearest the connector plug latch you have: Brown (ground),
The middle wire: Red-Yellow (supply)
Furthest wire away from the plug latch: Brown-White (ground via pin switch)
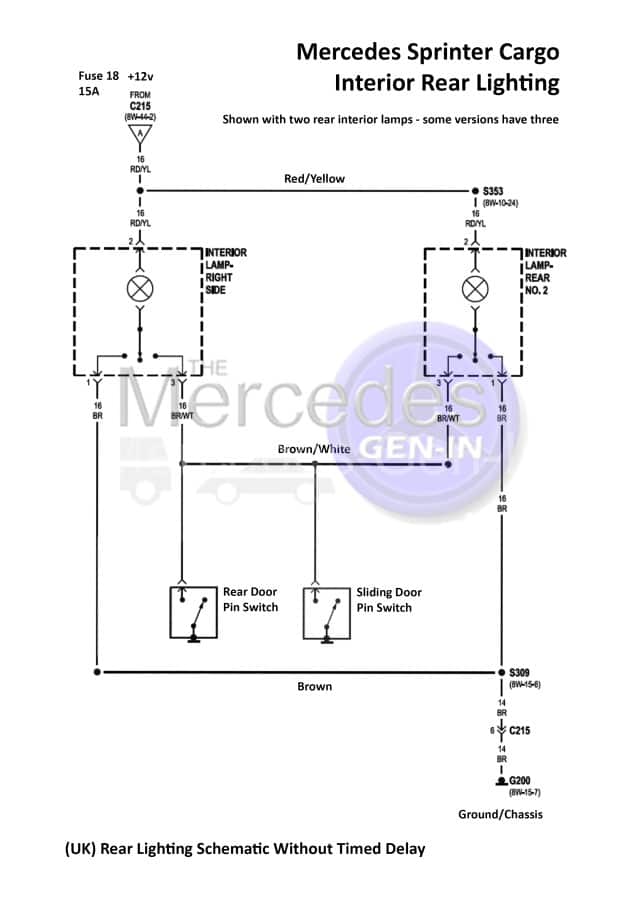
Below is the common schematic for UK Mercedes Sprinter vans without the timed delay illumination option (most pre 2006 cargo vans)
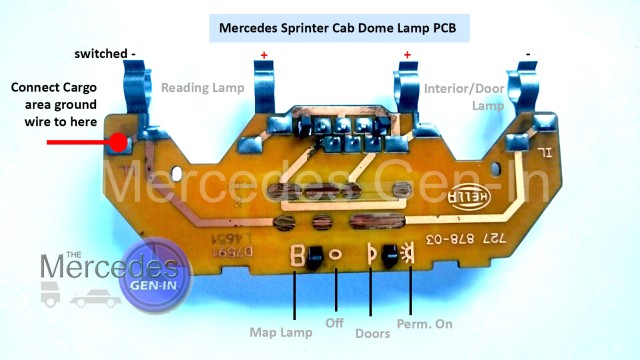
What was required was a way to indicate that the rear lamps were on behind the full bulkhead from the driver compartment, even better if all the lights in the cargo area could be isolated (switched on and off) from the cab.
Investigation of the dome lamp in the cab area found that it had two lighting circuits included within. The first, left hand lamp in the dome operates like the rear cargo lights, switch positions for Off, On, or On with front cab doors open. If you were to push the slider switch to the (Book/Map Icon) this illuminates a separate lamp in the dome that is magnified with a clear lens for map reading – adapting this switch position to control all the rear cargo lights is a perfect solution as it provides manual control and a visual indication (map light) that the rear lamps are powered. Turning off the map light in the cab ensures all the rear lighting is off and not draining the battery unseen.
Because all the interior lamps are fed with a constant supply to their switches, grounded by either a door opening or selecting ‘ON’ on their individual switches, lamp control can be done in two ways.
1- Switching the common live supply to all interior lighting
2- Switching the ground to supply to all interior lighting
As the live supply is common and fused through Fuse 18 (15A) any switch in this circuit would remove power from all interior lighting, including the front dome lamp. Power to the cargo lamps is split into two sections of loom running down both the left and right side of the vehicle on the mid level box section, so adding a switch to live supply here is not straight forward.
The solution is to switch the grounds to all rear cargo lighting from the front dome lamp when in the ‘map reading’ position. To achieve this you will first have to run a new common cable between all lamps that will become your cab-switched ground. This can be fed down the cab headlining to exit at the dome lamp and run to each of the rear lights in turn. It is possible to thread the wire over and inside one of the roof supports to reach the light behind the sliding door pillar.
Because of the repeated damage to the pin switches on the doors and the nature of the use of the vans for multi-drop delivery, we no longer required the lights to come on with a door open in the rear area. What was preferred was that the driver switched on the rear lights from the cab before entering. Once he got back into the cab he would turn off the lights on the dome light switch. Should he leave the lights on in the rear the front map light would be illuminated warning him to the fact.
Modifying the connections to each the rear lamps was simple. Cut the Brown/White wires from the plug and tape the ends, this disconnects the door pin switches. Then cut the existing Brown (ground) wire a couple of inches back from the connector and tape the loom. Now connect your new common ground to the short stub of brown wire from the plug using insulated wire-crimps.
Once all three cargo lights have been modified place their wheel switches into the permanently on position. Each lamp can still individually be turned off and isolated if needed by selecting the middle or door pin position.
Within the front dome light correctly identify the map reading bulb, this festoon lamp will be held in position by two spring clips on the PCB. Identify the outermost pointing clip holding the festoon lamp and carefully solder the new common earth cable you have run from the rear compartment to this point. Be sure to solder it to the outside part of the clip to maintain a good connection of the clip to the map bulb. (See photograph above)
Having dismantled the switch and looked how the switch functions I have determined that this point gets grounded when the switch is placed in the map light position – perfect for what we require! You could if you wished check this out on your own dome light with a test meter just to confirm your configuration is identical.
Once connected, the front dome light can be clipped back into position.
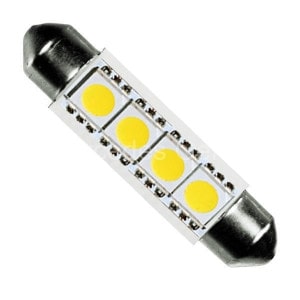
We decided to replace the existing festoon bulbs with LED types. This has two benefits for us. The first is that the light from the lamps is brighter than standard bulbs and also the total current drawn is substantially less, further ensuring that there is no chance of overrating the front dome light switch.
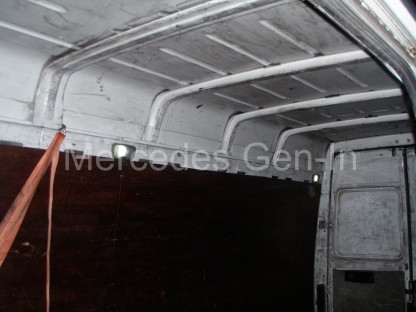
LED bulbs were fitted to the rear light units and they were tested and clipped back into place. It worked perfectly. A few moments with the driver to explain how the new lighting worked and they were pleased with the outcome. As the vehicles are parked on a secure compound at night we briefed the security guard that should he see any interior lamps showing on in the cabs after dark (that he can see from his lodge) he would turn them off. We now know that with this modification that if there is no light on in the front of the cab the cargo area is also in darkness and we are doubly assured the van will start with a healthy battery after standing a few days.
This modification may not suit everyone’s application but for the delivery vehicles on our fleet it was well worth the one-hour investment to modify the circuit. It is also unsuitable for later models fitted with interior light delay timers, as they are more complex and controlled by an electronic module and would not lend themselves to this type of modification.