If you find one day that the driver or passenger door of your Mercedes Sprinter W906 (NCV3) or VW Crafter becomes stiff to close and in some cases won’t close at all – suspect failure of the door check strap.
The door check strap is situated in the hinge edge of the door between the hinge pivots. It is a sliding bar attached to the door frame that enters the interior of the door and its tension is controlled with a very strong sprung ball bearing arrangement. The purpose of the check strap is to give two distinct ‘hold’ positions to the opening door and prevent it opening too widely, where it would strike the front wing.
The check device sliding bar is attached to the door frame with a single torx head bolt. The internal part of the mechanism is held on by two slightly smaller torx fixings recessed into the hinge edge of the door. There is another matching screw inside the door panel that holds the mechanisms rear edge, this is positioned just ahead of the window electronic control module on the hidden area of the door skin.
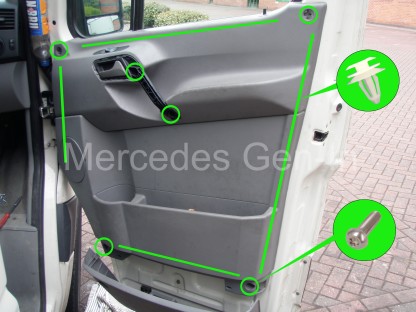
To remove the door trim panel (door card) prize out the two top trim bungs to reveal a pair of fixing screws in the top right and left corners of the panel, open the lower storage door and lift it upwards off its plastic hinges. This reveals a further two screws inset on the lower left and right corners, remove these also.
Now gently prize off the black trim top cover from the door handle opening lever assembly, this will reveal two large torx head screws above and below the handle portion of the trim. Once these are removed the only thing holding the trim panel/door card is a number of plastic trim ‘bullet’ clips that surround the panel on all outer edges. Using a trim tool or sturdy palette knife lever out all the clips and the door panel will then lift slightly upward and off.
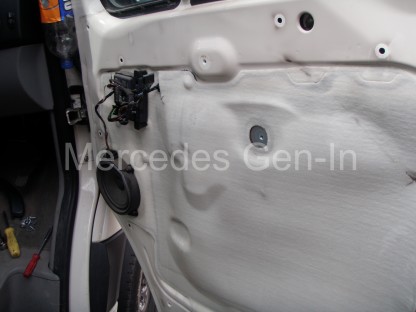
Disconnect the electric window switches from the door loom and unclip (if necessary) the bowden cable from the door opening lever. Access is given to the internals of the door. Gently peel back the plastic membrane from the area just above the speaker. Disconnecting the door speaker makes this job a little easier, but do remember to reconnect it when done. Find the single mounting screw for the rear edge of the check strap and remove it.

Peel back the lower front corner portion of the membrane to gain ‘arm’ access to the door cavity. Reach upward into the door and feed the check strap bar through the opening in the door and bring the whole assembly down and out of the door interior.
Once you have removed the door check it may be necessary to hold the door open while you work on the door interior, this can be done quite easily without any damage by jamming an empty soda/pop bottle into the hinge area.

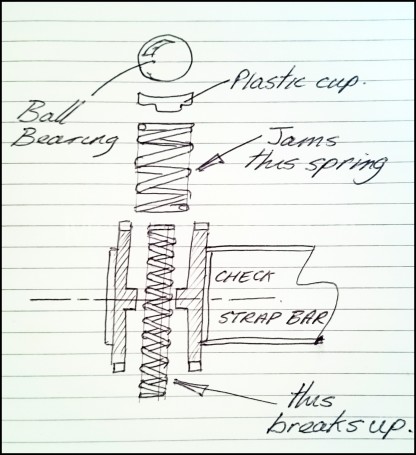
Once the strap mechanism is out of the door you will see that it has two mounting ears, these fatigue, work harden and shear in time – preventing the bar from sliding in a controlled manner ‘checking’ the door. Instead the unattached front edge causes the bar to jam and baulk in the mechanism preventing the door closing. You may have already found that the check strap came out from the door with the two front ears still attached to the door edge!
Once all the parts are removed from the door you can do one of two things – replace the complete strap or weld up the one you have and refit. If you choose the latter, although welding the part is quite simple as the fractures are often clean and fit back in position perfectly, the arm must be removed from the strap mechanism before welding.
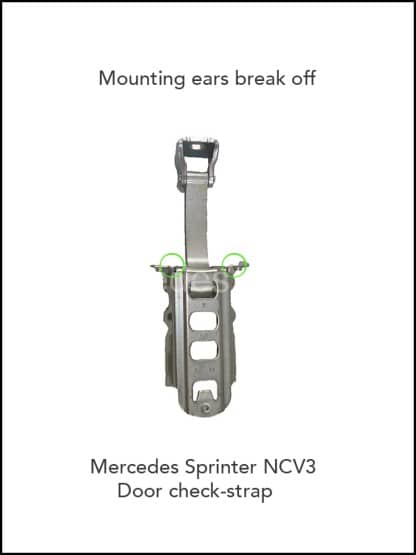
To remove the arm: force it through 45 degrees causing one ball bearing to remain in the end slot and the opposite one to latch in the last rail slot. With care then lever the exposed ball back into the sprung tube and release the arm from the rail. Be prepared to catch the ball bearings as they are under quite considerable tension. Once the component parts are visible you will see exactly what has caused the failure of the mechanism! Each ball bearing has a strong spring pushing a plastic cup that applies low friction pressure to the underside of the ball, between these two springs runs a lighter spring that connects both plastic cups, this breaks up causing one side of it to to jam into the main spring coils and making it almost impossible to compress when the door opens and the check bar requires it to move. This in turn makes the forces on the front mounting ears (where it fixes to the door) quite considerable and flexes the bracket as a result – eventually breaking off the tabs. Discard completely the broken smaller spring and clear the broken coils from the inside of the tube.
A replacemnt door check strap is in the order of £35 should you decide to purchase one and not repair the one you have.
Assembly is the reversal of removal – do not forget to reconnect the window look before refitting the door panel. The lock button on the top of the door panel passes through a removable trim section of the door card, if you remove it before re-fitting it (lifts up to remove) it reveals a slot in the main moulding that allows the pin to locate neatly in the card. Once the trim is fully fitted, simply push back the plastic plug that surrounds the lock pin.
Thanks for posting this…very helpful!
Many thanks for that Tom.
How do you get the mounting ears screws in!!@! It seems impossible. I have been struggling for hours
Hi Steven,
I assume that you will be sorted now, to be honest I don’t remember this being an issue however that would depend if you had re-welded the ears on or were just replacing the door check unit.
Let me know what the issue was.
All the best
Steve